The easiest way to boost your Wi-Fi problem is by configuring a repeater. You can also buy a powerline adapter which works better compared to a Wi-Fi repeater. But all of these methods involve unnecessary costs if you have an old router lying around.
Instead of purchasing new devices you can quickly set up your old router as a WiFi repeater. Well, below is a quick guide on how to do it. But, if you prefer a graphical representation, we also have a video tutorial on it.
You will need
- Two Wi-Fi routers. Even a Wi-Fi ADSL modem will work
- An Ethernet cable (cat5 or 6) to connect both routers.
- Computer with Ethernet port to configure the routers
Boost Your Wi-Fi Network With an Old Router
Let say our primary router (connected to ISP internet line) is placed at one corner of the house. And the opposite side gets weak or no Wi-Fi signals. So we will boost that part of the room by using our secondary router. It will be physically connected to the primary router via an Ethernet cable. Now, we will place the second router on the other side of the room with low Wi-Fi connectivity. Here both routers will broadcast the same network, and we will have full Wi-Fi coverage.
This setup works similar to that of a Wi-Fi repeater so the effect will also be the same. Wi-Fi repeaters extend the same Wi-Fi network which causes some network degradation. But since, both the routers will be connected physically the network latency is less as compared to a Wi-Fi repeater.
Related: 10 Steps to Secure Your Wi-Fi Network From Hackers
Step 1: Check details of your primary router

In this step, all we want is your primary router’s SSID and password. In case you know that you can directly move on to Step 2.
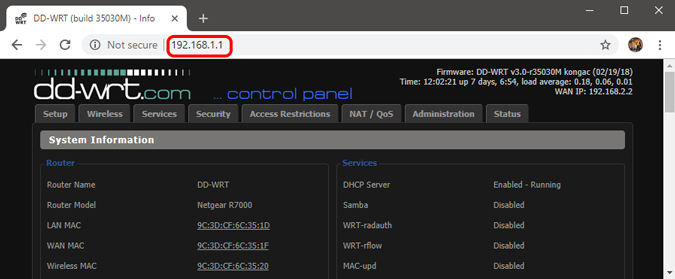
1. Connect to the primary router via your PC or Mac. Once you are connected, launch the browser and type in your router’s IP address. Usually, it’s the first address of the network. Suppose, my IP Address is 192.168.1.145 then the gateway address will be 192.168.1.1.
If you don’t know your router’s IP address, then open the command prompt and type the following command.
ipconfig | findstr "Default Gateway"

If you are on macOS, type the following command.
route -n get the default
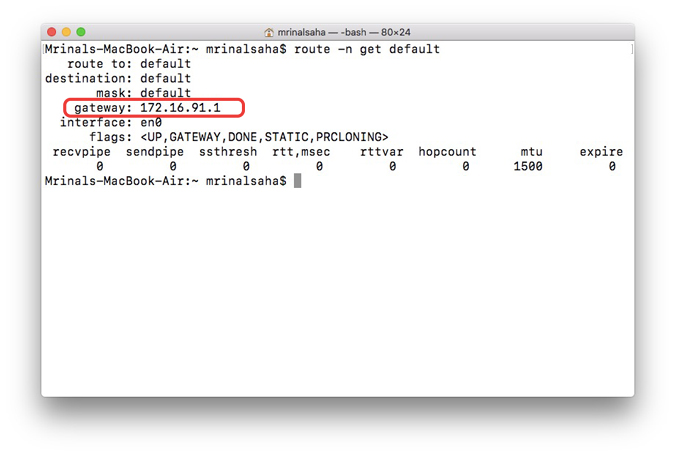
The IP address corresponding to the default gateway is your router’s login URL. Just type the URL on the browser and hit Enter.
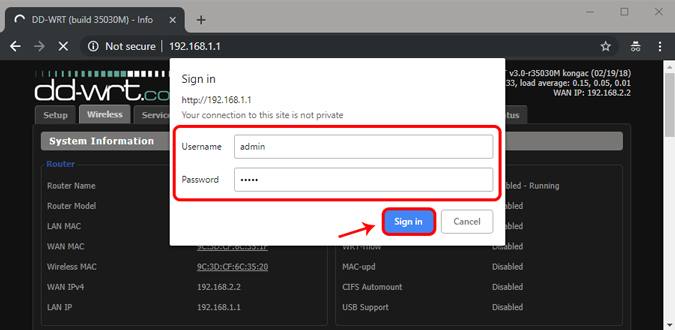
2. Next, you will be asked for the username and password. Again if you don’t know your router’s login username and password, look at the back of your router for Username and password. The default username and password depends on the router’s manufacturer. Mostly, the username and password is “admin”. In case this doesn’t work for you, visit the official manufacturer site to get the default credentials.
3. Once you are in the router’s settings page, look for Wireless or Wireless Security option. There you will see your router’s SSID, mode, password, and its encryption type. Note down these values separately, we will need them later.
In my case, the values are; SSID is TechWiser, Password is ****** and Encryption Algorithm is AES.

Read: How to Change DNS Server; An In-Depth Guide for All Platforms
Close the browser and disconnect your computer from the primary router.
Step 2: Configure the secondary router

In this step, we will configure our secondary router. This involves setting up the same SSID and password of our main router. And also change a few settings on the secondary router, so that both routers do not conflict with each other.
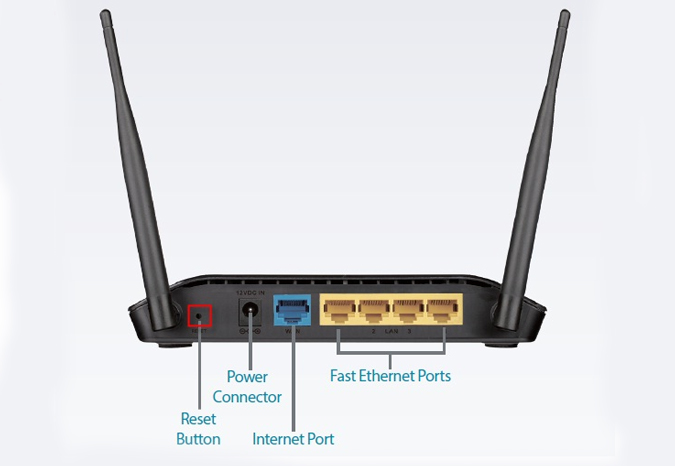
1. Take your secondary router and power it ON. At the back of the router, you will see a reset pinhole. Take a tip of Pen and press the hole for 5-10 seconds, till you, all the lights on your router blinking. This will put your router back to factory setting.
2. Now keep the router powered ON and connect your secondary router to your computer using an ethernet cable. Now again open the router’s login page by typing the IP Address in the web browser. Log in the web portal with the default credentials. Since you have reset the router, the username and password would be set back to default.
3. Once you are in the router setting page, go to wireless options. And there enter the same SSID, mode, password, and encryption that you have copied in step 1.
3. Next, you need to make sure there is no conflict between our primary and secondary router. So First, turn off the DHCP in the secondary routers. Our main router will do the work of assigning an IP address to the device
Second, change the IP address of your secondary routers. For instance, if both routers have IP address 192.168.1.1. Then to avoid conflict, we will assign secondary router an IP address of 192.168.1.200

4. Finally, now we have to make sure this secondary router work as a repeater. To ensure that the operational mode is set to router only. In some router, you won’t see the operational mode option. In that case, you have to look at the NAT option and make sure it’s disabled. Here, I am on a custom ROM called dd-wrt, so I directly have the option to set my router to repeater mode.

So to summarize, what we have done here is:
- Copy setting from primary routers like SSID and password
- Make sure there is no conflict b/w these router by turning OFF DHCP and router’s IP address
- We have to make sure that our secondary router only works in router mode and not act as the gateway.
Save changes and disconnect your secondary router
Step 3: Connect both routers

In the last step, we will connect both routers with an ethernet cable. So take your ethernet cable and connect any one LAN port of the primary router to the LAN port of the secondary router. Make sure you are connecting it to the LAN port of the secondary router and not WAN port.
Now, we are sharing the internet from the primary router to the secondary router using the ethernet cable. And now that our secondary router has the internet, next we will have to make sure that it’s able to share it. For this we have to make sure both routers have the same SSID and password, this will make them a part of one network. And the device jumping back and forth between them will join the one with the better signal.
But this will also create conflict between our primary and secondary router. So to avoid that, we will disable DHCP on the secondary router. Also, change its IP address and make sure it is set to routers mode and not as a gateway. And that’s it.
Closing Words
This will boost the range of your Wi-Fi. The bonus point of this method is that we are physically connecting both the routers. Since a repeater connects to a Wi-Fi wirelessly it boosts the current Wi-Fi signal which leads to latency and network degradation. Here, since the Internet is supplied to the other router physically via cable, there is no chance of network latency. Having said that, this will share your existing network bandwidth, so make sure you don’t have an equal amount of devices connected to both the router.
In case of any queries and issues, comment below and I will get back to you soon.
Also Read: How to Remove Someone From Your WiFI