Google Keep is one of the most popular note-taking apps with features like labeling, color options to differentiate each note, reminder, checkboxes, collaborating, adding images, recordings, drawings, etc. But here are a few Google Keep tips and tricks which are really amazing and helpful yet most people really don’t take advantage of.
Google Keep Notes Tips and Tricks
1. Grab Text from images
If you are already using Google Keep, you may already know that we can add images on Keep. But there is also another feature that grabs the text from the image. So if you are looking to take notes from printed text or a notebook, you can just take a picture of it > upload it to Keep > tap on the image > open three-dot menu > select grab image text and Google keep will extract all the text into the Keep Notes.
To do it on a Desktop, you can just upload the image > click on the three-dot menu without clicking on the image > select grab image text and it extracts the text to keep. But the downside is, it extracts all the text from all the images at once making it cluttered and hard to use if you want to upload a lot of images on one Note.
Also Read: Google Tasks vs Google Keep: What’s Different?

2. Let Google transcribe your words
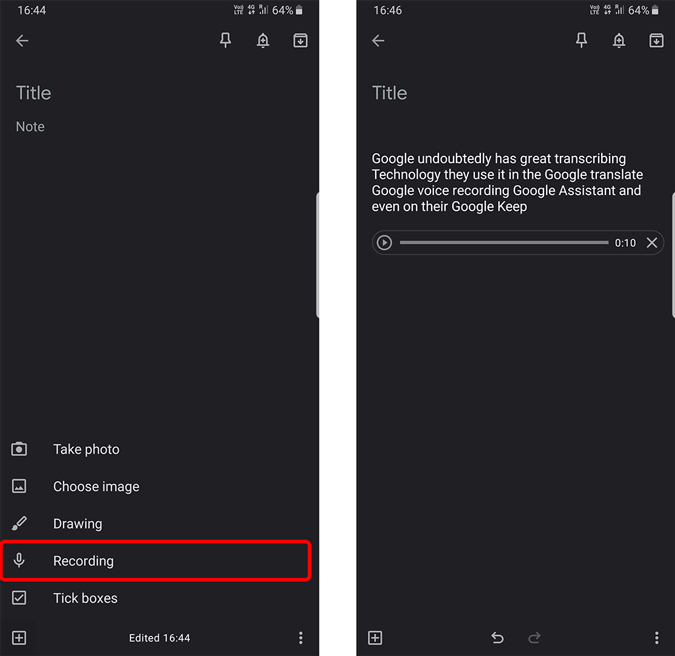
Google undoubtedly has great transcribing technology, they use it in their Google Translate, Google Voice Recording, Google Assistant, and even on their Google Keep.
There is an option called recording which you can click and start recording. But once the recording is completed, it will transcribe it to text and place it in the note. Later you can even delete the voice recording file, but still, the text will not get deleted making it easy to just type with your voice instead of typing everything.
Related: Evernote vs. Google Keep: Which Note-Taking App in What Situation

3. Grab text from the doodles
Just like on the image, you can even select the option called drawing, write on that drawing canvas and grab the text from it. This option is so much useful if you have a stylus on your device and it gives you a traditional writing notes experience.
You can also do that from the Gboard by selecting the drawing keyboard. But it will not create any drawing board, but instead, it just converts to text whatever you write on it.

4. Let other apps feed the Keep
You can select any text from any app on Android and it will show you an option called to share with an option like cut, copy, etc. You can click on share and select keep, you can also select the account you want to save it, give it a title and even add a label to it and click ok to save as a note in the keep without even opening the Keep notes app.
It doesn’t have an option to add that text into an existing note which is really kind of a downside if you don’t want to create a separate note for it.

5. Use Chrome Extensions
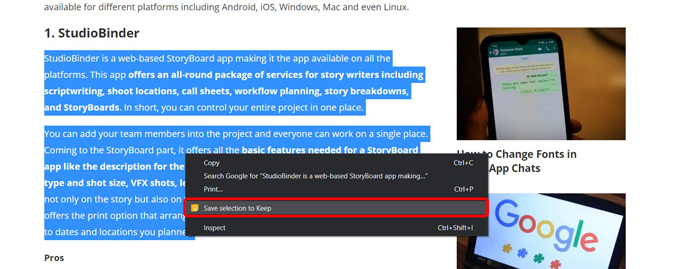
Using Google Keep extension adds additional benefits like adding notes with a single click. You can select any text from any website and right-click to open the context menu and selecting “Save selection to Google Keep”. To add this functionality to your browser you just need to install the Keep Chrome extension from the Chrome Store.

6. Sync with Google Assistant
Google Assistant has its own list and notes and you can only access them from the Assistant. But you can sync that with other apps including Google Keep. This will make your notes accessible from the apps, desktop, assistant, smart speakers, etc. To link Google Keep to Google Assistant, you have the top open Assistant Settings, you can do that by opening Google App > More > Settings > Google Assistant. Now scroll down and open the “Notes and Lists” option. Here you can enable the radio toggle beside Google Keep. All your future notes will sync with Google Keep and you can access your notes from all platforms.

7. Make Colors More Useful
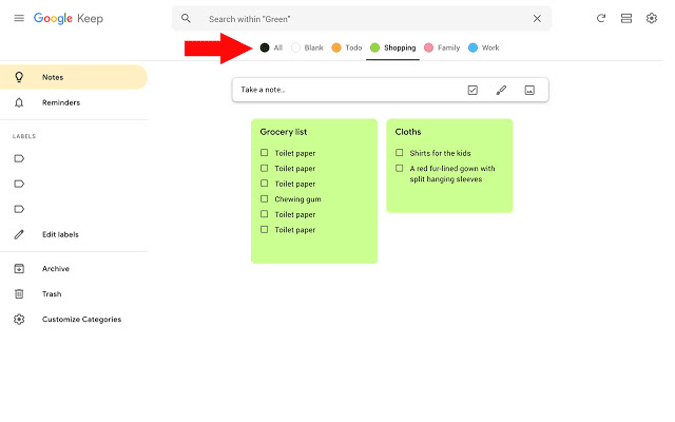
Colors in Google Keep are more of a design esthetic rather than a functional feature. But you can use the Category tab Chrome extension to make colors in Google Keep more useful. This extension helps you categorize each color as a different label. It also provides all the color options at the top of the website and by selecting each color you can view only the notes you have categorized to that color. But the only caveat is that this extension works only on desktop and you can’t take advantage of it when you are using the mobile app.

8. Install the app on the Desktop
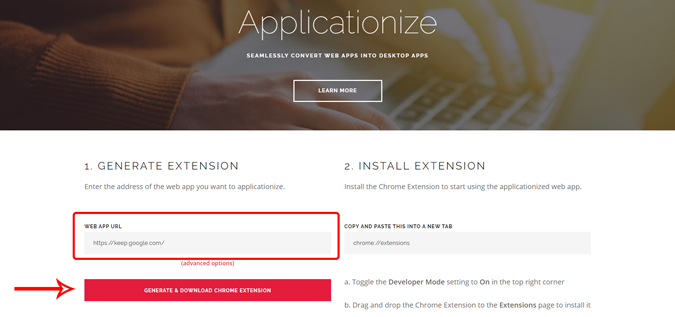
By default, there is no way to install Google Keep on the desktop but there is a way to install this web app using a third-party service called Applicationize. To convert open Applicationize > place the Google Keep URL and click on Generate on download Chrome Extension. It will make the web app into a chrome app, you can follow the instructions on that website to install that chrome app. Later you can use Google Keep just like a native app on the desktop.

If you using Edge Chromium as your browser, there is an inbuilt way to install any website like an app and many other features even better than Chrome.
9. Switch to Google Docs with ease
Google Keep is really an amazing tool to take quick notes, but none the less it is not a powerful document creating an app. In case you want to move your note from keep notes to docs, you can make that easily with just a few clicks. To move, just open the note in Keep Notes> tap the three-dot menu > click on the option called copy to Google Docs. Your note will copy to Docs and shows you a small notification that it is copied. Click Open and you can start editing your note using all the tools of Docs.

10. Use Keep with different Google Apps
Other Google services like Google Calendar, Gmail, Google Docs, etc have add-ons that you can see on the right side of the page. If they are not available, just click on the arrow mark at the bottom right. Anyhow, Google Keep add-on is already added, you can use that add-on to access Keep and calendar or other Google apps that supports add-ons simultaneously.

11. Drag and drop to Google Docs
Just like in the previous step, you can open Google keep on the docs from the sidebar. But with the docs, you get additional functionality that you can just drag and drop things from keep into the docs. You can drop images, text, or the entire note into the doc. This will be useful to add ideas, images, etc to keep when you are on the go and later arrange them into the doc neatly while editing.
12. Share Notes with Family
Collaborating is one of the most useful features of Google Chrome. Just click on the collaborator option and enter the mail address and save, now both can access that note and make changes. But if you add the family members, it will create a family group. Now you can just select the family group while collaborating and it will share will all your family members. This will come in handy to plan for trips, share shopping lists, etc.

Adding family members has other benefits like Family calendar, family plans for services like Youtube Premium, Music, Play services, Stadia, etc.
13. Remove URL Previews
When you add any links to any notes in the Keep. It will show a preview at the bottom of the notes and also on the list page of keep notes. This can be annoying and also distracts the uniform design language of the Keep. Anyhow you can actually remove them directly from the settings. Just click on the gear icon at the top-right corner and click on settings. Here disable the “Display rich link previews” option and that’s it. keep will not show link previews anymore.

14. Create Hierarchy in checkboxes
Checkboxes are one of the features everyone who uses Google Keep knows, but most of them don’t know that you can create a hierarchy with them and organize even better. Just place the cursor on the list and you can see six dots that are there to move that option in the list up and down. But you can also swipe that to the right to create a hierarchy. On the phone, just swiping right on the item in the list will create the hierarchy. This will make things easy to understand and easy to strike off as once you strike off the parent item all the child items in the list will get strike automatically.
15. Use Hashtags for Labeling
One of the subtle features of keep is using hashtags. They will definitely help you while searching for those specific notes. But keep notes also adds that note to the respected label by using the hashtag. For example, if you are having a label named “Shopping”. you can use “#Shopping” in your notes somewhere and the Keep notes will automatically add that note under the shopping label. Later you can just switch to that shopping label and find out all the shopping-related notes even without labeling every note every time, especially considering labeling notes in Google Keep is a three-step process.

16. Use Keyboard Shortcuts
If you are an avid user of keyboard shortcuts like me, then you should definitely check out the shortcuts available on the Keep. To check out just click on “?” and keep will show you keyword shortcuts in a pop-up. My favorite shortcuts are “C” to create new notes, “L” to create a new list, and “E” to article the select notes.

Also Read: This Android App Keeps you Updated on Corona Virus Outbreak
Final Words
These features not make your work even easier but also faster. As a fun fact, I have written all this post on the keep using the voice recording option. The level accuracy Google gets in understanding is quite awesome.
So what’s your favorite feature of Google Keep feature and why do you prefer Keep comparing to other apps like Evernote.