My work as a blogger involves working with screenshots, day in and day out. Some of these screenshots have a white background which blends with the white background of the page. This makes it difficult for our readers to interpret the image, as there are no borders to define them.
Read: 3 Apps to Take Long Screenshots on Android
Add Border to Photos on Any Platform
There is something about images with border. This is why we like our images to have a frame, right? Not for nothing are people gaga over the frames added by Instagram. It looks good. In my case, and countless other bloggers and designers, it helps the user/reader differentiate between text and images. So, how do you add borders to photos?
1. Add Border to Photos Online
LunaPic is a free web-based tool that you can use on your computer or smartphone via your browser. Just launch the site and start adding a border to your pics. Don’t misinterpret me, LunaPic is crazy powerful and comes with a lot of options and settings.
You can do pretty much anything with it but for the purpose of this post, I will stick with adding borders. Open the site (direct link to border tool below). There is an upload file option. Choose your file, pick your border color, and enter your desired border size in pixels. It is also called thickness.
Read: Make Photo Square Without Cropping – Online Tool

The above screenshot has a black border with a thickness of 1px. Looks good? There is an option called Tiled Background where you can add designs as background. There is a sample image on the page that will update in real time as you choose different options. Go, play around with it.
You will notice a floating toolbar on the left of your screen. This is where you can add text, crop, resize, zoom in/out, scale, pick a color, draw, paint, add artwork, animations, and do a lot more with your images. It comes with cloud support and connects with a number of image hosting sites.
Because it is a browser-based tool, you can use it on any machine with any OS like Windows, Linux, MacOS, and any browser like Firefox or Chrome.
Visit LunaPic
2. Add Border to Photos on Android or iOS
PicsArt is a wildly popular image editing tool that is available for both Android and iOS. For the purpose of this article, I am using the Android version, but the process remains the same on either platform. You begin with downloading the app.
There is a ‘+’ icon near the bottom of the screen. Click on it and give necessary permissions to let the app access your gallery.

You will see four options. I chose Edit because I had a screenshot. You can choose any other based on your needs. Choose the image you want to add a border to and open it.

When the image is loaded, you will see a scrollable toolbar at the bottom of your screen. There you will find the Border tool. Click on it.

This should reveal a new window where you can choose the color and thickness of your border. There are two types of borders: inner and outer. I will keep inner at 0px and outer at 1px for the purpose of this article. You can choose any. Color is black.

The image will update in real time so you can see the results. When you are done, click on the checkmark in the upper right corner of the screen. This will lead you to the sharing screen.

Here, you can either save the photo in your gallery or upload it directly to, say, Instagram or Snapchat.
Also Read: Top 5 Free Online Image Editor Like Photoshop
PicsArt is really powerful. It has been downloaded more than a few million times and comes with a strong community. You can follow other people to get inspiration from their work. Play around with the tool to see what you can do, and how you can participate in the challenges!
Download PicsArt on Android and iOS
3. Add Border to Photos on Windows
Sometimes, you are working with images in bulk and need to batch process it. Maybe, you want a tool that you can use without an Internet connection. You like to work on a bigger screen. You want a software that is free, probably even open source?
ShareX ticks all the boxes. A freeware, open source image editing tool for Windows that you can use to add borders to photos in bulk. You can create different presets, think of it as profiles, with settings. Say, you want your screenshots to have 1px outer border in black and resize it to 375×667.
Read: 8 Ways to Take Screenshots on Windows
Create a preset and save it, name it. Now, you can simply open the image, choose the preset and watch the magic happen. Your image will be resized and a border will be added. It is now ready to be saved.
Let’s see how to do it.
Open ShareX. On the left panel, you will see the Tools option.

Select Image Effects from the drop-down. This is where you can create and name your presets, add a border, resize, and even add a watermark on the fly. Choose the image to which you want to add a border to.

Click on New Preset and then click on Add button to add a border option. I have also added Resize. Set the parameters and name your preset. There is no need to save. Now, you can choose your image and add border on the fly.
ShareX, like PicsArt, works with a number of cloud storage and image hosting sites. This means you can download images from Dropbox and Drive to edit them, and then upload them directly to Instagram, Imgur or other platforms right from the interface.
Download ShareX
4. Add Border to Photos on macOS
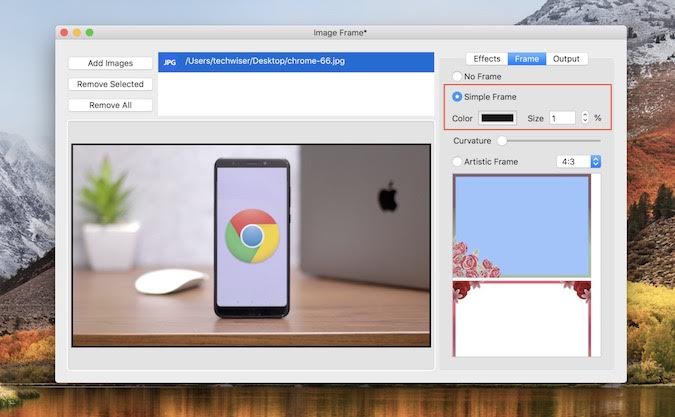
While you can use the native Preview app to add a border (go to Tools-Annotate-Rectangle), it’s not very intuitive. So, if you are looking for a dedicated app, try Image Frame. The app is free to download from the App Store and easy to use.
Once you have launched the app, click on the Add Images button in the top right corner of your screen. You can either add a single image or import multiple images at once. Next, drag and drop the image to the preview window. Now, by default, the app comes with 6 different Artistic Frames, but if you just want to add a simple border, click on the Radio button next to Simple Frame. Choose a color and size of the Frame and that’s it. You can now import pictures and start using them.
Wrapping Up: Add Border to Photos
Adding a border to a photo can do wonders for your image. It draws attention to the image. You can say it grabs the eyeball. So, which tool or app are you using to add borders to your images, and why. Share with us in the comments below.