Windows 10 came with all guns blazing with a whole new UI and some interesting features. One of them was live tiles that one could see in the Start menu. A lot of people didn’t like the idea but many did. And for those who did, there is a way to not only bring back live tiles to the Start menu but also place these live tiles on the desktop. Let’s find out how you can add live tiles and tile widgets on the desktop in Windows 11.
Adding Live Tiles and Widgets Anywhere on Windows 11
Earlier, there was a way to enable live tiles and widgets in Windows 11 and other Start menu elements using the Registry Editor, however, the option was blocked by Microsoft later. It seems that they don’t want Windows 11 users messing around with the feature, or registry files, for that matter.
The benefit of adding these live tiles widgets on the desktop is that you can have fresh data, updated at regular intervals, at a glance. Just switch to the desktop view and there you go! Lots of data like prices, figures, weather, and whatnot on a single screen.
Note that placing too many widgets can render the desktop cluttered. Also, it will reduce the laptop’s battery life and affect internet speed by that much. If you have a fast machine with an awesome battery and blazing internet speeds, go right ahead. Otherwise, I would suggest selecting widgets tastefully.
Let’s begin.
Get Live Tiles Anywhere (Free Windows App)
The first thing you need to do is download the Get Live Tiles app from Microsoft Store using the download link shared below. Once the app is downloaded, open it and you will see a settings screen.
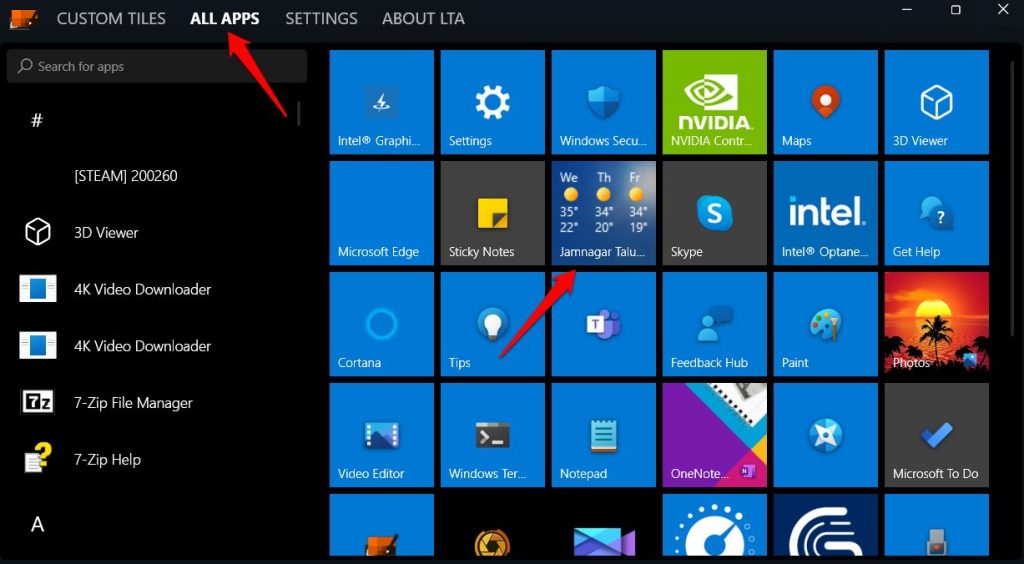
Click on the All Apps tab where you will find a list of common tiles and widgets for a variety of apps like weather, Notepad, Microsoft To Do, and more. There is a handy search bar on the left to hunt faster and a list of all apps in alpha-numerical order below that.
You can also create your own custom tile from the Custom Tiles tab but more on that later. For now, let’s select the weather tile.
Right-click on the widget and you will be met with a few options:
- Open / Run – useful to see the widget in action without activating it first
- Create a copy and customize – when you want two copies of the same widget but with different information. An example can be weather widget with different lcoations
- Create a widget – when you want to create a widget and use it or place it
- Pin to Start menu – when you want to pin the tile or widget to the Start menu to get similar effects as in Windows 10
- Create a desktop icon – when you want to add the live tile widget to your Windows 11 desktop

Choosing Open / Run will simply open the associated app which will give you a glimpse of how things work. In the case of weather widget, it will open the Weather app where you can set location, temperature, and other details. Customization options will vary from app to app. Once the default settings are set, you are ready to create a widget.
1. Select Create a widget option. This will immediately create a weather widget and place it on the desktop. You can right-click on it to set its position or drag it around anywhere.

2. When you select Pin to the Start menu option, press the Windows key to find the live tile widget. The only caveat is that because the Windows 11 Start menu was not designed to accommodate widgets, they appear too small and hence, not useful.
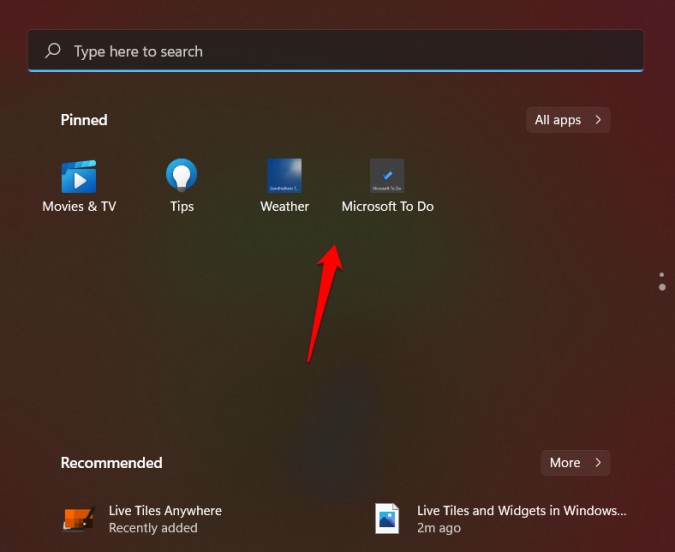
As you would have noticed, the information in the tile is unreadable rendering the live tile pretty useless. Live tile widgets work fine on the desktop though. Press Windows key+D to quickly view the desktop and press again to go back to the previous open window.
We saw how easy it is to search for and place a live tile widget on the desktop. But not all app widgets are available by default. Let’s see how you can create a live tile widget for your favorite Windows 11 app.
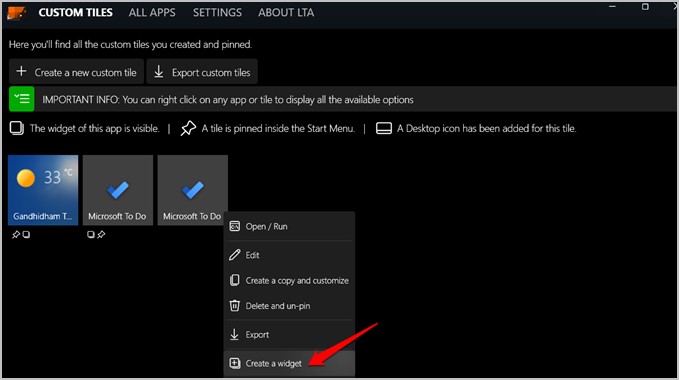
1. Go to the Custom Tiles tab where you will see a list of all widgets that you have currently active. Click on Create a new custom tile button.

2. Select Element to execute in the left sidebar and select Installed app next from the drop-down menu. Then click on Pick an app button to choose an app that you want to create a widget for.
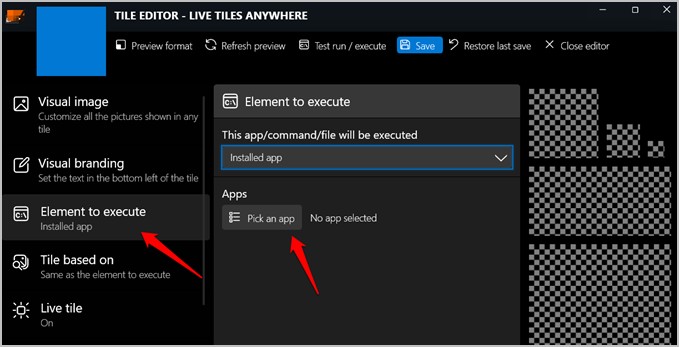
3. Select an app from the given list and click on Save button at the bottom.

4. You can now select Visual branding and Visual image button to add some style elements. If not, move to the Tile based on tab and select Same as the element to execute from the drop-down menu. Click on Test run / execute option to check if it opens the original app. A live tile preview should be visible on the top-left corner of the window. Finally, click on Save to save changes.

5. I have two widgets for the same app because one came preinstalled and the other I just made. Right-click on the newly created live tile and select Create a widget to place it on your desktop.
And you are done.
Download Get Live Tile Anywhere
Wrap Up: Use Live Tiles in Windows 11
We are not sure why Microsoft is hell-bent on not allowing Windows users to play around with live tiles and widgets. Windows 11 does support widgets but you can’t place them anywhere or move them around. They are available on the Taskbar and can be managed from there.
The only way right now is this amazing little app that is free to use. There is no other app like this in the market which makes it unique. Hope we do have more options in the future. Till then, enjoy.
Windows doesn’t just removes features but also adds some useful ones like Focus Sessions.