Chrome OS has many features like downloading Android apps and personalizing your Chromebook with the Chrome Canvas app, which most people have already known. But there are some lesser-known tricks like getting an App Store for Linux apps, using task manager, taking a screenshot of a specific part of the screen much more. Let’s check out how to make your Chromebook a Pro Machine.
Best Chromebook Tips and Tricks
1. Continue browsing from your phone
While you might already using your Android to unlock your Chromebook, do you know you can also sync open tabs between your Chromebook and Android? For example, if you are searching for some shoes on the Amazon, you can seamlessly shift your browsing to your Chromebook and take advantage of the bigger screen.
To set it up make sure you are logged into the same Google account on your Android and Chromebook, Next, open the Chrome app on your Android and tap on More option and then Settings. Next, tap your name, tap Sync and turn it ON.
Once done, take a look at the top portion of the app drawer, whenever you browse something on your phone with Chrome browser, you can see the title of that page as the first suggestion on the Chromebook below the launcher’s search bar. Just open it and continue your browsing on the Chromebook.
2. Change the Shelf position
By default, Chromebook puts the Shelf (a.k.a dock or toolbar) at the bottom edge of the screen. However, it also gives you an option to change the position of that Shelf to left or right just like Linux by right-clicking (tap with two fingers on the trackpad) and setting the shelf position.
Or even hide the shelf by selecting the auto-hide option.

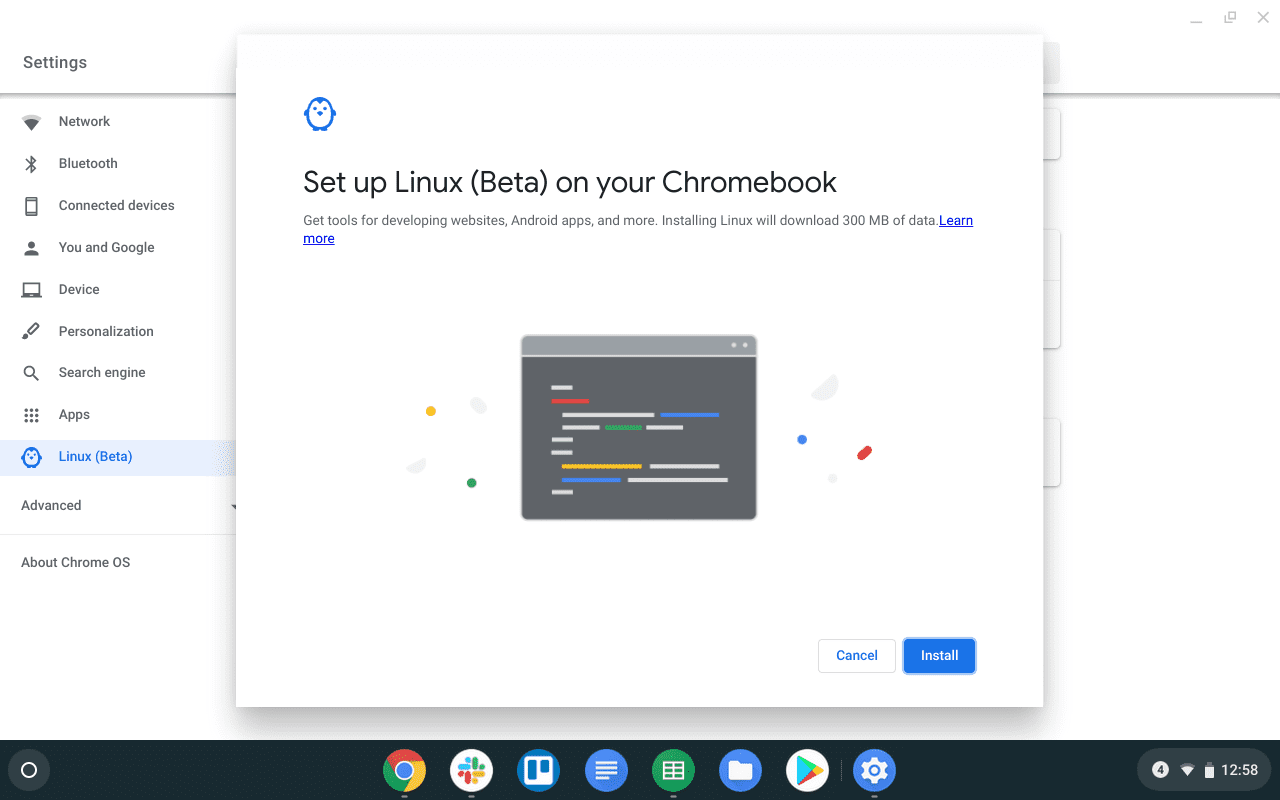
3. Run Linux apps
Some Chromebooks can even run Linux. But it is not supported on all the devices, so it’s a good idea to first, check if your Chromebook supports Linux. If it does, it opens the door for a lot of possibilities and now you can install many professional apps like GIMP, Kdenlive, etc.
To Enable, open system settings and click on the ‘turn on’ button beside Linux. You will get a terminal in your app drawer which can be helpful to install Linux apps.
Here are some of the best Linux apps you should try on your Chromebook and how to install them.
4. Get app-store for Linux apps
Enabling Linux brings new features and software to Chromebook, but installing Linux apps is a bit hefty process and you need to use the terminal to install any Linux apps.
But we can get Gnome Software Center which can act like an app store for Linux.
To install, open the terminal and run the command
sudo apt-get install gnome-software gnome-packagekit
If you aren’t seeing any apps on the store, try these 2 commands and then reboot
sudo apt-get update

sudo apt-get dist upgrade

5. Run Windows software
As we can now run Linux on Chromebook, we can use the Linux app called wine to run Windows app on the Chromebook.
Windows have a great collection of apps than Linux and we can install apps like Photoshop, Brave Browser, etc which are not even available for Linux. As these Windows apps are working on Linux and Linux is working on Chrome OS in a virtual box kind of setup, these apps have few lags and work great only on powerful Chromebooks like Pixelbooks.
To install, open the terminal and run the command
sudo apt-get install wine
Wine will only work on the intel based Chromebooks but not on ARM-based Chromebooks. Wine is also available as an Android app, which can be installed on any Chromebook and work perfectly, but it can only install Windows RT apps.
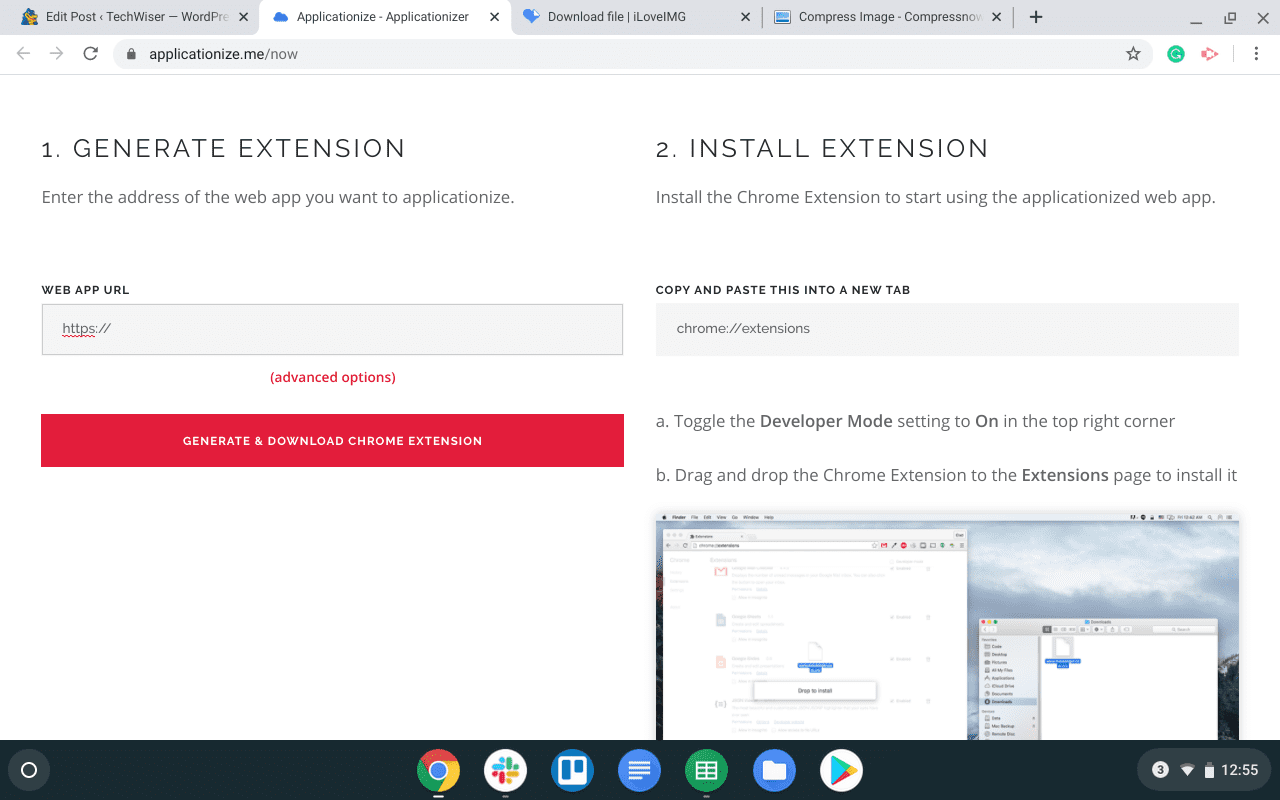
6. Turn websites into Chrome apps
One thing Chrome OS still lags behind is the lack of apps. Of course, we have Android apps and Linux apps. But some of them are not well optimized to work on Chromebooks.
Thankfully, you can turn most web apps to standalone Chrome apps with a simple trick. Just head over to Aplicationize website and paste the URL you want to convert into an app. And follow the instructions shown on the Aplicationize website.
Google Docs, Twitter, Facebook, Wordpress are some of the apps which don’t work great with Android and are in which you can try this method for a better experience.
7. Use your Android phone to unlock Chromebook
Most Chromebooks now are supporting tablet mode as they are already touch-enabled. But typing the password in a tablet mode is not an easy task as we need to use the Virtual Keyword. But we can change that to PIN when using in tablet mode.
Open System Settings and in the ‘You and Google’ section, click on the ‘screen lock and sign-in’ option. Change the option to ‘PIN and Password’ and set the PIN. So every time, you are using the Chromebook in tablet mode, you can just press the PIN to unlock.
You can connect your Android phone from the connected devices section and unlock your Chromebook when your Android phone is near it. Just like how you can use Apple Watch to unlock your iPhone.
8. Kill the apps using task manager
Whenever any app hangs and stopped responding, use the shortcut Search + Esc to open task manager and we can end the process through the task manager.
It’s just like pressing Control + Alt + Delete in Windows.

9. Adjust your keyboard backlight
Some Chromebooks come with a backlight for their keyboards. You might have seen buttons to change display brightness but not the keyboard brightness. You can use the shortcut Control + Shift + brightness keys to increase or decrease the Keyboard brightness.
10. Control Notifications for individual app
While you can always block all the notification by activating do not disturb mode, but then it might also block other important notifications. Thankfully, Chromebook lets you control notifications for each app just like on the Phone.
Simply, open the quick settings panel on the bottom left of the screen and click on Notifications. You can enable and disable notifications for each app easily from there.

11. Dual Screen mode
Chrome OS has an option to access the dual-screen mode with a simple shortcut. Using Alt + [ on any app makes the app align to the left side of the screen and we can use Alt + ] for another app to align to the right side. And we can also toggle between them seamlessly with Alt + Tab shortcut.
Also, we have the option to press Alt + = to maximize any app and press it again to get back to its previous position.
12. Get back the missing Caps Lock
On Chromebooks, Caps Lock is replaced with the Seach button. But we still can access the Caps Lock by pressing the alt + Search shortcut or remap it from the settings.
Go to Settings and click on Keyboard in the device section. In front of the search option, you can remap the key to different functions. Just set it to capslock and use that search button as capslock from now. Also, remember that remapping the search button to capslock will disable shortcuts with the search button like Seach + Esc to open task manager.

13. Know every shortcut on Chromebook easily
There are a lot of Shortcuts in the Chromebook and you can access all the shortcuts just by clicking Control + Alt + ? on your Chromebook. It will show you all the shortcuts possible on the Chromebook in different sub-sections for you to search easily.

14. Navigate between Chrome Tabs much fastly
We can navigate between the chrome tabs with the shortcut Control + Tab, which is already popular. But there is another lesser-known way to navigate even faster.
You can just swipe with three fingers on the trackpad from left to right and right to left and change the tabs. It may take time to use it when needed, but after using it for a few days, it will make the navigation much easier and faster.
But make sure you are not using two fingers, that may take you to the previous page or the next page which is not you wanted.
15. Open apps with a Shortcut
You can open apps in the Shelf ( a.k.a dock or toolbar ) easily through simple shortcuts. Just press Alt + 1 to open the first app on the shelf from the left. Similarly Alt + 2 for the second app, Alt + 3 for the third app, etc.
So if you have placed Chrome as the first app in the Shelf, you can just access Chrome by just typing Alt + 1 every time.
16. Take a partial screenshot
This is something you might know already that you can take a screenshot just by pressing the Control + Overview button which has an icon of a rectangle with 2 lines and in the place of F5.
But there is also an option to take a partial screenshot of just a certain portion of the screen. Just press Control + Shift + Overview button, the screen will turn a bit darker, just select the part of the screen you want to take a screenshot and get a screenshot of just the portion you want.
A fun tip: Press the Control + Alt + Overview button, and take a screenshot of any window on Chromebook.
17. Change the Downloads Location
By default, all your downloads go to the download folder and there is no other folder on the Chrome OS. Thankfully, you can change that.
Open browser settings > downloads and change the location by clicking on the change button. And create a new folder from there if you want. Normally all the files you have downloaded and the files you copied will stay in the same place, with this trick, you can actually make it more organized.
Or even directly download to Google Drive, as Chromebooks generally don’t have much memory space, you can save a lot of data on your Chromebook.

17. Add Dropbox or One Drive in the File Manager
By default, along with native files, you all get Google Drive option in the file manager, but you cannot find any other services. But we can install them easily by opening the three-dot menu on the Files app and click on ‘add new service’ and then ‘install new service’. And we can download services like Dropbox, One Drive, etc from here easily to your file manager.
As an added bonus, you can even change the download location to them and save space on the system memory.

18. Quickly change the Audio Output and Input
Chromebooks have an option to easily change the Audio Output / Input by opening the quick setting panel and selecting the option beside the audio controls. It will show all the options including Bluetooth. You can seamlessly switch between audio devices without connecting and disconnecting every time.
This option will only available if you have connected any devices to it. Similarly, you can change the input too.

19. Stop access to create an account from the lock screen
Chrome OS gives us an option to create an account from the lock screen itself. With that, anyone can open your Chromebook and can create an account in it. Though they cannot access your files, they can use your entire Chromebook with their google account or by using Guest Account.
In case, you don’t want that, you can turn off that by going into system settings and in the ‘people’ section, select ‘manage other people’ and turn on ‘restrict sign-in to the following users’. You can select some users whom you want to use your Chromebook if you want.
And turn off Guest browsing. So no one can access your Chromebook without logging-in.
20. Take advantages of Chrome Offers
With the Chromebook, Google is also throwing some offers for you. Which you can access those offers by Going into this link: – Chromebook Perks
Open this link from the Chromebook so that Google can verify that you are using Chromebook and provide you a promo code that you need to paste in the Redeem option in the Play Store and can use that Offers.

Best Chromebook Tips and Tricks
Chromebooks have been successful with millions of user base for its simplicity. And these tricks like shortcuts and continuing browsing from the phone make it even simpler and seamless. Features, like running Linux apps and converting websites into Chrome apps, brought a lot of functionality to the Chromebooks. As they are also touch-enabled and can work in Tablet mode, they were the best Android tablets that have the potential to replace desktops and laptops for many people.