It can be frustrating if your mouse stops working every time you wake your Windows 11 PC from sleep. After all, not all of us are familiar with keyboard shortcuts or have a touchscreen display to operate Windows 11. While the reason behind the issue could vary from user to user, thankfully, troubleshooting the issue isn’t that difficult. So, let’s check them out.
Table of Contents
1. Remove All Non-essential Peripheral Devices
At times, other external USB devices connected to your PC can interfere with your mouse and lead to such issues. So, your first course of action is to disconnect all the USB peripherals (such as printers, scanners, webcams, etc.) and check if that resolves the issue.
2. Allow Mouse to Wake the Computer
If your mouse doesn’t have permission to wake your PC, it will stop working right after Windows goes to sleep mode. Additionally, if you’ve configured Windows to turn off your mouse to save power, then such issues may arise. Here’s how you can fix that.
1. Press Windows + X or right-click on the Start button on the Taskbar and select Device Manager from the list.

2. Double-click on Mice and other pointing devices to expand it.

3. Right-click on the mouse that’s not working and select Properties.

4. Switch to the Power Management tab and uncheck Allow the computer to turn off this device to save power. Mark the box that reads Allow this device to wake the computer.
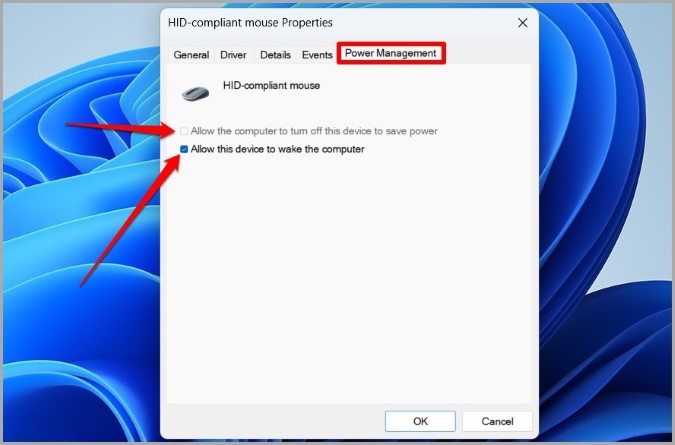
5. Click on OK to save changes.
Check to see if the issue is resolved now.
3. Update or Reinstall Mouse Drivers
It’s not uncommon for drivers on your PC to get outdated over time. If that’s the case, you can try updating them to see if that improves the situation.
1. Open Device Manager again. Expand Mice and other pointing devices.
2. Right-click on the problematic device and select Update driver.
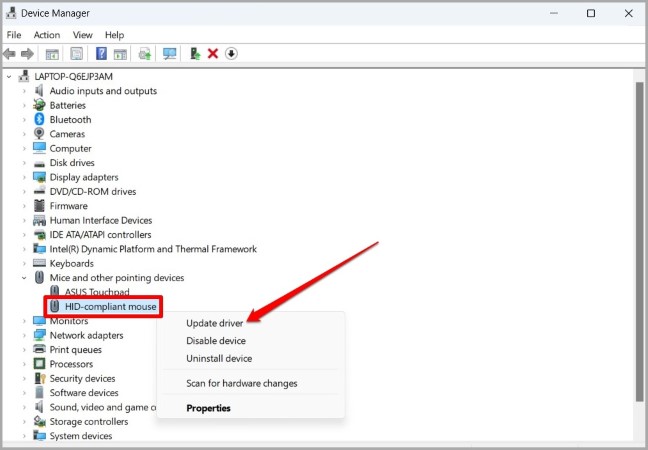
From there, follow the on-screen instructions to complete the process.
If the issue remains, then it could be the case of mouse drivers being corrupted. In that case, you can follow the same steps above and uninstall the drivers.

Once removed, restart your PC to allow Windows to install them again.
4. Run Hardware & Devices Troubleshooter
By running the hardware troubleshooter, you can allow Windows to detect and resolve any hardware-related issues that might have been keeping the mouse from working after sleep. Read on to learn how.
1. Press Windows + R to launch the Run dialog box. In the Open field, type the following command, and press Enter.
msdt.exe -id DeviceDiagnostic

2. In the Hardware and Devices window, click on Next.

3. If the automatic repair pops up, click on Apply this fix.
Next, follow the on-screen prompts to complete the troubleshooting process.
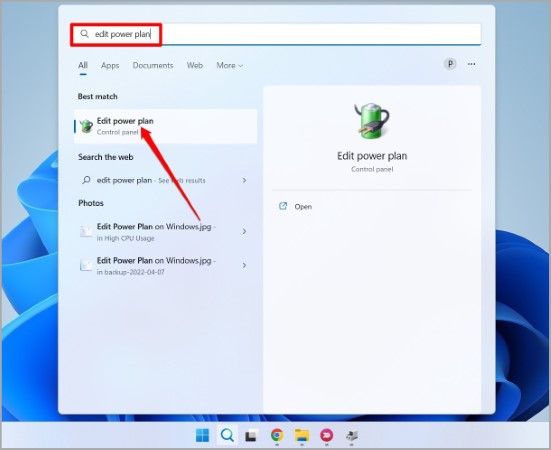
5. Disable USB Selective Suspend
USB selective suspend is a nifty feature on Windows that tends to suspend your inactive devices in order to reduce power consumption. As a result, your mouse and other USB accessories may stop working after prolonged inactivity. To avoid this, you should disable USB selective suspend on your PC.
1. Press Windows + S to open the Search menu. Type Edit power plan in the search box and click on the first result that appears.
2. Click on Change advanced power settings.
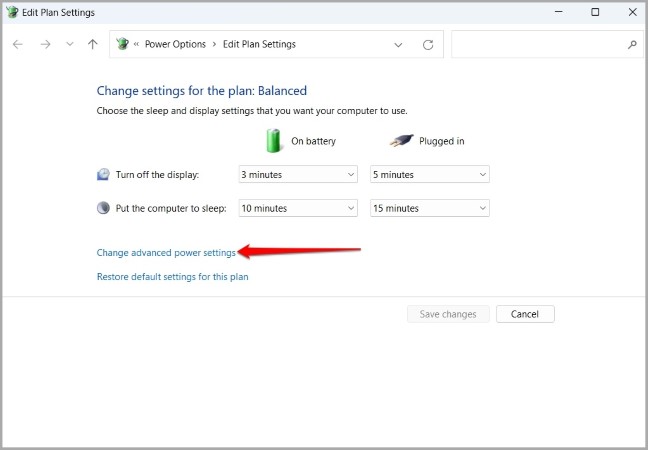
3. Double-click on USB settings to expand it.
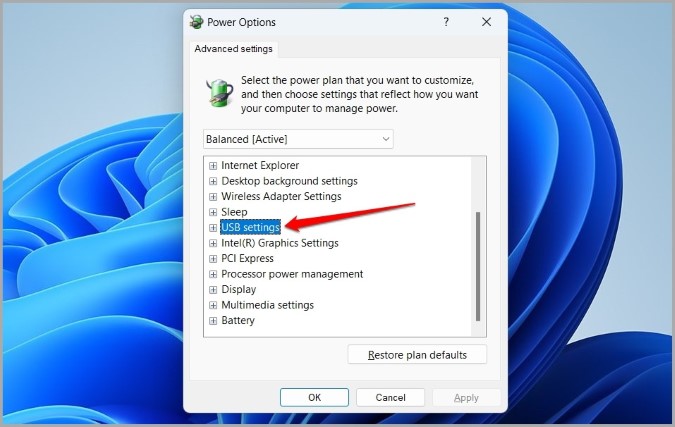
4. Expand the USB selective suspend setting menu and click on Enabled.
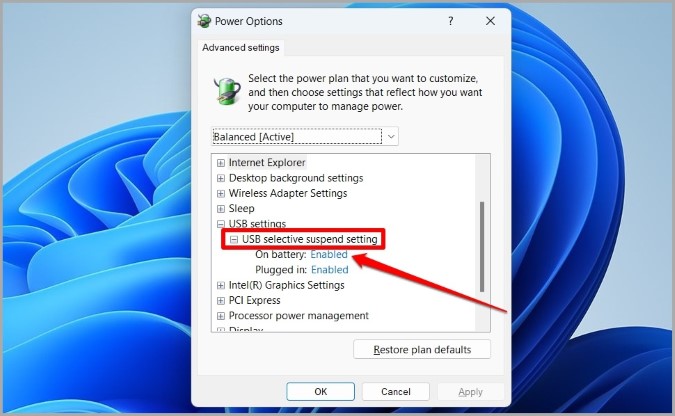
5. Use the drop-down menu to select Disabled. Then, click on Apply followed by OK.

Note: If you’re using a Windows laptop or tablet, you’ll have to disable the USB selective suspend setting for both On battery and Plugged in mode.
6. Reset Power Options
If disabling USB selective suspend doesn’t help, then it could be one of the other power settings that may have resulted in the mouse not working after the sleep issue. Rather than going through each of those settings, you should consider resetting the existing power options by following the steps below.
1. Press the Windows key on your keyboard, type in cmd, and select Run as administrator.

2. In the console, paste the following command and press Enter.
powercfg –restoredefaultschemes

After executing the command, exit the command prompt window. Now check to see if the issue is resolved now.
7. Uninstall Recent Windows Update
Software updates can also go wrong at times. If your issues with the mouse only started occurring after a recent Windows update, you can try removing that particular update to fix the issue. Read on to learn how.
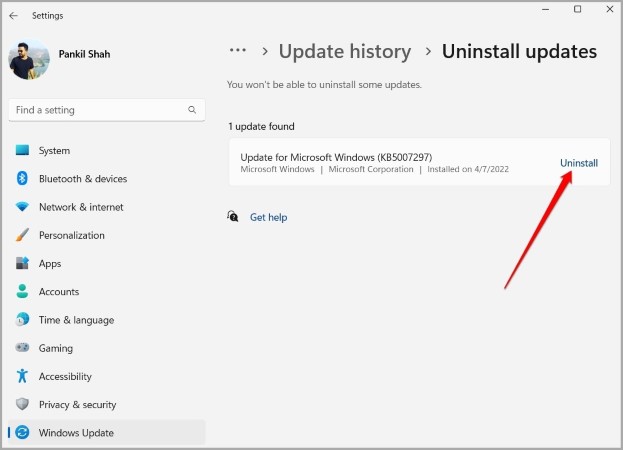
1. Press Windows key + I to launch the Settings app. Switch to the Windows Update tab on your left and go to Update history.

2. Click Uninstall updates.

3. Locate the most recent update and click Uninstall.
Wake Up Call
One of the above solutions should work out for you while fixing the mouse not working after the sleep issue on Windows 11. If not, the issue could be with the mouse you’re using and you may have to buy a new one.