Sometimes, you can’t install third-party apps on Windows 10 or 11 OS. Instead, you are greeted with an error message such as:
- You can only install apps from the Windows Store
- The app you are trying to install isn’t a Microsoft verified app
Note here that the Windows Store has been renamed to Microsoft Store but the error codes haven’t been updated yet it seems. However, not all apps are available on Microsoft Store and most Windows users are used to the idea of installing apps directly using .exe executable file. Here’s what all you can do when Windows won’t let you install any app or software.
Table of Contents
1. Disable Windows S Mode
Some computers and laptops like the Surface series come preinstalled with Windows 10 in S Mode or Windows 11 in S Mode. The difference? You can only install apps from Microsoft Store and can’t install third-party apps on Windows at all. Microsoft says S is for Safe but it is more restricted for the end users. You can leave S mode but the process is irreversible so if you leave, there is no way to enable S Mode again.
Here’s how to disable the S Mode:
Note: I will be using Windows 11 as an example but the steps will remain the same for Windows 10 unless otherwise stated.
For Windows 11:
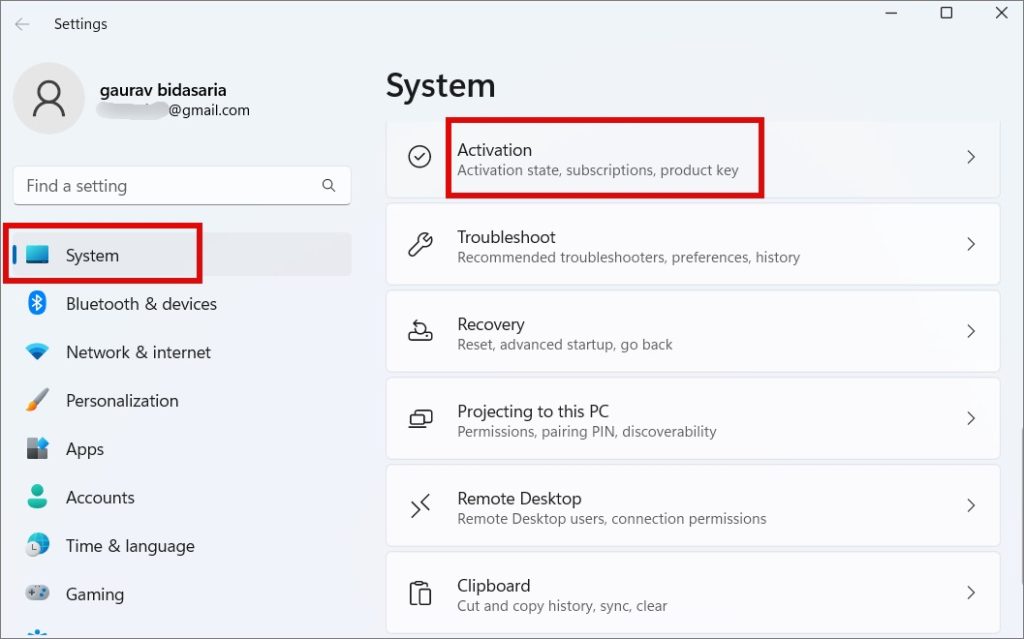
1. Press Windows+I to open Settings and go to System > Activation.

For Windows 10
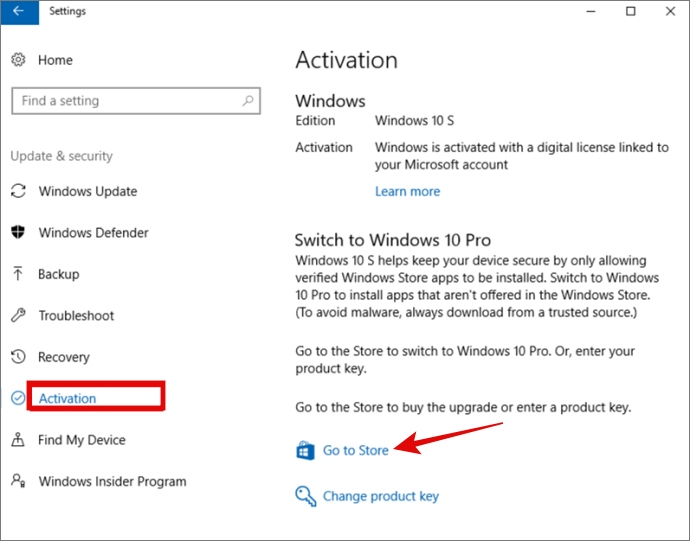
Press Windows+I to open Settings and go to Update & Security > Activation.

2. Click on Go to the Store in the Switch to Windows 11 Pro (or Windows 10 Pro) section. Be careful NOT to click on ‘Go to the Store’ link under the ‘Upgrade your edition of Windows’ section.
3. You will be redirected to a Switch Out of S Mode page in the Microsoft Store. Click on the Get button here and wait for confirmation.
You should now be able to install 3rd-party apps on your Windows 10 and 11 computer.
2. Check App Compatibility
Microsoft, at any given time, has several versions of Windows floating around. Right now, it supports both Windows 10 and 11 while they recently pulled the plug for Windows 7. Check the requirements section to make sure that the app you are trying to install supports what you are running on your computer. You find OS compatibility on the download page.
3. Enable Third-Party App Installation From Settings
Both Windows 10 and 11 have a setting that restricts installing apps from outside of Microsoft Store. While not enabled by default, it may have been configured on your computer.
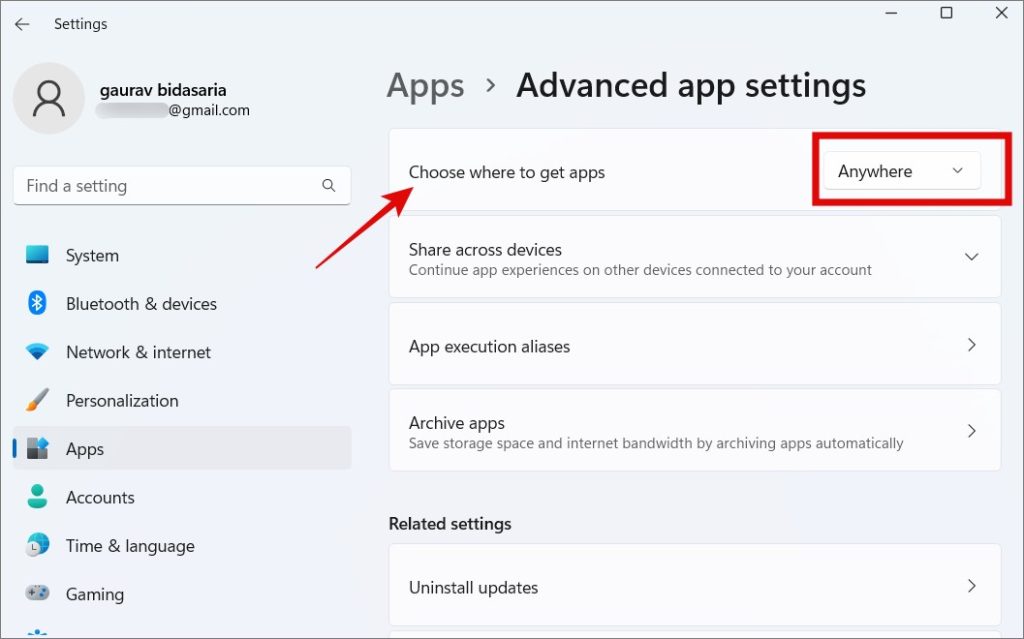
1. Press Windows+I to open Settings. Go to Apps > Advanced app settings. If you are using Windows 10, go to Settings > Apps > Apps & features.

2. Under the Where to get apps section, select Anywhere from the drop-down menu.

4. Free Up Storage Space
Lack of storage can be another reason why you can’t install 3rd-party apps on your Windows 10 or 11 PC. Apart from files, you store and apps you install, cache and other data pile up quickly. Apps like Photoshop or games like GTA take up space in GBs.
Uninstall apps that you no longer use, run CCleaner to delete cache and other junk data, delete large files or offload them to external drives like HDD/SSD, and try again.
Pro Tip: We have a detailed guide on how you can improve performance of your Windows 11 computer. Storage is not the only factor that impacts it.
5. Run as Admin
This is an old trick but still works. First, you need a user account with admin rights to install an app on Windows 10 or 11 computers. Second, even when you are operating an admin account, sometimes, right-clicking and running the executable file with admin rights helps.
Finally, Windows supports multiple user accounts. So if you are installing an app using an admin account but the app will also be installed and available for other users’ accounts, it may need additional permissions. Think guest accounts here that are often created by default by Windows.

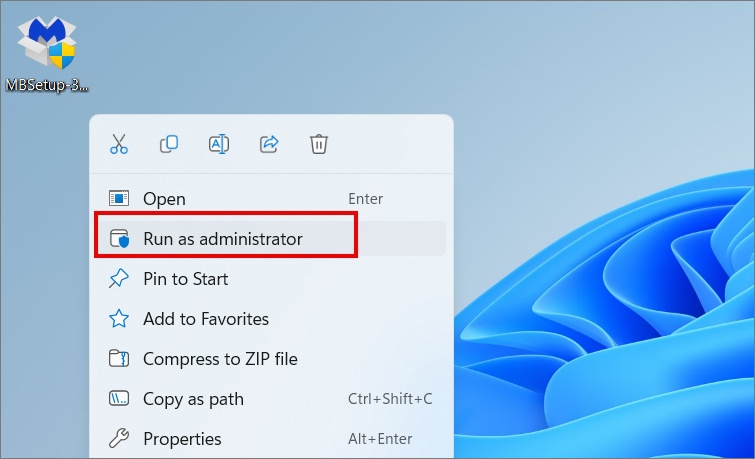
Simply right-click on the setup file and select Run as administrator.
6. Check 32-Bit or 64-Bit
Most Windows computers now come with 6-bit architecture, however, some old PCs may still be rocking a 32-bit one. Because of this, many software is available in both 32 and 64-bit versions. Which one are you trying to install?

Here’s how to find that.
1. To check your Windows version, go back to Settings like you did before and then click on System > About.

2. Find System type where you will find what you are looking for.

7. Run App Compatibility Troubleshooter
Windows 10 and 11 come with a built-in set of troubleshooters to help fix common issues like the one you are facing where you can’t install third-party apps on your Windows computer. One such troubleshooter is to check app compatibility.
1. Press Windows+I to open Settings again and search for compatibility and select Run programs made for previous versions of Windows.

2. In the pop-up that follows, click on the Next button and then follow on-screen instructions.

Another troubleshooter that you can run is Program Install and Uninstall troubleshooter, however, that is not natively available. You will need to download it first using the link above and then run it on your computer. Once downloaded, simply open the file to run it directly. No need to install anything. Then follow the on-screen instructions that are easy.
8. Enable Developer Mode
This is an advanced setting and most users won’t have to go down this route. I have developer mode disabled and can easily install third-party apps from outside Microsoft Store. However, if you can’t and are an advanced user, try this.
1. Open Settings as we did in the preview steps above and go to Privacy & security > For developers.

2. Toggle Developer Mode on here.

3. You will be shown a warning in a pop-up on the consequences of enabling developer mode on Windows 10/11.

4. Click on Yes here.
5. Once Dev Mode is enabled, check Install apps from any source, including loose files option. Reboot the computer once.
I recommend that you disable developer mode once the job is done and you have installed necessary apps. Enabling the above option can pose a security and privacy risk which we do want. Also, download and install apps from trusted and reliable sources only. The threat is real.
9. Uninstall Old App Versions
You cannot install the same software twice. In fact, you can’t even install different versions of the same software twice. For example, Microsoft recommends not installing Office 2016 and 2019, or other version, together. It simply won’t work. Check if that’s the reason you can’t install an app on Windows. Microsoft Store would detect older version of the app automatically, but if you are installing directly, it may not detect.
Click on the Start button to search for the software or go to Settings > Apps > Installed apps and search for it.

If the app is installed, it would be listed here. To uninstall, simply open the kebab menu (three-dot icon) and select Uninstall.

Note that some apps need secondary apps or utilities to function and hence, you will need to find and uninstall them too before you can install a different version of the third-party app on Windows. For example, several games required Steam, installing iTunes also installs Apple Mobile Device Support, and so on.
There Is an App for Everything
Windows is the most popular and used desktop OS in the world, and for good reason. It is user-friendly, versatile, and the ecosystem is robust. But it is also complex which occasionally leads to certain complications.
While some apps like Malwarebytes will automatically the correct version of your OS and download the right installation file, most don’t. Hence, you need to figure it out. Installing apps from Microsoft Store has its benefits too like you don’t need to worry about compatibility, but not all apps are listed there yet.
Did you know you can change the default download location of apps installed from Store?