The Google Camera app is known for its amazing features and capabilities. You can quickly share images on social media, enable face retouching, use Google Lens to scan QR codes, capture RAW images, and much more. If you are curious about exploring Google Camera, here are the best Google Camera settings that you should know about.
Table of Contents
1. Use Shortcuts to Take a Selfie or Video Quickly
Generally, you have to open the Google Camera app first and then switch to the selfie or video mode. If you take many selfies or videos, you can easily open these modes right from your phone’s home screen using the app shortcuts function.
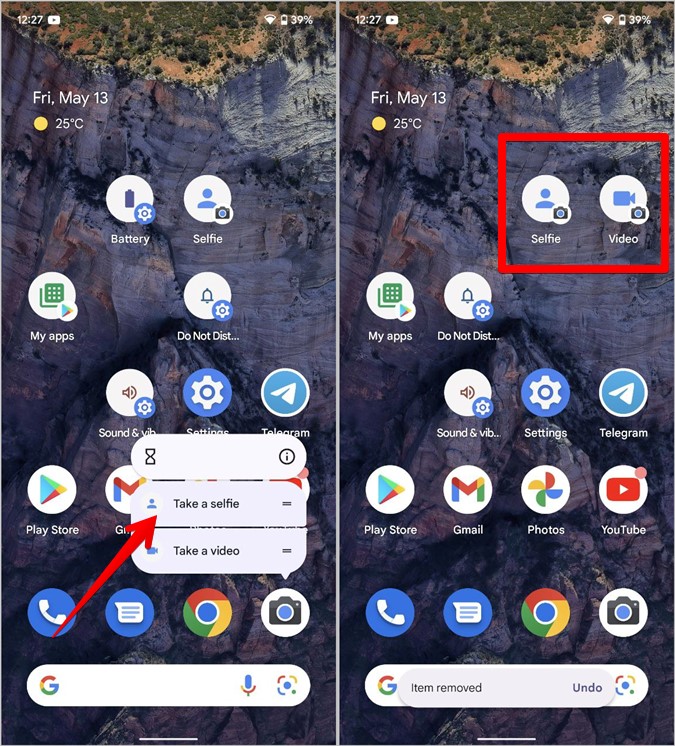
1. Long press the Google Camera app icon on the home screen.
2. The shortcuts for selfies and videos will show up. You can tap on one of these shortcuts to quickly capture a selfie or video. A faster method is to add these two shortcuts on the home screen itself.
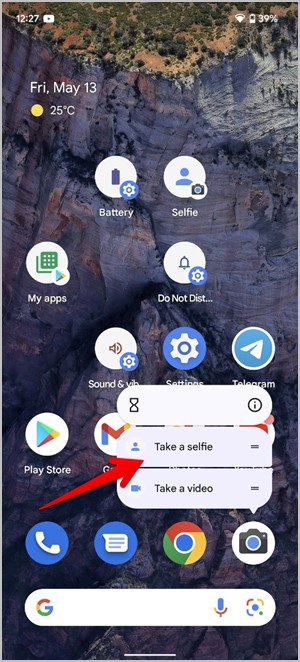
3. For that, long-press the selfie or video shortcut and drag the shortcut on the home screen.
4. Then, whenever you want to take a selfie or video, simply tap the icons on the home screen.
2. Change Image or Video Ratio
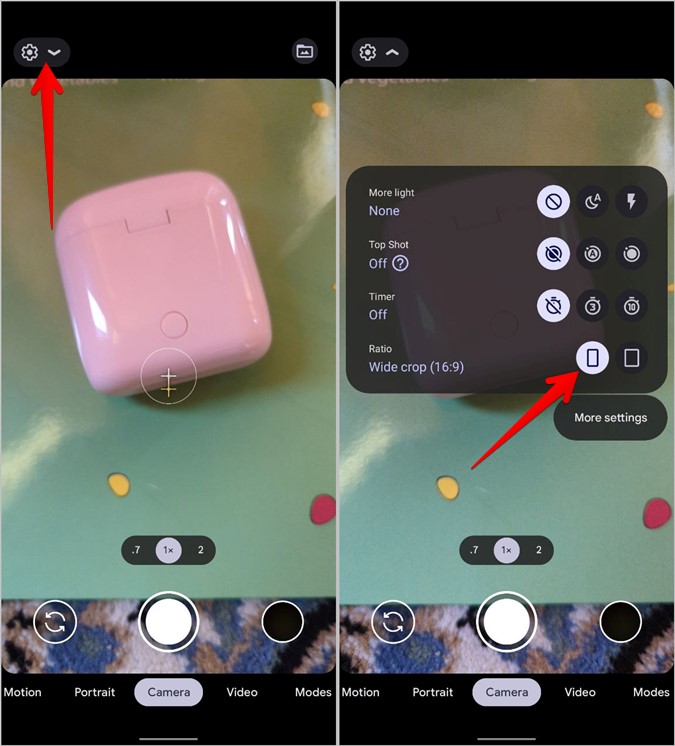
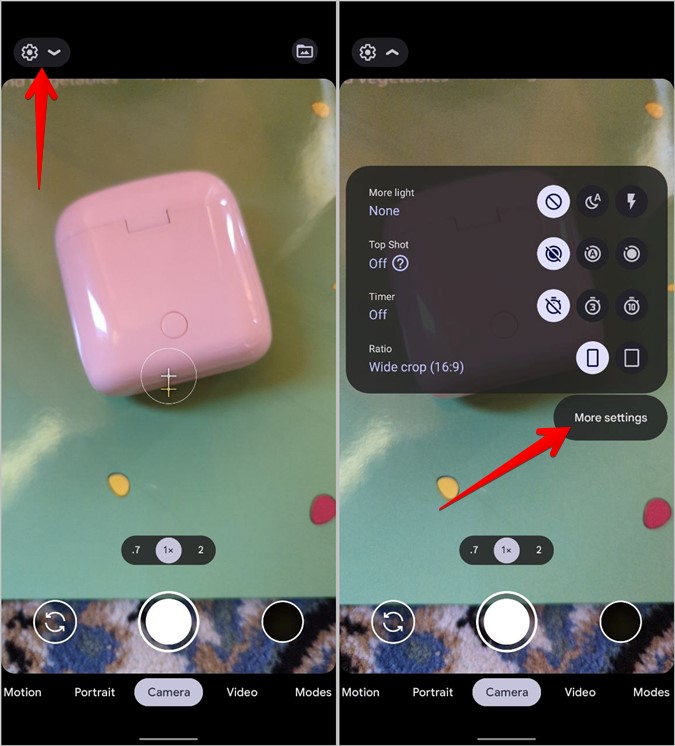
Google Camera lets you take pictures in 4:3 or 16:9 image ratio. To choose the desired image ratio, tap on the down arrow at the top to expand the settings panel. Tap on the Full image (4:3) or Wide crop (16:9) icons next to the Ratio option to switch between them.
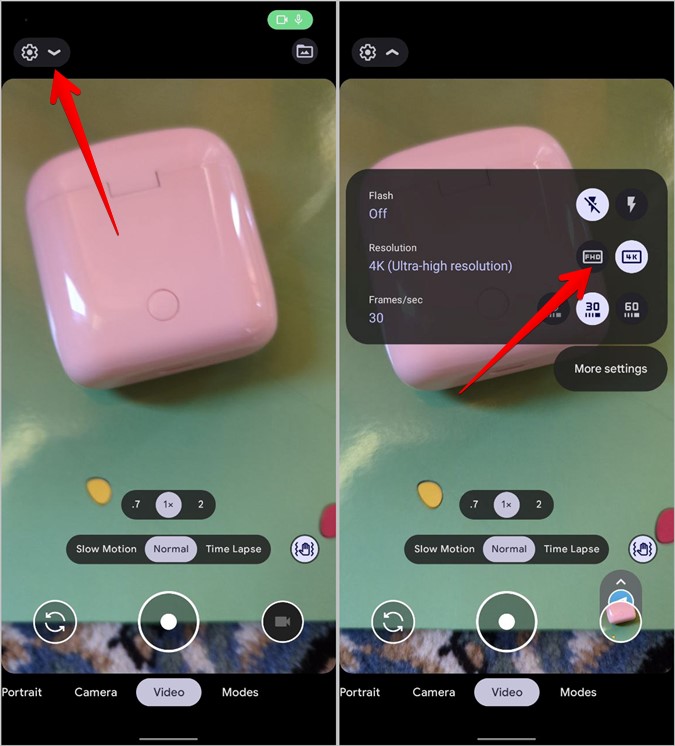
Similarly, tap on the Video tab at the bottom followed by pressing the down arrow at the top. Choose the desired video resolution.
Pro Tip: Long press the Shutter button to start recording a video quickly without switching to the Video tab.
3. Change Photo Resolution
Google Camera allows users to take pictures either at full resolution or medium resolution. The latter uses less storage space, thus helping users save storage on their phones.
1. In the Google Camera app, tap on the small down icon to open the Settings panel. Tap on More settings to open Google Camera Settings.
2. Scroll down and tap on Camera photo resolution. Choose the desired resolution from the two options of full and medium resolutions. Sadly, it doesn’t specify the dimensions of medium resolution or allows users to manually choose between different image resolutions.

4. Lock Your Pictures
By default, all your pictures taken from the Google Camera app will show up in Google Photos or any other gallery app installed on your phone. However, if you want to hide your photos, you can take advantage of the Locked folder, which will require you to enter your screen lock to view the photos. This is basically a feature of Google Photos but it can be accessed directly from the Google Camera app.
In the Google Camera app, tap on the Save to (Folder) icon at the top and select Locked folder. New photos will be saved to the Locked folder, which can be accessed using the Google Photos app only. Learn how to use Locked folder in Google Photos.

5. View Recently Captured Items Quickly
Tap on the image preview bubble icon at the bottom of the Google Camera app to take a look at your most recent photos or videos without leaving the Camera app. Open any picture or video and press the Edit icon to edit your picture or video.

The Google Camera app lets you quickly share captured photos and videos to social media.
1. Capture a photo or video using Google Camera.
2. Once captured, you will notice an up arrow on the image preview bubble at the bottom. Tap on it to reveal the list of apps. Press the app icon where you want to share the image and select the contact to whom you want to send it.

If you don’t see the social media icons or your favorite social media app icon is missing, open the Google Camera Settings and go to Social share. Enable the toggle next to Off followed by enabling the toggle next to the apps that should show up.
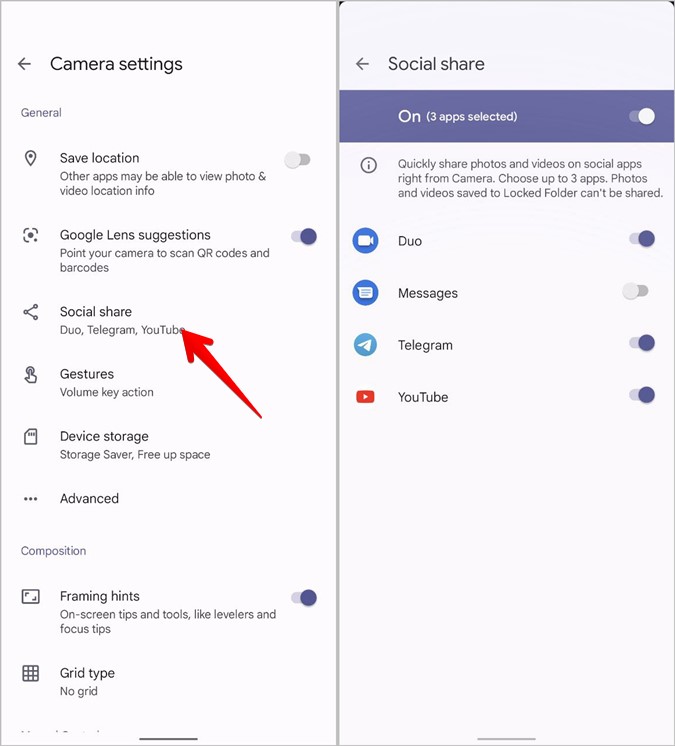
Note: Only three apps can be added to the list.
7. Change Function of Volume Button
By default, both volume buttons can be used as shutter buttons to capture pictures. But, you can remap the buttons to zoom or volume.
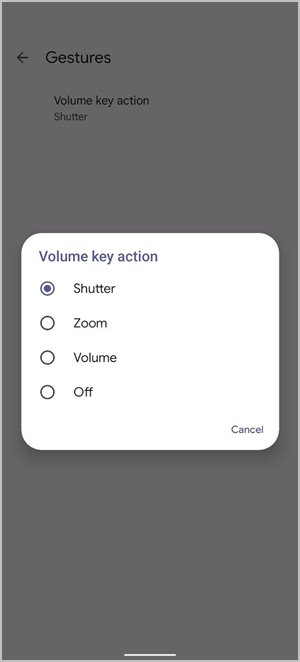
To do so, open the Google Camera Settings and tap on Gestures > Volume key action.

Choose the desired Volume key action such as zoom, shutter, volume, or off.
8. Enable Face Retouching
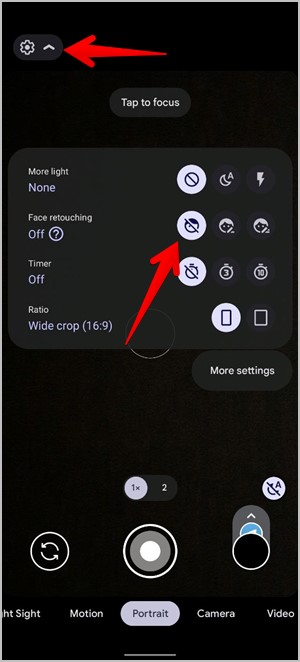
When capturing selfies or portrait photos, you apply face retouching to enhance your features. This tool will adjust under-eye tone, eye brightness, and skin texture.
Go to the Portrait mode or switch to selfie mode. Then, tap on the down arrow at the top. You will see the Face retouching option. Choose the desired retouching style (off, subtle, or smooth) from the options.
Pro Tip: Tap on the camera screen once to reveal manual camera controls.
9. Scan QR Codes
The Google Camera app comes integrated with Google Lens, the AI-based image-search tool. You can use it to scan QR and barcodes right from the Camera app.
Open the Google Camera app and point toward a QR code. Google Lens will automatically detect the QR/barcode code and read it. If that doesn’t happen, long press on the code that you see through the camera viewfinder to read it.

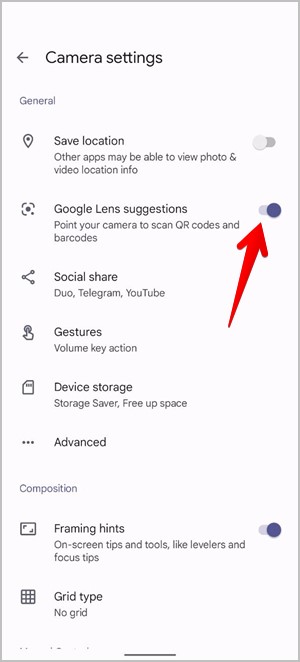
However, if the Camera app still doesn’t detect QR codes, open the Google Camera Settings and enable the toggle next to the Google Lens suggestions.
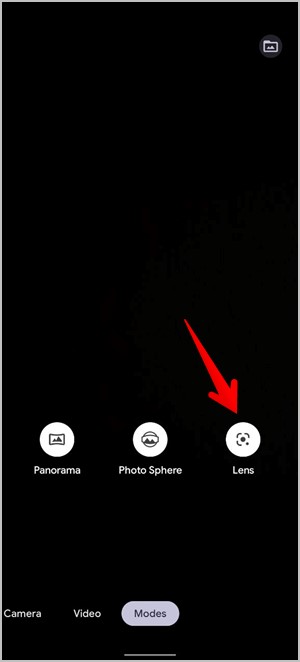
You can also use the full Google Lens functionality from the Camera by using the Lens mode. Learn how to copy text from paper to laptop using Google Lens.
10. Turn Location Stamps on
You can save a photo or video location info using the Google Camera app. To enable this feature, go to Google Camera Settings and turn on the toggle for Save location.

11. Enable Raw Photography
Did you know you could shoot RAW images using the Google Camera app? RAW images are quite useful for professionals as they get full control to edit pictures on a PC. The RAW images are saved in a separate folder on your phone.
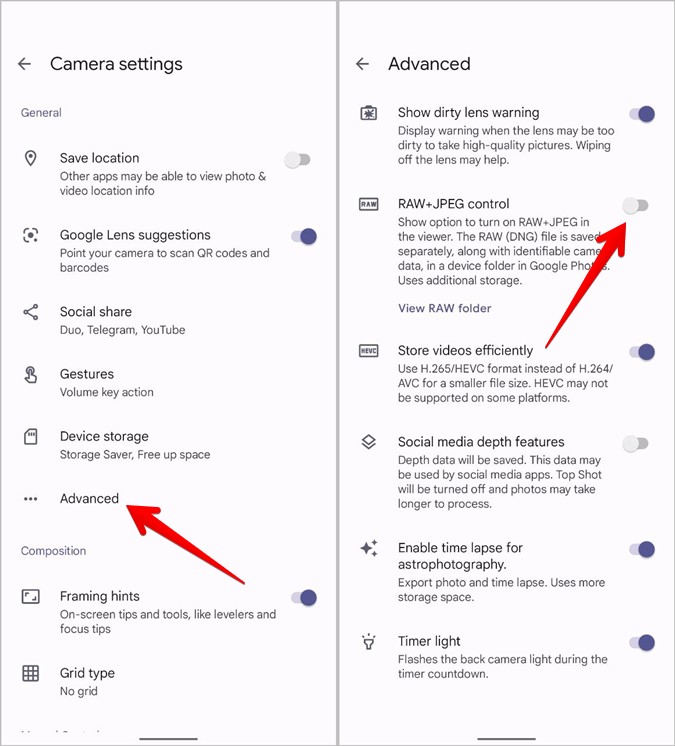
To enable RAW images, go to Google Camera Settings > Advanced. Enable the toggle for RAW+JPEG control.
Tip: Check out the best RAW camera apps for Android.
12. Enable Dirty Lens Warning
Sometimes, when we take photos, the camera lens is dirty, resulting in poor-quality images. Fortunately, the Google Camera app has an exciting feature that will notify you if the camera lens is dirty.
Go to Google Camera Settings > Advanced. Enable the toggle for Show dirty lens warning.

13. Find Out the Number of Photos That You Can Take
The Google Camera app lets you find out how many photos or minutes of videos you can take on your phone. It calculates this based on the available storage.
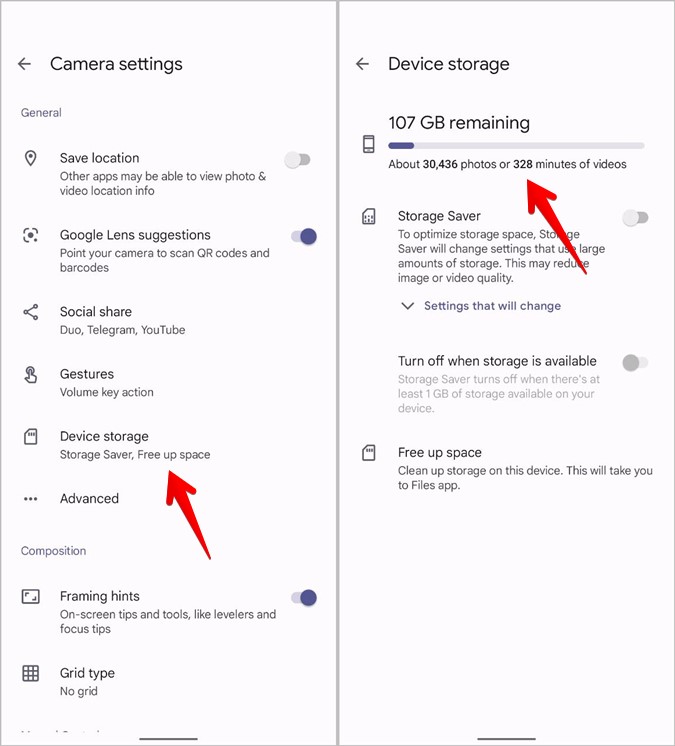
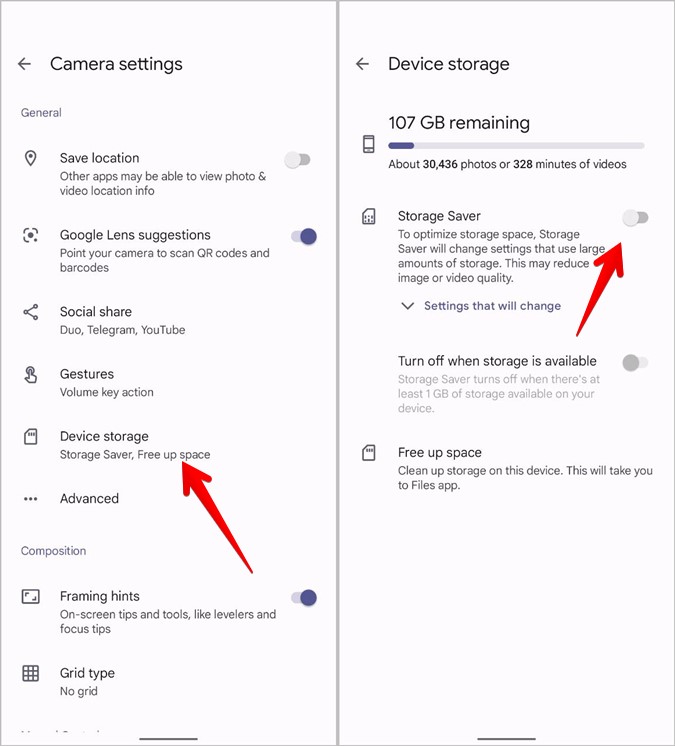
To view this data, go to Google Camera Settings > Device storage. Look for the metrics under the available storage.
14. Optimize Storage Space
If your phone has less storage or you want to take more photos and videos using the available storage, Google Camera lets you optimize the storage space automatically. When enabled, it will change a couple of settings (like no RAW photos, medium resolution photos, the video will be recorded in Full HD, etc.) that will help in saving space.
To optimize storage, open Google Camera Settings > Device storage. Enable the toggle for Storage saver.
15. Turn on Audio Zoom
When recording videos if you zoom on something, the audio zoom will boost sound coming from the subject and reduce background noise. To enable audio zoom, open Google Camera Settings and enable the toggle for Audio zoom under the Video section.

Note: This feature is available only on Pixel 4 and later phones.
Bonus: More Tips to Use Camera
In addition to the above tips, Google Pixel phones offer the following tips to use the Camera app.
Switch Between Front and Rear Camera
Google Pixel phones let you switch between the front and rear cameras in the Google Camera app by twisting your wrist two times. To enable this feature, go to phone Settings > System > Gesture > Flip camera for selfie.
Open Camera App Quickly
Press the Power button twice on your Pixel phone to quickly open the Camera app from any screen. Go to phone Settings > System > Gesture > Quickly open camera to enable this feature.
Use Quick Tap to Open Camera
You can open the Camera app by tapping the back of your Pixel phone twice. This is possible with the Quick tap feature on supported Pixel phones. Go to phone Settings > System > Gesture > Quick tap to start actions.
Select Open app and tap on the Settings icon next to it. Choose the Google Camera app.
Edit Your Photos
Hope you enjoyed reading about the best Google Camera settings. Once you have captured pictures, you can edit images in the Google Photos app. You can even edit videos in Google Photos. And if your pictures have unwanted objects or faces, you can use Magic Eraser to remove them.