If you want to change how Windows behaves by taking more control over the security or disabling few things which Microsoft throws at you, you can do that by tweaking the Group Policy settings. Yes, you can also do the same from the Registry Editor, but Group Policy has few more advantages like Group Policy will not change after a Windows update, unlike Registry. Most importantly, you can either configure Group Policy locally on your system or make the active directory to apply to multiple systems in your domain. So this is especially useful for the offices and schools running Windows computers.
Best Group Policy Settings
Before we begin, let’s understand that Group Policy is a graphical tool that lets you edit native OS settings, Kernel settings, etc. However, tweaking the Group Policy in a wrong way can even cause your OS to malfunction. So, if you are going to make any changes make sure to export the list before making any changes.
How to Access Group Policy
One of the biggest caveats of Group Policy is it is available only on those computers running Windows Professional, Education, or Enterprise Versions. Even though you are running Windows Home, you can access Group Policy but with few workarounds, which I will explain below.
To access Group Policy, there are multiple ways, one of the easiest ways is to open the Command Prompt > type “gpedit.msc” and click enter.

Though Group Policy is not a part of Windows Home editions, there is still a way to access it. All you have to do is install a third-party Group Policy Editor by downloading this Batch file. Open it as an administrator, it will start installing in the command prompt. It will take around 2- 3 minutes to install. Once the process is done, open the command prompt again and type gpedit.msc to access it.

1. Disable any Software Installation
By not allowing users to install various software, you can decrease the amount of maintenance and cleaning required when something bad is installed as it is also one of the potential reasons for the malware. This is even more useful especially in schools, where you want students to access only what required.

If you want to restrict users from installing or running programs, you can set that by opening Group Policy > Navigate to Computer Configurations > Administrative Templates > Windows Components > Windows Installer and double click on Turn off Windows Installer option. Change the setting to enable and make sure the option says “For Non-managed applications only”, so that they can install all the apps which are permitted by management. Now click on Apply and restart the computer for changes to take place.

Blocking to run Specific Applications
Blocking all apps to install is overkill in many situations. If all you wanted is blocking out just a few apps then you can make these changes to the Group Policy.

Open Group Policy > User Configuration > Administrative Templates > System and double click Don’t run specified Windows applications option. Change the setting to enable and click on the show button. Now you can enter the list of the apps you want to be blocked for the users and click ok. Now click Apply and restart the system for the settings to apply.

2. Block the access to Control Panel
It is important to set limits for the control panel mostly in business environments as it gives you control over the entire system. You can either block entire access or limit its access.
To block the access, open Group Policy > User Configuration > Administrative Templates > Control Panel > and double click on Prohibit access to Control Panel and PC settings and click on enable and apply. And the changes will be applied right away.

Show only Specific control panel items
The above process blocks access to the entire control panel. But if you are looking to limit the usage. you can do that by opening Group Policy > User Configuration > Administrative Templates > Control Panel > and double click on Show only specified Control Panel items and click on enable. Now click on the show option to specific each control panel option to show. If it is not on this list, it will not show to the user.
This means you’ll need to carefully pick and type out each Control Panel item you’d like to include. You can find the names of all Control Panel items on Microsoft’s website.

3. Disable Command Prompt
Command Prompt is undoubtedly so useful and also a nightmare at the same time as it gives the opportunity to the users to run the commands and programs which you are not intended to. It can also be a dangerous tool in the hands of the inexperienced. There are a lot of reasons to disable the command prompt, Maybe you’ve got kids who share a family computer or you let guests use your computer when they stay with you. Or perhaps you’re running a business computer you need to lock it down.
To disable, open Group Policy > User Configuration > Administrative Templates > System and double click on Prevent access to the command prompt option. Change the Policy to enable and apply. Now you need a restart for the changes to apply.

4. Disable Windows Registry Editor
Same as the Command Prompt, registry editor can even break things and bypass few group policy restrictions. So to safeguard the policy, you can open Group Policy > User Configuration > Administrative Templates > System and double click on Prevent access to registry editing tools and enable it. Now click on Apply and restart the PC to apply changes.
5. Block Removable Media Drivers
USBs or other forms of removable media devices can be dangerous for the PC. If someone accidentally or purposefully connects a Virus infected storage device, it may affect the PC or even the domain. When running a lot of computers, allowing media drivers makes it hard to manage the storage. Blocking removable media drivers is commonly used in many schools and colleges.
To block media drivers, open Group Policy > User Configuration > Administrative Templates > System > Removable Storage Access and double click on the Removable Disks: Deny read access. Now click on the enable option and apply to stop PC to read external drivers.
Blocking write option
The above option will only make PC to not read the files in the external Device. But you can still copy the files into the external device. If you want to safeguard the files, you need to block the write option too. This is commonly implemented in business environments.
To block write options, open Group Policy > User Configuration > Administrative Templates > System > Removable Storage Access and double click on the Removable Disks: Deny writes access. Now enable the option and select apply to apply the changes.

Alternatively, you can use All Removable Storage classes: Deny all access to block both read and write options at the same time.
6. Hide Partition Drive from Computer
If there is any sensitive information in the systems, you might want to hide it from the specific users to access it. You can do that from Group Policy settings. But do remember that this setting will only hide it from file explorer and few other apps, but people can still access it from the command prompt.
Anyhow, you can hide it by opening Group Policy > User Configuration > Administrative Templates > Windows Components > Windows Explorer and double-clicking on Hiding these specified drives on My Computer and select the enable option. Once enabled, click on the drop-down menu in the Options panel and select which drives you would like to hide. The drives will be hidden when you will click on OK.
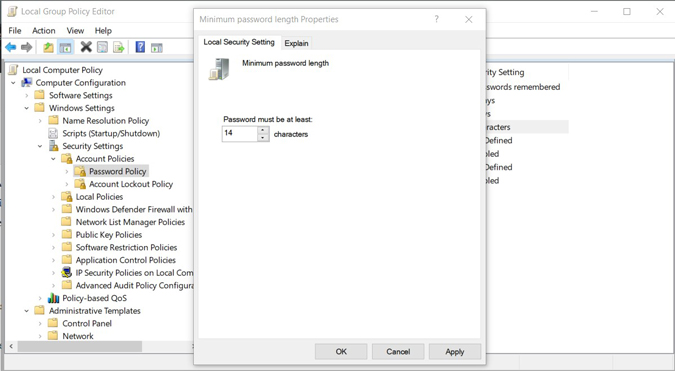
7. Increase the Minimum Password Length
The default Windows Password length is 8 and you need to be using at least one uppercase, lowercase, and number or special character. It is actually well secured. But you can improve security by increasing the password length. You can set it up to 14 along with using uppercase, lowercase, and number or special character.
You can change that by opening Group policy > Computer Configuration > Windows Settings > Security Settings > Account Policies > Password Policy and double-click Minimum password length policy & Specify a value for the length and click on and apply.
8. Track Account Logins
With Group Policy you can force windows to track all successful and failed logins to the PC. You can either set it to a specific computer or a specific user. Anyhow, this will be useful to track the unauthorized persons who is trying to login. You can enable it by opening Group Policy > Computer Configuration > Windows Settings > Security Settings > Local Policies > Audit Policy and double tap on Audit logon events.
Here check the checkbox next to “Success” and “Failure” options. When you will click on ok, Windows will start keeping a record of logins made to the PC.
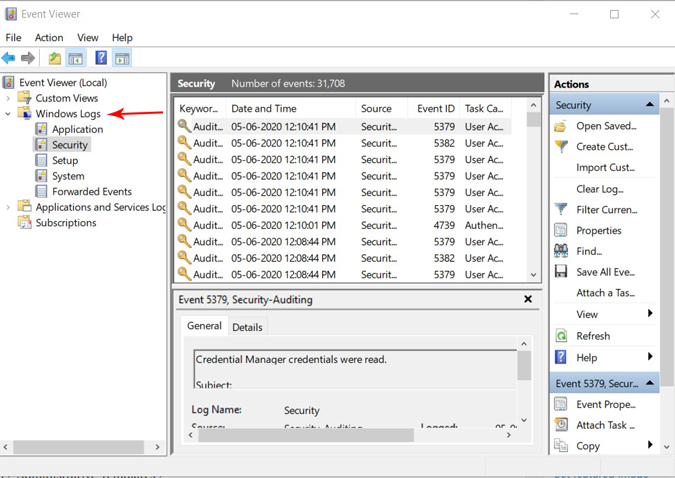
To view those logins, Open Run and enter eventvwr to open Windows Event Viewer. Now expand the Windows Logs and then select the Security option. In the middle panel, you can look at all the login attempts. You can look at the account tried to log-in, date, and also the time. But success and failed attempts are mentions with code.
9. Disable OneDrive
You might like OneDrive or totally hate it. If you or your organization do not use OneDrive or you just want to remove from your PC, you can do with Group Policy. Open Group Policy > Computer Configuration > Administrative Templates > Windows Components > OneDrive and double click Prevent the usage of OneDrive for file storage. Now enable it and click apply. You need to restart the PC for the changes.
10. Keep Group Policy Changes in Control
Anyhow, these changes can be reverted back to normal by using the Group Policy with the same method but setting them back to disable. You can remain in charge of Group Policy by using Group Policy Object Auditing. To keep a continuous track of changes made in Group Policy Objects, try Lepide Change Reporter.
Wrapping up
Once done adjusting the Group Policy settings, You need to move settings to the computer group in Active Directory where you can set the directory for every PC in the domain. You can also set specific Group Policies for only individual users or computers. Now all you need to do is download the Group Policy from Active directory to apply. Any changes to the active directory will automatically apply to the individual systems.