While Microsoft has made lots of efforts to make Start Menu better, there’s still room for improvement. You can customize it according to your preference like making it full screen, disabling Bing, custom live tiles, etc. With that said, here are 15 ways to customize the Start Menu on Windows 10.
Best Start Menu Customizations For Windows 10
1. Remove Tile Groups
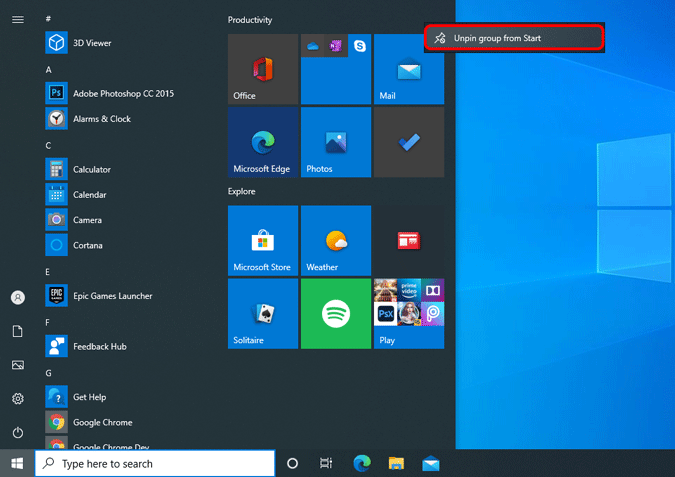
The first thing to do after a fresh Windows 10 install is to remove Microsoft’s “Tile Groups”. These Tile Groups are dynamic and recommend apps based on your usage. I find it slightly unwanted and annoying.
To remove it, head over to the Start Menu. Hover to the right side of the Tile Group name until you see a “=” icon. Right-click on it and select “Unpin group from Start”. You have to do it twice for both the “Productivity” and “Explore” Tile Group.
2. Pin Apps
Now, that we have Microsoft’s Tile groups removed, we can add our own Tile Groups by pinning apps. I usually keep my most-used daily apps and games in the Tiles for quick access. To do that, right-click on any app in the Start Menu and select “Pin to Start”.
You can also use the TileCreator app to manage apps, icon size, and folders in Tile Groups.

Alternatively, you can also search by app name and select “Pin to Start” from the quick options.

3. Resize Tiles
Windows lets you resize the size of app icons in the Tile groups and it’s amazing. For instance, I have the NewsFlow app on Tiles. It’s an RSS reader app and I have the tile size as “Wide”. Hence, every time I open the Start Menu, NewsFlow has a news headline for me. It works like a news bulletin ticker. If I want to read more, I just have to tap on the News and it opens the particular article in the app. Neat!
Apps that support “Live Tiles” have the option to have Wide or Large icons.
Additionally, you can also resize the start menu. Hover on the edges of the Start menu and you’ll have the option to scale up or scale down the Start Menu.
![]()
4. Full Screen
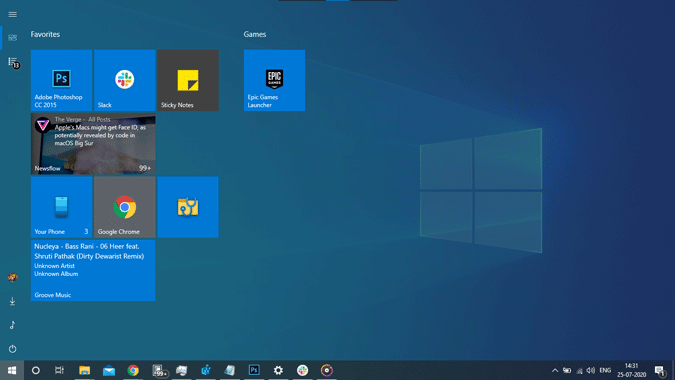
Microsoft also allows you to make the Start Menu full screen. Now, apart from aesthetics, there’s also a functional use to it. The full-screen Start Menu first off displays “Tiles” instead of “All Apps”. So, since we added our own Tile Groups in the previous step, you would see only those in the full-screen Start Menu. This way, your Start menu now only has apps and information as per your need.
To make the Start Menu full screen, head over to the “Start Settings” and turn on the toggle beside “Use Start full screen“.
5. Pin Folders to Start
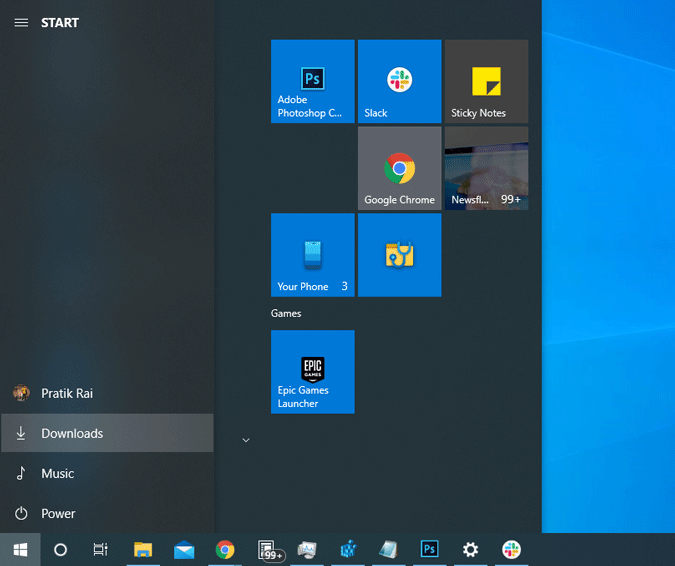
Apart from apps, you can also pin pre-defined folders for quick access on the Start Menu. In order to do that, head over to the Start Menu, and search “Start Settings”. Under Start Settings, navigate to the bottom and select “Choose which folders appear on Start“.

In my case, I have Downloads and Music folder pinned because these are the folders I access a lot. In order to access these pinned folders, hover to the extreme left of the Start Menu and you would find these folders unfurl.
Also Read: How To Get Windows 10X File Explorer on Windows 10
6. Pin Folders to Tiles
In case you want to pin custom folder location to the Start Menu, there’s no option to do that. But, you can pin custom folders to the Tile groups. To do that, open the folder location in File Explorer. Right-click on the folder and select “Pin to Start”. The folder will start appearing in the Live Tiles on the Start Menu.
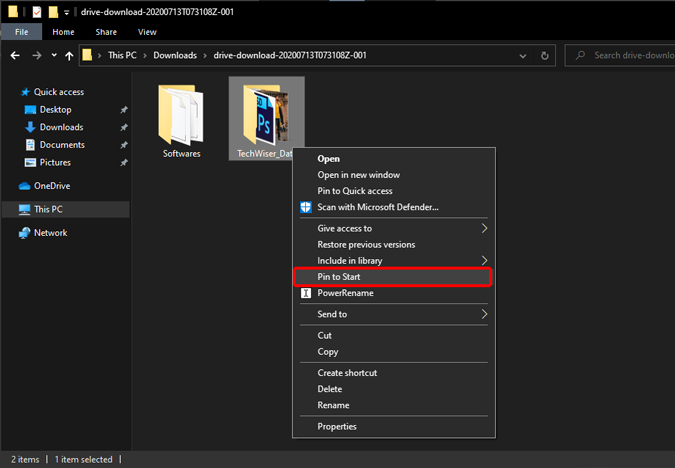
This is how the folder looks on the Start Menu Tiles.

7. Pin Webpages
Apart from apps and folders, you can also pin webpages on the Start Menu. For instance, I use a file-sending web app called Snapdrop quite often. So, I have it pinned on the Tiles group.
In order to pin a website to the Start menu, open the webpage in Edge. Next, click on the three-dots or meatballs menu on the top-right. From the dropdown menu, select “More Tools” and click on “Pin to Taskbar“. This will install the website as an app and pin it on the taskbar as well as Start Menu. In case you don’t want the taskbar shortcut, you can unpin it by right-clicking on it and selecting “Unpin from taskbar”. This does not affect the Start menu pin.
Do note that, these websites will only open in Edge.

This is how the websites look on the Start Menu Tiles.

8. Increase Tile Space
With so many things to put up on Tiles, you would eventually run out of space. Hence, Windows provides you the option to increase the Tile space. To do that, head over to the Start settings and turn on the toggle beside “Show more tiles on Start“.

9. Profile Icon
Windows, now lets you set a picture for your local profile. To do that, head over to the Start Menu and search for “Your account info” and hit Enter. On the Your info page, navigate to the bottom and you will have an option called “Create your Picture“. You can choose to click a photo with your webcam by clicking on “Camera”. In case you have an existing photo in your local folders, upload it by clicking on “Browse for one“.
Once you have uploaded the profile picture, it will show up on the extreme left side of the Start Menu. Moreover, you will also see the icon on the Login screen.
![]()
Also Read: How to Center Taskbar Icons in Windows 10
10. Change Start Menu color
With the profile icon out of the way, Windows also lets you change the Start Menu color. To do that, head over to the Start Menu, search “Choose your accent color”, and hit Enter. Under the Colors menu, navigate to the bottom and check “Start, taskbar, and action center”. You will also have the option to choose a different color or key in your colors’ RGB value.
This will change your bottom taskbar, action center, and Start menu color.

11. Make Start Menu transparent
You can also make the start menu transparent. However, it’s more of translucent than transparent. To do that, within the same Color menu as above, turn on the toggle beside “Transparency effects“. It works best when you have a dark Start menu color and a vibrant wallpaper. For instance, I have a grey accent and a bright macOS Big Sur wallpaper.

12. Replace Bing
The most annoying part of the Start menu is “Bing” suggestions. It irks me and I have redirected it to somewhere useful like – Google. Well, you can do that too.
Head over to the Edge browser and download the Chrometana Pro web extension. This extension will redirect all your bing searches to Google. Note that, this will only redirect your Bing searches to Google. The search results or images that pop-up on the Start menu will be pulled in from Bing itself. Moreover, there’s no way to open the results in Google Chrome.
13. Disable Bing Search
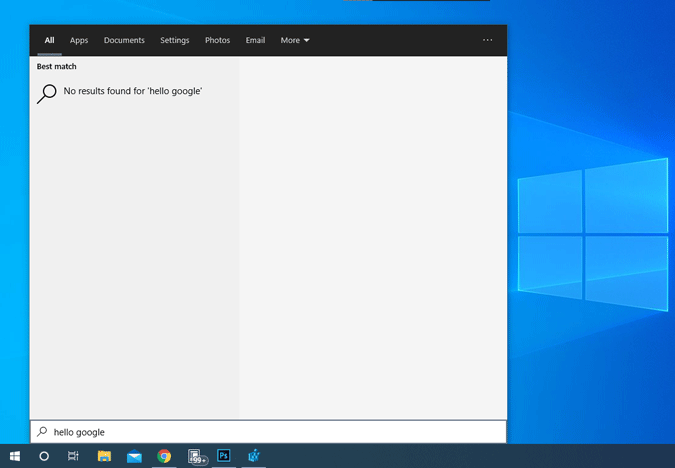
The problem with using the Chrometana Pro extension is that you cannot use Bing in the Edge Chromium browser. The extension will redirect every Bing search to Google whether it’s from the Start Menu or the browser itself. Hence, if you use Bing in the browser, I would recommend disabling the Bing search from the Start menu.
To do that, head over to the Registry Editor. Type the following URL on the search bar.
Computer\HKEY_CURRENT_USER\SOFTWARE\Policies\Microsoft\Windows
Next, right-click on Windows and select New>Key. Rename the folder as “Explorer“. Within the Explorer folder, right-click on the empty space and select New> “DWORD (32-bit) value“. Rename the key to “DisableSearchBoxSuggestions” and change the value to 1.
In case you are guided through the Windows web setup after the restart, just select Skip for now and you should be good for now.
14. Start Menu Alternatives
Finally, you can also replace your Start menu with better third-party alternatives. I would recommend replacing it with Start10 or Classic Shell. Both of them bring in the old-school legacy Windows 7 start menu without web results. The only difference between Start10 and Classic Shell is aesthetics. Start10 uses the Microsoft Design Language (MDL2) and complements other apps.
Download Start10 (30-day trial, $4.99)
Download Classic Shell

15. PowerToys Run
PowerToys is a new experimental tool build by Microsoft. In terms of visuals, it looks more like Spotlight on Mac than the Start menu on Windows. However, it’s quite useful compared to the Start Menu and I would recommend replacing it with Start Menu. It not only lets you search applications but you can also effectively search for files, perform quick math calculations, etc.
Download Microsft PowerToys

Reset Start Menu
At any point in time, if you mess up your Start menu with no point of return, you can easily reset your Start menu. To do that, head over to the Registry Editor and key in the following URL.
Computer\HKEY_CURRENT_USER\SOFTWARE\Microsoft\Windows\CurrentVersion\CloudStore\Store\Cache
Under the cache folder, delete the “Default Key” folder.

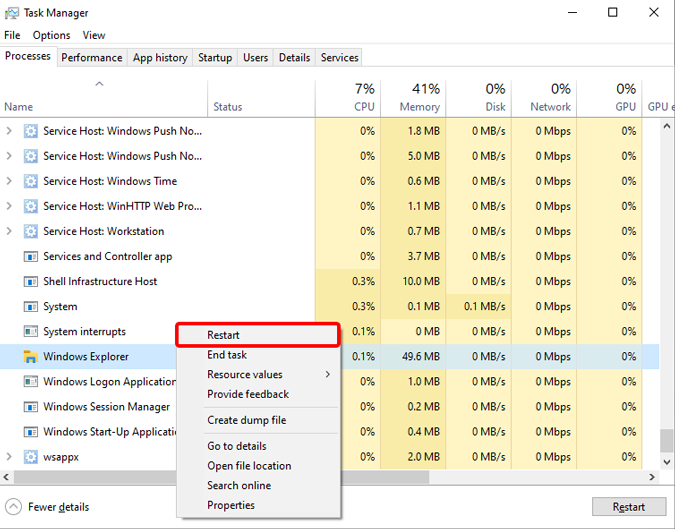
Once you have deleted the folder, head over to the Task Manager and restart the Windows Explorer task to reset the Start menu. This will also reset your File Explorer pinned folders.
For more issues or queries, let me know in the comments below.
Also Read: 3 Ways to Get Picture in Picture on Windows 10