When you type – www.google.com on your web browser, your smartphone asks the DNS server for the corresponding IP address where that site is located and once it has that information, you are able to open Google on your browser. In simple words, the job of DNS servers is to match the domain name (like www.google.comg) with its IP address (like 172.217.24.238).
By default, your ISP automatically assigns a DNS server, when your router or Android connects to the internet; but, you don’t have to use those.
Android does not allow you to change the DNS servers when connected to mobile data. Meaning the following app works only for Wi-Fi connections. Also, Google Chrome browser, overrides the system DNS to use Google’s own DNS servers, which means Adblock DNS servers won’t work on Chrome Browser.
Read: Find Out Who’s Connected to Your WiFi Network
One reason you might want to change the DNS servers assigned by your ISP is if you suspect there’s a problem with the ones you’re using now. An easy way to test for a DNS server issue is by typing a website’s IP address into the browser. If you can reach the website with the IP address, but not the name, then the DNS server is likely having issues. Another reason to change DNS servers is if you’re looking for a better browsing speed, or block malware, pornography or getting American Netflix outsides states.
Now that you are convinced why you need different DNS settings, let’s see how you can change the DNS settings of your Android smartphone.
Table of Contents
How to change Android DNS settings?
There are quite a few DNS changer app available in the PlayStore but I will cover only two because the process is simple and there is not much to do once you understand the basics.
1. Android Native Process
We are so used to searching for apps for everything that we forget, Android is a smartphone OS and comes with a lot of feature built-in. Whether they work as intended and how feature-rich is a different matter altogether.
Let’s see how it works.
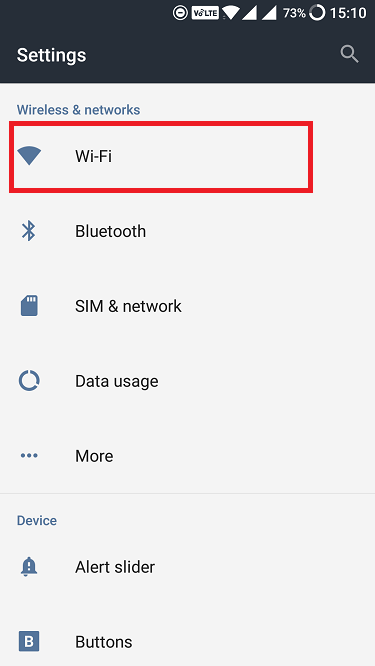
Go to Settings app on your Android phone and tap WiFi.
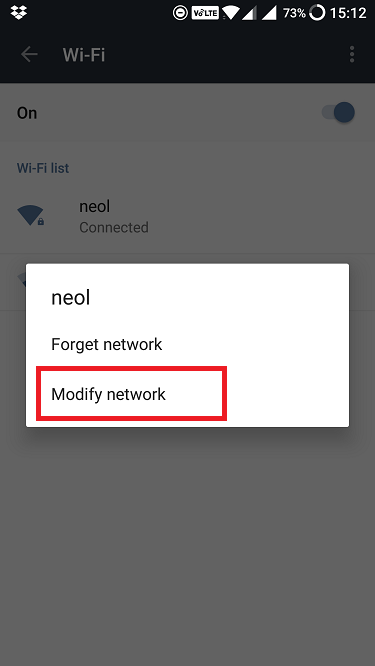
Long press on the Network you are connected to and click Modify Network on the popup screen.
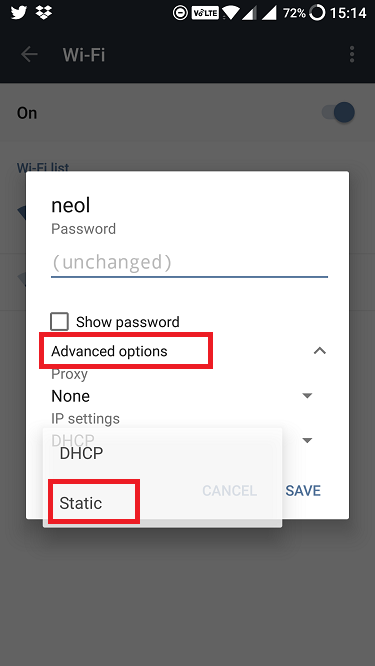
You will notice Advanced options there. Click it to reveal IP Settings where you will switch from DHCP to Static. The allows you to enter your own settings basically.
Scroll a little further and you should now see DNS 1 and DNS 2 options where you can enter your new entries. On my OP2, it was pre-configured to Google’s DNS entries.
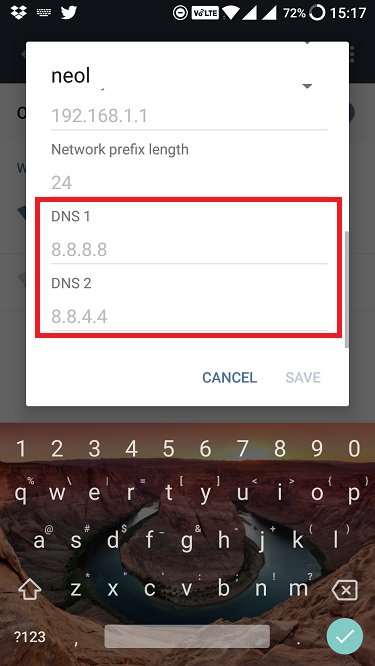
And that’s, you can save changes to successfully update your DNS settings on your Android. However, there is one problem with the above method. Before Android Nougat, you didn’t have to worry about entering your IP address, subnet mask, and all that network details. However, after Android N update, now you have to take care of that too otherwise, the save button will turn gray out meaning you can’t save your DNS settings. This is where third-party DNS changer apps come in.
2. DNS Changer Beta (No Root)
While there is no shortage of DNS changer app in the Play Store, most of them, either don’t work or are filled with ads. DNS Changer Beta, on the other hand, is not only free but comes with no annoying ads.
Apart from the usual features like a list of DNS servers to choose from and the option to stop or start using DNS to browse the Internet, there are some additional features that I liked. You can disable the notification in the notification center. You can remove the icon in the status bar so no one knows any better.
According to their Google Play description, when the app stops working, you get a push notification with an explanation and possible solution. I am yet to see that though.
You can choose to run the app right from the boot and password protect the app. The list of free DNS servers has more options like Verizon and Norton. The latter will help you block sites with adult content too.

Apart from this, the app will also allow you to configure IPv4 and IPv6 settings, and the latter can be disabled if you want. If there is a DNS server setting you want to use but is not available in the list, you can create your own entry.
Here comes the part that I like. The app works with Tasker right out of the box. If you don’t know what Tasker is, I strongly recommend you to check it out. Your phone will run on autopilot and you can thank me later.
There is a whitelist option for apps which you want to use with your default DNS servers. The app is open source and completely safe.If you want, you can also check DNS man which is available on F-Droid for free and works well.
Pro: No Root Required, Easy and Simple to use
Con: Since the app is creating a VPN connection, theoretically, they can monitor all your browsing data. Also, VPN can lead to quick battery drain.
Check out DNS Changer Beta (Free)
3. Override DNS (Root)
Unlike the previous app, this one will need a rooted Android smartphone. If you don’t know how to root it, You can either visit XDA Developer’s forum to learn it or use the above app. The process is complicated and there is always a risk of bricking your phone. Now, with that out of the way, let’s check out Override DNS.
The overall process remains the same where you can either choose from a drop-down menu of pre-configured DNS settings or you can opt to enter your custom values.
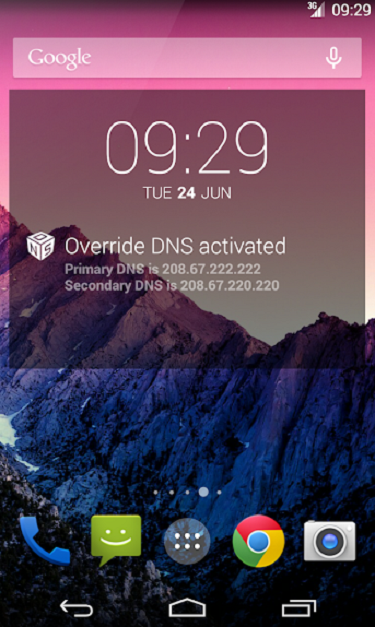
Pro: The reason this app makes the list is that unlike other apps, Override DNS will not create a VPN, instead it changes in the internal network settings, which means less battery drain and better performance. It also assures privacy, since no one sees your Internet traffic. The developer is known to be very responsive so if you have doubts, just connect with him.
Con: The only issue with OverRide DNS is you’ll need a rooted Android device for it to work.
Download Override DNS ($2)
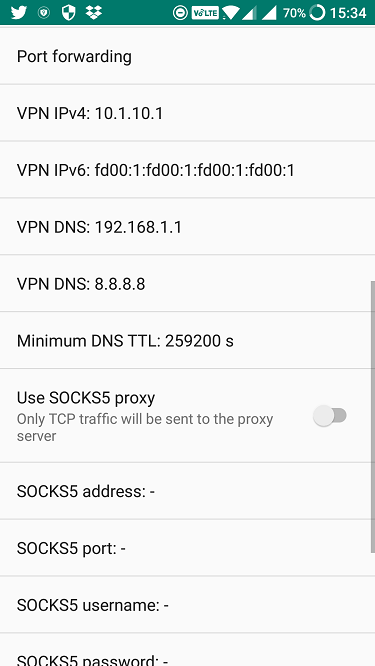
4. Netguard
Netguard is popular name when it comes to blocking internet access on specific apps. But in this article, I am not talking about the Netguard version that is available on the Play Store, instead, the one that many of you are using to block ads. The app is free to use and available on Github which you will have to sideload if you are not using it already.
Apart from protecting you from unwanted ads on an app level basis and offering robust firewall features, you can also use Netguard to change your DNS settings.
Open the app and go to Settings, Advanced Options. This is where you will find options to change DNS, subnet mask, and manage all your Internet traffic the way you want.
Pro: If you are already using Netgard to block internet access to certain apps, then it makes sense to use it as a DNS changer.
Con: Since DNS changer is not their advertised featured, the interface is not very intuitive like the other apps in the list.
Download Netguard (Free)
5. DNS Manager (with DNSCrypt)
This app, as the name suggests, comes with DNSCrypt built inside. Cool, so what does it do and why do I care? The job of DNSCrypt is to mask your DNS queries so no one knows what you are doing on your smartphone, the way it was always supposed to be, but isn’t.
The app has a free version which is buggy and may or not work depending on your model and OS version, and how lucky you are! The pro version, available for $1.99, works well.
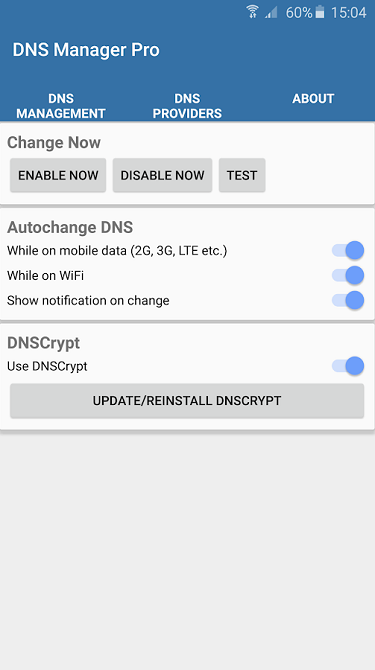
The UI of the app is rather too simple but as long as it works as advertised, it is fine by me. The pro version is ad-free and comes with all the features that we saw in other DNS apps above.
Download DNS Manager (with DNSCrypt) ($1.99)
How to tell if you have successfully change DNS servers?
Just like your computer’s MAC address, the DNS servers don’t go beyond the router. So there is no way for you to check your DNS servers using an online website like you do with your IP address. However, there are still few things you can do.
First of all, make sure you flush your DNS cache for the effect to take place – on Android you can do so by simply restarting the device. Next, download the free PingTools app from Google Play store and look for DNS section inside it.
If you are using OpenDNS as your DNS resolver, then simply go to http://welcome.opendns.com. If you have done configuration right, you’ll see “Welcome to OpenDNS!” and if not, then you’ll get an ‘Opps’ page.
Wrapping Up: DNS Changer Apps
I like DNS Changer Beta more because it offers a lot more control over my DNS settings and how I surf the web. The whitelist option is handy because I don’t want all apps to use it. I also use some regional apps.
I Netguard because it allows me to manage both my DNS settings and protects me from unwanted ads. I don’t have to use 2 separate apps now.
If you have a rooted Android phone, Override DNS is a good option. It offers privacy and better performance over other apps.
Even if you are satisfied with your ISP’s default DNS settings, I would recommend you to try this once and see how it goes. Chances are, you are going to see some kind of improvement. Let me know your thoughts in the comments below.
The new Cloudflare app, enable the Cloudflare DNS (1.1.1.1) in a single click.