iPhone’s default font size is excellent and readable for an average user. But if you or someone you know have problems with eyesight, it might feel too small. In that case, increasing font size on iPhone can be really helpful to you and your eyes. Allow me to show you the easiest way to change the text/font size on an iPhone. Let’s begin.
Table of Contents
Method – 1: Increase or Decrease Text Size
There are two ways to change the font size on an iPhone. Let’s take a look at the first method to do so. Here are the simple steps to follow.
1. Open the Settings app on your iPhone.
2. Scroll down and tap on Display & Brightness.
3. Now tap on Text Size.

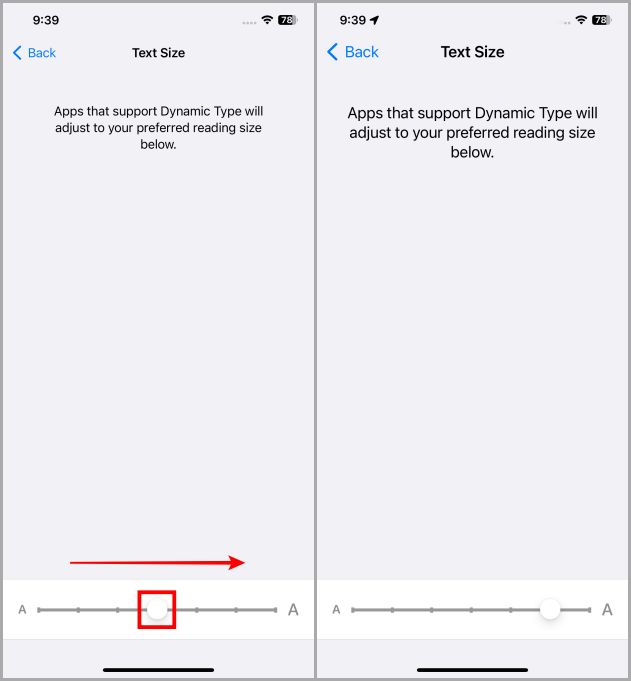
4. Drag the slider towards the right to increase the text size and towards the left if you want to decrease it. That’s it, now the text size of your whole iPhone will be adjusted.

Also Read: How to Change Font in Instagram Bio
Method – 2: Get Even More Bigger Text
If the maximum size from the first method is still small for you, try accessibility options to further increase the text size on your iPhone. Let’s take a look at the steps to do so.
1. Open the Settings app on your iPhone.
2. Scroll down and tap on Accessibility.
3. Now tap on Display & Text Size.

4. Tap on Larger Text to proceed further.
5. Enable the toggle named Larger Accessibility Sizes. This will unlock some more sizes for the text on your iPhone. And now drag the slider towards the right to further increase the text size on your iPhone.

The size of the font has been increased. But if you are still struggling to read your screen, I would suggest you bold the text on your iPhone to make it clear and visible to your eyes. Here are the steps to do so.
(Optional Steps)
6. Tap on Back to go back.
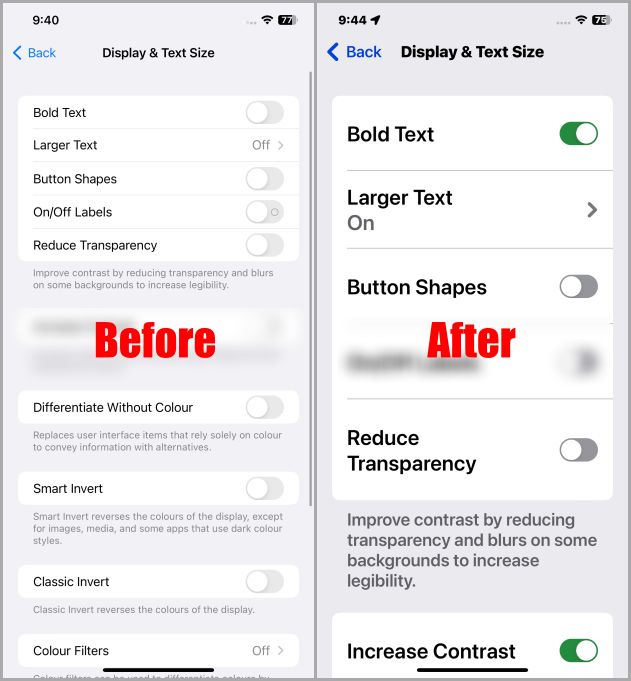
7. Now enable the toggle named Bold Text. It should help you with some extra visibility. Plus you can also enable the toggle called Increase Contrast to increase the contrast of your iPhone screen.

Here is a sample of the before and after of an iPhone screen, after doing the above-mentioned customizations.

Pro Tip: How to Change Fonts in WhatsApp Chats
Bonus Tip: Change Text Size of a Particular App
If you are having a problem with the text size of one particular app on your iPhone, then iOS also allows you to change the text size of that app specifically. It is kind of buried deep in iOS. Here are the simple steps to follow.
Note: Not every app supports changing the text size by using this method, but most of the apps will support it.
1. Open the Settings app on your iPhone.
2. Tap on Control Center.
3. Scroll down and tap on + next to Text Size.
Note: If you already have “Text Size” in Control Center, ignore this step and follow the next.

4. Now open the app in which you want to increase the font size. For example, I want to increase the font size in iMessage on my iPhone.
5. Now swipe down from the top right side of the screen to access the Control Centre while keeping the iMessage open.

6. Tap on the Text Size shortcut.
7. Tap on Messages Only (or the app you have opened).

8. Now swipe up on the slider to increase the text size in that particular app.
9. Tap anywhere on the screen to close the Text Size slider and go back to the Control Centre. Now when you go to iMessage (or the app that you’ve opened while doing this), you’ll find the text size changed inside that app.

Here is a before and after of the iMessage after changing the text size by using the above-mentioned steps.

Change Text Size on iPhone
Text size is a small thing yet it can affect your user experience a lot while interacting with your phone. So having the perfect text size is really helpful. Go ahead and customize the text size on your iPhone according to your eyesight. I hope this article helped you in getting well-visible texts on your iPhone.
Do you use Notion? If so, here is how you can easily change fonts and colors in Notion.