There are times when your Android phone starts behaving weirdly with the Internet. The phone is connected to Wi-Fi but has no internet access. And on top of that, that dreaded “Connected but no Internet Access” message is just vague. There are a number of reasons that can lead up to this issue. Here are some things you can try if your Android device is connected to Wi-Fi but has no internet.
Table of Contents
1. Restart Phone and Router
If you are wondering, “Why is Wi-Fi not working on my Android phone but working on other devices?”, begin the troubleshooting process by restarting your Android phone. You should also restart your Wi-Fi router. For that, simply unplug it for 30 seconds and then plug it in again. Know why turning off and on works in devices.
2. Test the Internet on Other Devices
I know this sounds stupid. But trust me, I’ve been there and done that. More often than not, you might be facing the Android connected to Wi-Fi but no internet issue because your router is not connected to the internet. So, try to connect to that router wirelessly using another device and see if you can access the internet.
If the other devices connected to your WiFi network are also not able to access the Internet, then chances are either your ISP is down (you can confirm this by calling your ISP), or someone has accidentally cut the broadband cable coming to your house (you can confirm this by asking your neighbors who share the same connection) or you have simply exhausted your monthly data plan.
Most ISPs have an unlimited data plan, however, there are few internet providers that cap data usage after a certain threshold. To fix this, you simply have to recharge your internet plan. Once you’ve done that, reboot your device and try to connect to the Wi-Fi network again.
Another scenario is that at times some websites don’t work on a particular WiFi network. For instance, in our office WiFi, all torrent websites are blocked. So, if that’s the case, try opening a bunch of different websites.
If you are able to access the Internet on all the other devices except your Android smartphone, then obviously, there’s something wrong with your Android. Moving forward we’ll try to fix the internet issue on your Android smartphone.
Also read: Learn how to test your internet speed.
3. Check Time and Date Settings
This is another thing that looks silly but ill-configured time and date settings can cause a lot of internet problems on Android phones. Generally, Android devices are configured to obtain date & time information automatically from your network operator. However, if you’ve changed those settings manually then you might have to change the settings. Because when the date & time settings are set to manual, the clock may not be updated due to a restart.
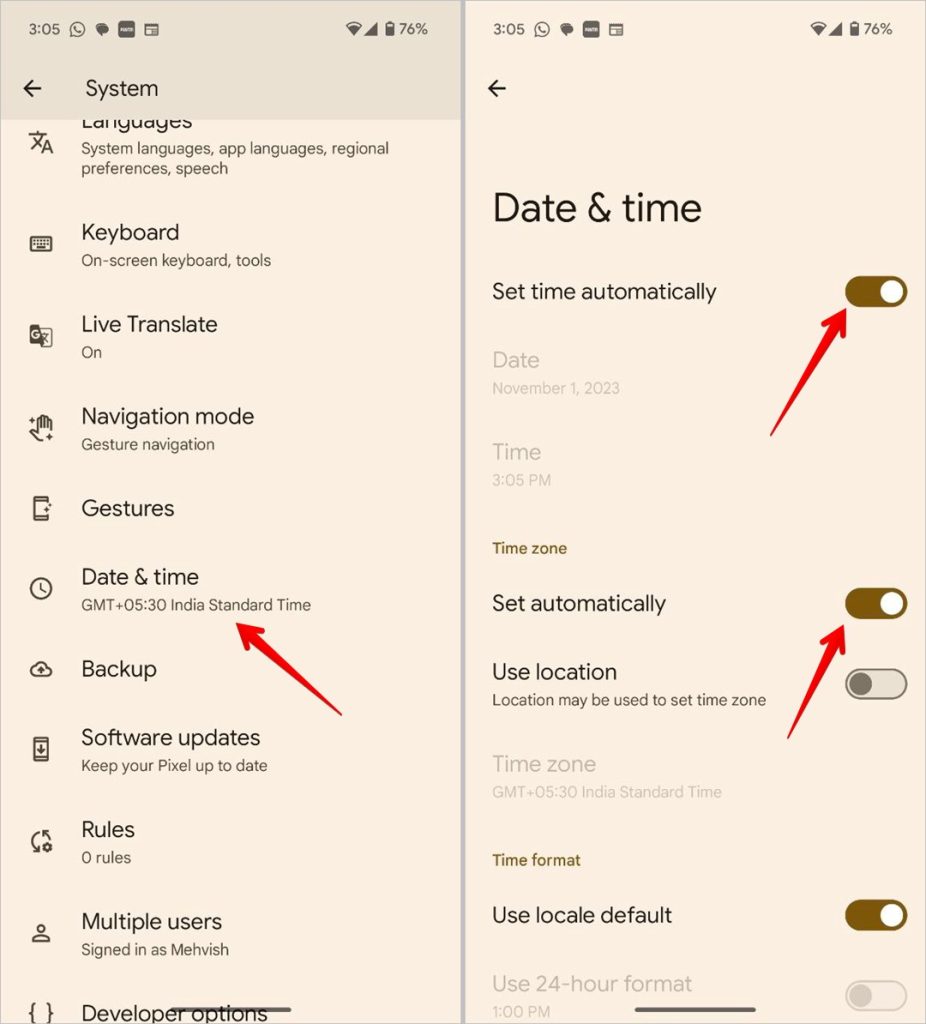
To set up an Automatic date & time, go to Settings > System > Date & time. On the next screen, enable the toggle next to Set time automatically and Set automatically for time zone. Once you’ve done that, reboot your device and try to connect to the WiFi network again.
Tip: On Samsung Galaxy phones, go to Settings > General Management > Date and time.
4. Check for That One Extra Step on Public Wi-Fi
You can skip this step if you are connecting to a home WiFi network. However, some WiFi networks (especially in offices, airports, or coffee shops) have a special kind of Wi-Fi network called “Captive Portals”.
When you connect to this type of WiFi network, even after entering the correct WiFi password – you have to complete one extra step before accessing the internet. This one extra step could be anything from signing in with your email or phone number, watching ads, or agreeing to the network’s terms of usage.
To find out if you are connecting to Captive Portal WiFi, you will notice your device will display a notification prompting you to sign in. If you don’t get the sign-in notification for the first time, you can disconnect and reconnect to the network. It should work. Tap the notification and follow the instructions on the web page. Complete the required task or contact the network administrator for the login credentials.
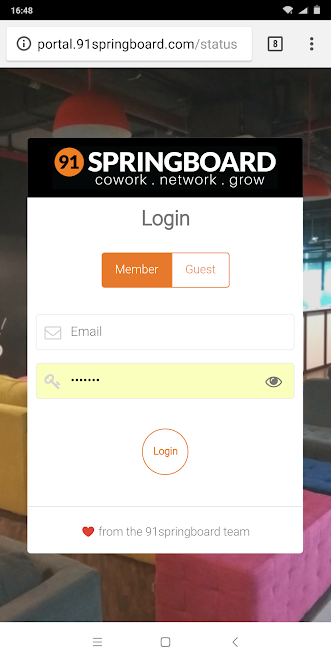
For example, our office WiFi network requires users to log in with an official username and password to access the internet. See, the screenshot below. This login session is only valid for 24 hours and then you have to repeat the process.
5. Forget and Reconnect to the WiFi Network
Sometimes, forgetting the problematic network and reconnecting might fix the internet issue. When you reconnect the WiFi network, you might be provided with a new local IP address which might actually fix the issue. Please note that forgetting Wi-Fi network will remove the Wi-Fi password. Make sure you know the password before resetting it.
To do that, open your Android Settings and go to Network & internet > Internet . Tap on the WiFi network and select the option Forget. On Samsung Galaxy phones, go to Settings > Connections > Wi-Fi and tap on your Wi-Fi followed by Forget.
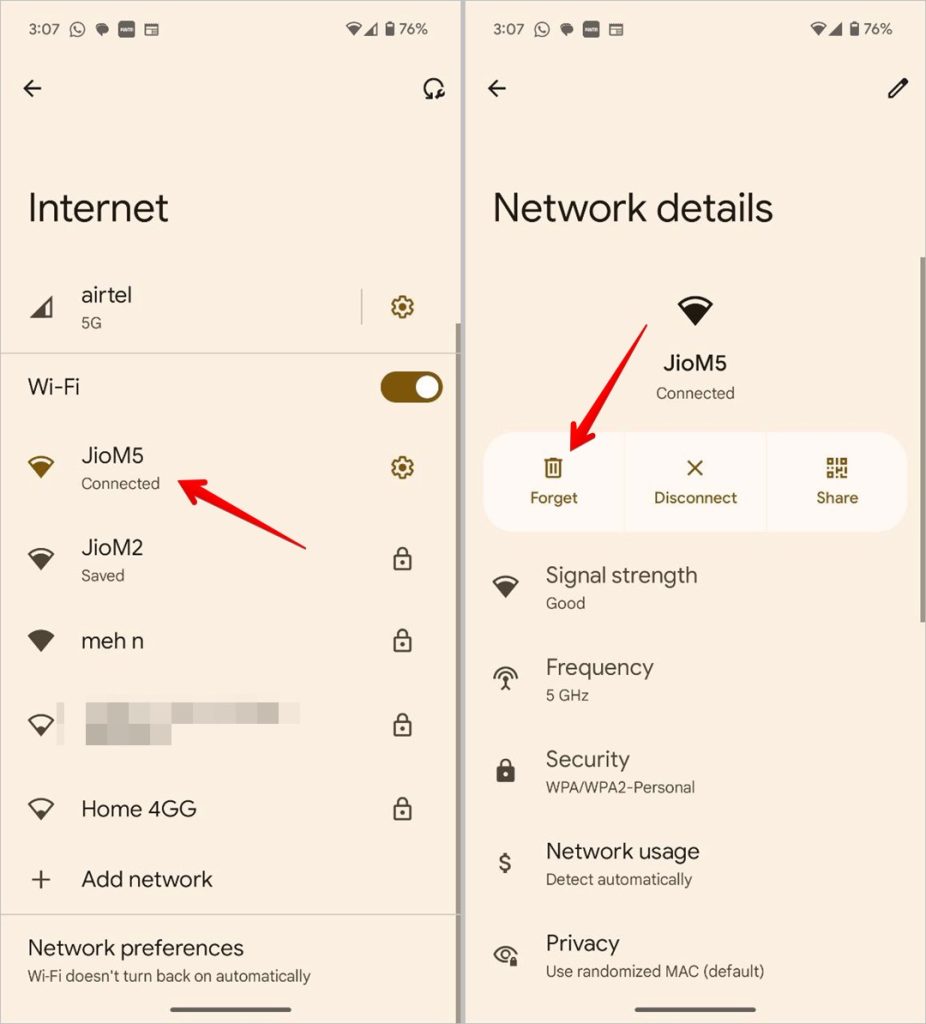
Now, tap on the WiFi network again, enter the password, and tap on the Connect button. That is it. If the issue is still not fixed, proceed to the next solution.
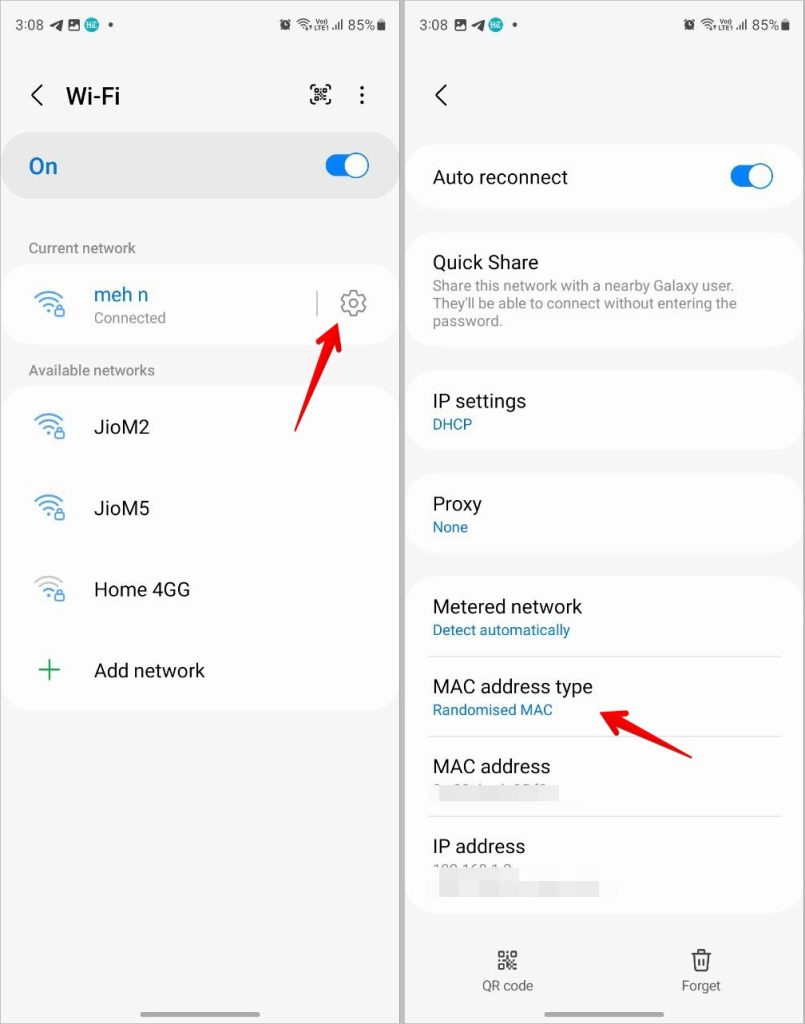
6. Disable Mac Randomization
This fix is particularly helpful if your Wi-Fi is showing no internet on a Samsung Galaxy phone. You just need to switch from a Randomized Mac address to phone address.
Go to Settings > Connections > Wi-Fi. Tap on the Settings icon next to your Wi-Fi network. Select the Mac address type and choose Phone Mac.
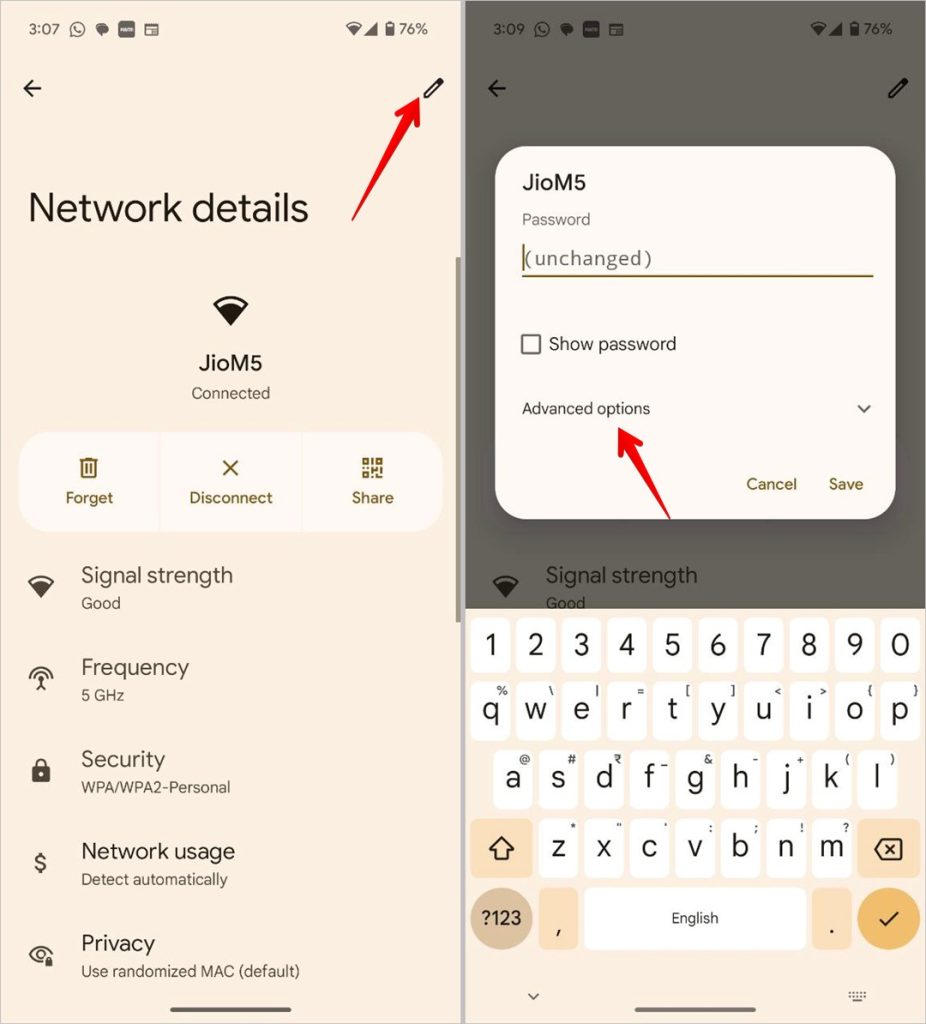
7. Change Your DNS
Check if you are able to access websites from their IP Address instead. If you can, then chances are there is a problem with your ISP’s domain name server. Simply switching to Google DNS (8.8.8.8; 8.8.4.4) will fix the issue.
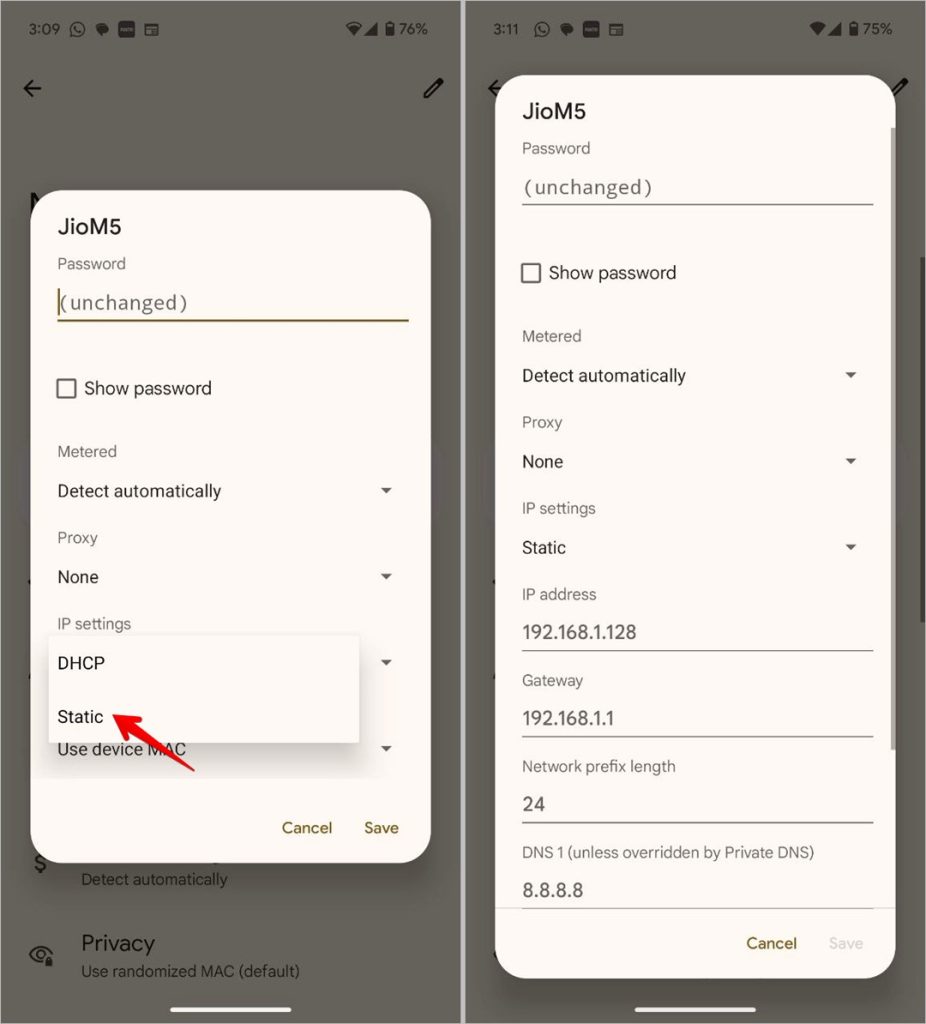
We have a detailed guide on how to change the DNS on all your popular devices, but for Android, simply go to your WiFi settings, and tap on the Settings icon next to your Wi-Fi network. Tap on the Pencil (Edit) icon at the top followed by Advanced options.
Select Static under IP Settings options and enter 8.8.8.8 and 8.8.4.4 (or 208.67.222.222 and 208.67.220.220) in DNS 1 and 2 respectively. Save changes and that’s it.
8. Check Wi-Fi Name
Many Android phones are unable to connect to the internet even though they are connected to Wi-Fi due to name conflict issues with the Wi-Fi network. Ensure there are no random characters in your Wi-Fi network’s name. Also, check if you have 2.4Ghz and 5Ghz Wi-Fi network, they should have different names. Change the Wi-Fi name from the router website or app.
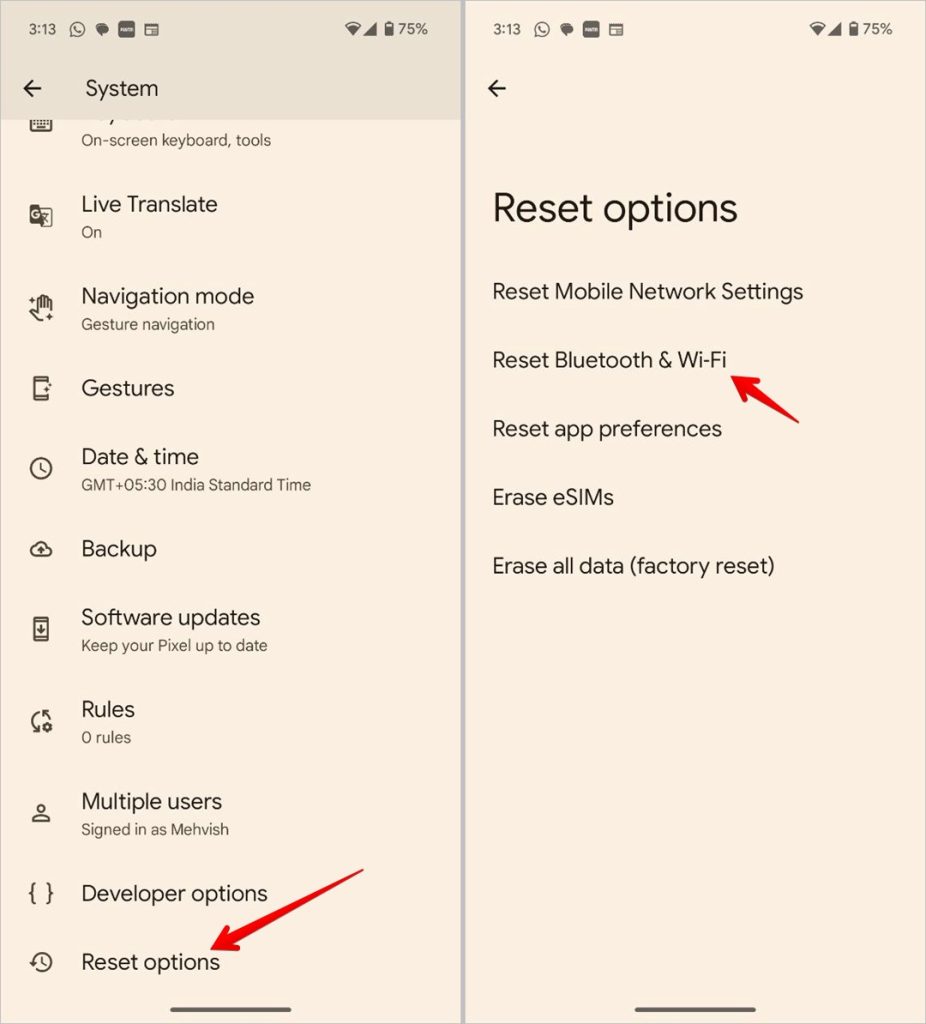
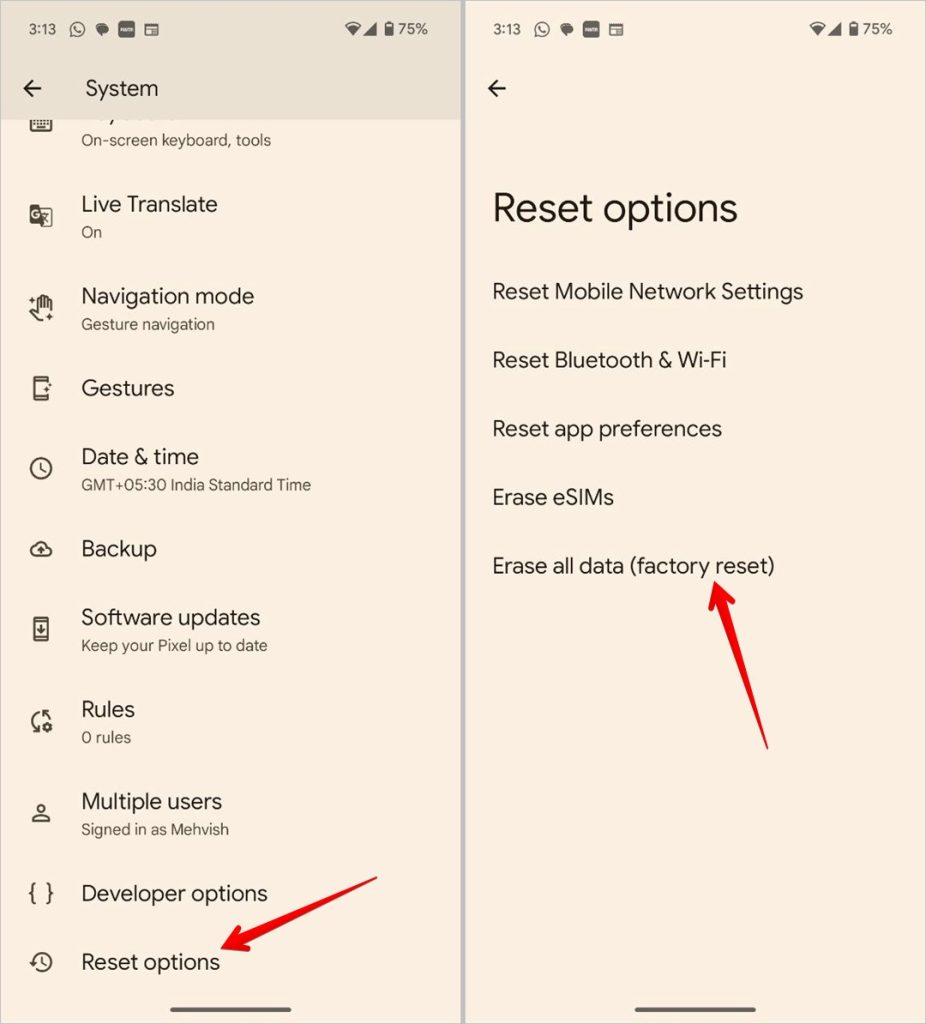
9. Reset Android Network Settings
If all the above tips didn’t solve the Android connected to Wi-Fi but no internet issue, then it is time to reset Android network settings. Doing so will restore all the network settings to their original values and you will have to set them again.
Go to Settings > System > Reset options > Reset Bluetooth & Wi-Fi. On Samsung Galaxy phones, go to Settings > General Management > Reset > Reset network settings. After resetting, try to connect to the WiFi network and see if it fixes the issues.
10. Check If Router is Blocking Network Traffic
It is possible that the WiFi router you are trying to connect to might be blocking your Android device from connecting to the internet. For example, someone may have accidentally exploited your router’s MAC address filter and blocked your Android. If that’s the case then you won’t know it, unless you look at the WiFi router’s admin page and unblock yourself.
The router admin page differs from manufacturer to manufacturer and model to model. So, consult your router manual, go to the appropriate settings page and see if the router is blocking your device. Some routers have the IP address of the portal, username, and password written on the back of the device. We have a detailed guide here, that will help you to log in to your router.
In my case, I have a D-Link router. I can check if my device is blocked or not by navigating to the “Advanced” tab and selecting the “Traffic Control” option. For other routers, look for options such as the MAC Address Filtering menu. If your Android phone is on the list of blocked devices, click Remove or Allow to restore internet access.
Tip: Know how to see what others are browsing on Wi-Fi.
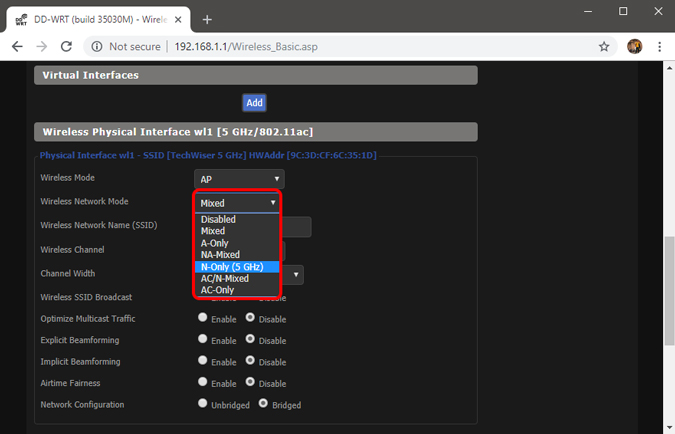
11. Change the Wireless Mode on the Router
This is an exceptional case and happens only if you have an old Wi-Fi card or device. If you are getting Internet access on other devices, then chances are there is a communication barrier between your Android and router.
There are several Wireless modes on a router. For instance, you might have seen something like 802.11 b, 802.11 b/g or 802.11 b/g/n, etc. These b, g, n, and ac are different Wireless standards. B is the oldest WiFi standard which covers less area and gives less speed while ac is the latest with wider coverage and better network speed. Consider them like USB 1.0, 2.0, and 3.0 standard; where the latest is fastest and backward compatible.
Now usually the Wireless mode is set to 802.11 b/g/n/ and it works fine for most people. But sometimes the old devices (especially old smartphones) are not compatible with this mode and thus show network issues.
One way to fix that is — from your computer, log in to your router dashboard and look for the option that says – Wireless Mode. Usually, it’s under the Wireless settings where you set WiFi SSID and password. Next, to the Wireless mode, you’ll see a drop-down menu, click on that and select 802.11 b and save changes. Now restart the WiFi on the devices that had the WiFi issues and see if this fixes the problem. If this doesn’t work, then try 802.11 g. If you still find no luck then see the next solution.
12. Turn off Mobile Data
At times, when you have mobile data turned on and then connect to a WiFi network, you might not be able to access the internet. So, try disabling mobile data to fix the issue.
Now, you might be thinking Android is too smart for this. But occasionally, when you connect to a WiFi network, Android will prioritize WiFi over mobile data. However, some networks require users to log in before they can access the internet. Even after logging in, Android might not see it as an active connection and still use mobile data. Under such circumstances, Android might be unable to connect to the internet on both networks.
Tip: Learn how to clear data usage on Android.
13. Reset WiFi Router
The next step to fix the issue of Android connected to Wi-Fi but no internet is to reset the router. Again, depending on the router’s manufacturer, the reset option might be located either on the Maintenance page or the Advanced options page. Alternatively, you can also do a hard reset by pressing the hardware reset button located on the back of the router.
Do keep in mind that resetting the router will remove all the settings and ISP IP address configurations. So, note down the credentials and backup the necessary information beforehand so that you can configure the router once you are done with the reset.
14. Factory Reset Android Phone
Eventually, if nothing else works then you should bring the hammer down and factory reset your Android device. To do a factory reset, open the Settings app, and navigate to Reset options present under System or General Management (Samsung) Finally, tap on Factory data reset.
On the confirmation page, tap on the Reset Phone button to factory reset the Android device. The resetting process may take some time to complete. So, make sure that your device is fully charged or at least has over 70% battery before doing the factory reset.
Fix the Internet
Those were some of the best troubleshooting methods to fix Android connected to Wi-Fi but not internet issue. If you find some other workaround, do let us know. Before you go, know how to fix the same issue on your PC.