“Why can’t I install iOS 17?” Is that the question that brought you here? Or, are you getting error messages like “Unable to install”, “Unable to check for update”, “Unable to verify update”, or “Preparing to update” while trying to install iOS 17 on your iPhone? You aren’t alone. Many other iPhone users are unable to install iOS 17. There could be several reasons for that like low storage, compatibility issues, internet problems, and others. Let’s check how to fix iOS 17 not installing or updating on iPhone.
Table of Contents
1. Check iPhone Compatibility
Every year Apple drops support for older iPhones. Devices older than iPhone X are the victims of iOS 17. So if you have an older iPhone, you will not get iOS 17. Here’s the list of iPhones on which you can install iOS 17:
- iPhone 15/ 15 Plus/ 15 Pro / 15 Pro Max
- iPhone 14 / 14 Plus / 14 Pro / 14 Pro Max
- iPhone 13 / 13 mini / 13 Pro / 13 Pro Max
- iPhone SE (2nd generation, 3rd generation)
- iPhone 12 / 12 mini / 12 Pro / 12 Pro Max
- iPhone 11 / 11 Pro / 11 Pro Max
- iPhone XS / XS Max
- iPhone XR
Tip: Check out the best hidden features of iOS 17.
2. Look at the Right Place
For several iPhone updates, Apple allows users to stay on the existing iOS. Therefore, you might see the latest version of iOS 16 instead of iOS 17 on your screen while downloading the new update. You may wonder, “Why am I not getting iOS 17?”. The thing is you must look just below the iOS 16 section under Settings > General > Software update and you will find the Upgrade to iOS 17 button, just as you can see in the screenshot for iOS 16.

3. Restart iPhone
If your iPhone supports iOS 17 and you are unable to install it, simply restart the iPhone once. Often, the error messages will go away when you restart the phone.
To restart your iPhone, long press the Power button until you see the Power off slider. Drag the slider to the right to turn off your iPhone. Then, turn on the iPhone again using the Power button.
4. Put Device in Airplane Mode
If restarting the iPhone seems like a big task, you can try putting the device in Airplane mode. Doing so will turn off most of the network connections on your phone, thus fixing any temporary network issue that could be causing problems while installing iOS 17.
To enable Airplane mode on your iPhone, open Settings and enable the toggle next to Airplane mode. Wait for a minute. Then, turn off the Airplane mode by disabling the same toggle.

5. Charge Your iPhone
Your iPhone should have at least 50% battery in order to install iOS 17. Therefore, if your iPhone is low on battery power (less than 50%), you must charge it first and then try installing the update.
6. Check Wi-Fi
If you get an error like “Unable to verify update” or ‘ This update requires a Wi-Fi connection to download’ while installing iOS 17 or iPadOS 17, you should check the Wi-Fi connection. This error mostly occurs due to an issue with the internet connection.
To fix it, you can try the following tips:
- Restart your Wi-Fi modem.
- Try installing iOS 17 using a different Wi-Fi connection, if available.
- Turn off Wi-Fi and install the update using mobile data.
- Switch from 5Ghz Wi-Fi network to 2.4Ghz or vice versa.
Tip: Know how to set up contact posters on iPhone in iOS 17.
7. Check Date and Time
Sometimes, a mismatch in the date and time on your iPhone and the Apple servers can also cause problems while installing iOS 17. To fix it, go to Settings > General > Date and time. Enable the toggle next to Set automatically.


Tip: Know how to put a picture on another picture on iPhone.
8. Free up Storage
Your iPhone must have at least 1-2GB of free space in order the download the latest version of iOS without any issue. You must check the storage on your iPhone by going to Settings > General > iPhone storage. If the storage is full, know how to free up storage on iPhone.


9. Turn off Hotspot
If you are using a hotspot to install iOS 17, I would advise you to turn it off and instead use a regular Wi-Fi connection to download iOS 17. Hopefully, that should fix the issue of iOS 17 not installing on iPhone.
10. Turn off VPN
Furthermore, you should also disable any VPN service that is active on your iPhone while installing iOS 17. It can be a third-party VPN app or native service that can be deactivated by going to Settings > General > VPN.
11. Turn off Low Power Mode
The Low power mode is a feature that helps in saving battery power by turning off some functions of your iPhone. Low power mode can also be responsible for iOS 17 not installing issues. To fix it, you simply have to turn off the Low power mode. For that, go to Settings > Battery. Turn off the toggle for Low power mode.


Tip: When Low power mode is enabled, the battery icon in the status bar will turn yellow.
12. Remove SIM Card
Over the years, one odd thing that seems to fix the issue of iOS updates not installing is to re-insert the SIM card. Basically, first, remove the SIM card from your iPhone and then put it back.
13. Turn off Content and Privacy Restrictions
Some users suggest that turning off Content and privacy restrictions helped them in fixing the iOS 17 not installing issue.
Go to Settings > Screen Time > Content & privacy restrictions. Turn off the toggle next to Content & privacy restrictions.


14. Redownload Software Update
Often, iOS update doesn’t download properly and that’s why you cannot install it on your iPhone. To fix this issue, simply delete the current download and redownload the software update.
Go to Settings > General > iPhone storage. Scroll down and tap on iOS X, where X is the version number. Press the Delete update button.
Restart your iPhone after deleting the update. Then, download and install the update again from Settings > General > Software update. Hopefully, you will now be able to install iOS 17 on your iPhone without any issue.
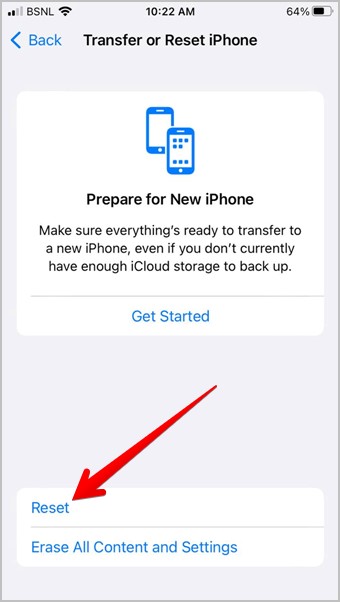
15. Reset Network Settings
Next, you must try resetting the network settings on your iPhone to fix the issue of iOS 17 not installing on your iPhone. Doing so will reset network settings like Wi-Fi to default values, thus fixing any issue that could be hampering the installation of the iOS update.
Go to Settings > General > Transfer and Reset > Reset > Reset network settings.

16. Install Update Using Computer
If you still cannot install iOS 17 on your iPhone, you should try installing it using iTunes on your computer as shown below, or using the Finder app on macOS.
1. Connect your iPhone to your computer.
2. Open iTunes and click on your device icon at the top.

3. Click on Summary > Check for update.

4. Then, click on Download and update button if an update is available.
Have Fun With iOS 17
I hope you were able to install iOS 17 after following the above fixes. One of the interesting features that iOS brings is the ability to use live stickers on your iPhone. Also, know how to use standby mode on iPhone in iOS 17.