Recently, I faced this issue with my Chromebook where it easily connected to the Wi-Fi but I was unable to access the internet. After 15-20 minutes of troubleshooting, I was finally able to solve the problem. If you are in a similar situation, here’s everything you can try to fix Chromebook connected to Wi-Fi but with no internet connection error.
Table of Contents
Chromebook Connected to Wi-Fi but No Internet
To proceed, first, check whether the problem lies with your Chromebook or the router. You can do that by connecting another device to the same Wi-Fi network. If other devices connected to the same Wi-Fi can’t access the internet either, then the problem is with your router. If there aren’t any issues with other devices, then the problem is with your Chromebook. Once you know that, the troubleshooting process will become easier and faster.
If the Problem Is With Your Router
As a primary step, turn off your router for thirty seconds and then turn it back on. A reboot can solve the problem most of the time. If it doesn’t, follow the steps below.
1. Check Whether Your Router Is Connected to Internet
In most scenarios when you have a problem with the router, the router itself may not be connected to the internet. You can confirm this by looking at the WAN light on your router. Make sure the WAN light is blinking and not constantly on or off (few routers show a green light as a sign of internet access).
If it isn’t blinking, then chances are you have a loose or broken broadband cable connection, your ISP may be down, or you may have capped your monthly data plan. In any case, your router itself cannot access the internet. Contact the customer care of the ISP to solve the issue.
2. Your ISP May Be Down
Sometimes, the problem may not be with your router but with your service provider. Visit the Downdetecter website and search for your ISP to check whether their service is down in your location. If many users are reporting that the service is down, then all you can do is wait until it is restored. You can also contact the ISP for more details about the problem.
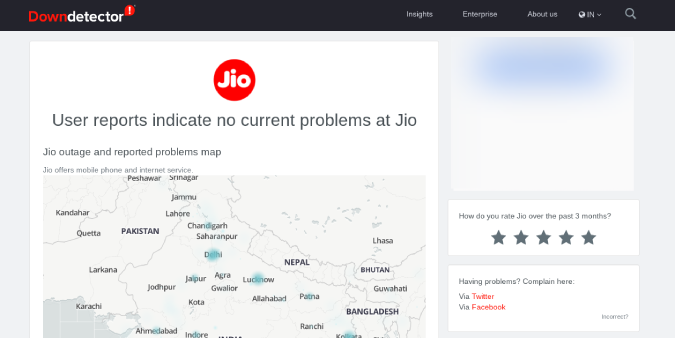
If users around where you live are not reporting any issues then the problem could be on your end.
3. Check for Captive Portals
Some Wi-Fi connections are protected with captive portals. It is an extra layer of sign-in step required to access the internet even after you have connected to the Wi-Fi network.
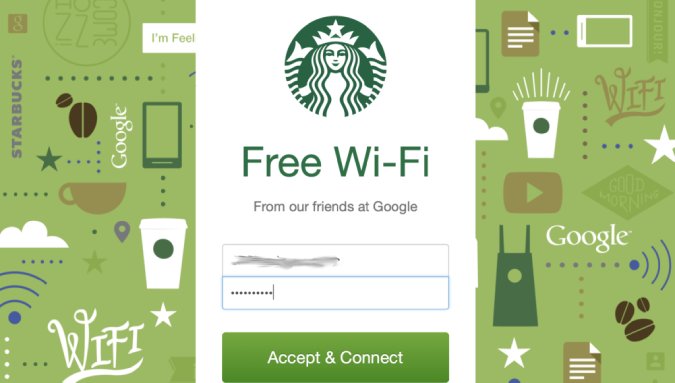
Chrome OS detects and notifies you about these captive portals when you are connected to the Wi-Fi (if there is one). If you don’t receive such notifications, try reconnecting to the Wi-Fi or forget the network and connect again.
To do that, open Settings > Wi-Fi and select the Wi-Fi network that you want to connect to and click on Forget.
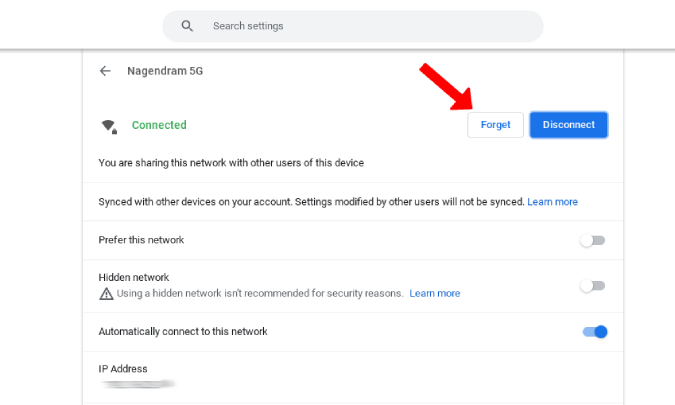
Now you can connect to the same Wi-Fi. This should notify you about the captive portal if the network supports it. You can also try Chrome connectivity diagnosis Chrome extension to check whether the Wi-Fi you are connected to has a captive portal or not.
4. Update Your Router’s Firware
Some ISPs do a bad job at updating the firmware of their routers. If your router is few years old, there is a good chance that the firmware on your router is old and can have security issues along with a buggy experience like this. You can update the firmware to the latest version to fix and prevent such issues from occurring in the future.
Open router settings. You can do a quick Google search for the default IP address, username, and password of your ISP. Enter the IP address in Chrome which will open your router settings and use the username and password to log in.

Once you are in the dashboard, check for the firmware option. Now you can download the firmware image from your router manufacturer’s website and update it.
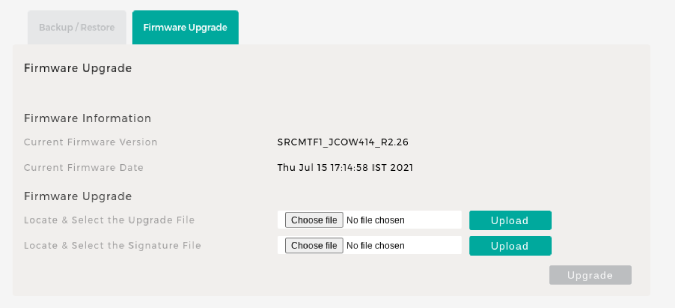
Also, it is recommended to update the router firmware every once in a while.
5. Enable Both 2.4GHz and 5GHz Network
Sometimes, Chrome will not load a website when it takes a lot of time to load. Instead, it will show This site can’t be reached page. A slow internet connection is to be blamed here. But sometimes, the network can be slow because it is connected to a 2.4GHz network.
For starters, 5GHz connection is faster but the range is lower, whereas 2.4GHz connection is slow, but the range will cover a much wider area. When you are trying to connect to Wi-Fi far from the router, your device may automatically connect to a 2.4GHz network. But this network can be slow sometimes.

By enabling both networks, you can force the device to connect to a 5GHz network. You can enable it from the router settings. There you should find the option to assign two SSID names for 2.4 and 5GHz which will enable both the networks. Once enabled, you can force the Chromebook to connect to the 5GHz network. Do remember, all routers may not support 5GHz.
6. Reset Router
If none of these solutions are working, then the obvious step is to reset the router. This will change everything to the factory settings forcing all the changes that were made on the router to revert to default. Upon reset, you will need to password protect your router and change settings according to your need again.
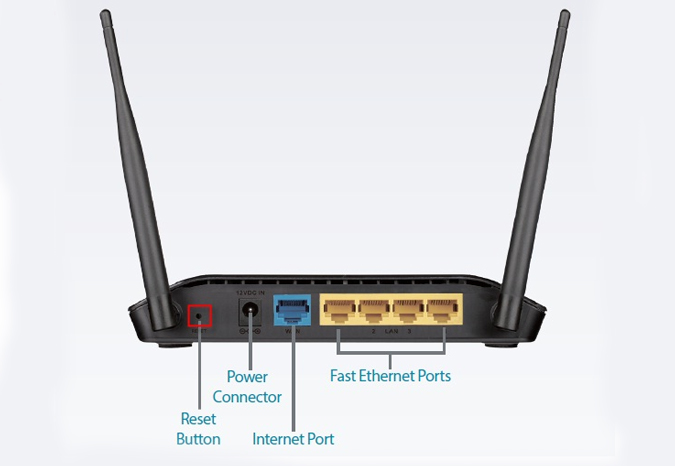
You can find the reset option on the maintenance page or advanced options page or you can press the physical reset button located on the back of your router. The reset button on most routers is placed inside a tiny hole. So you need to use a paper clip or sim ejector tool to press and hold the button for 5-10 seconds or until all lights blink and the router restarts.
7. Call ISP
If the problem is software-related, resetting is the one-stop solution to fix it. If Chromebook still can’t access the internet after connecting to the Wi-Fi, call your ISP. There could be a problem with the hardware.
If the Problem Is With Your Chromebook
As a primary step, shut down your Chromebook for thirty seconds and turn it back on. A reboot should solve the problem most of the time. If it doesn’t, follow the steps below.
1. Check Multiple Websites
Some websites do not work on particular Wi-Fi networks. These websites may be blocked by your college/office, ISP itself, or your country’s government. So try accessing multiple websites. Your Chromebook may be connected to the internet all along. If nothing can be accessed, the next thing you can do is check whether the problem is with your VPN.
2. Try Turning off the VPN
The problem could be with the VPN that you are using. Though the chances are low, it’s still worth checking out. If you are using a VPN, try reconnecting or connecting to a different location. If reconnecting isn’t solving the problem, then turn off the VPN and check again.
Also, consider only well-known paid VPN networks that are more reliable.
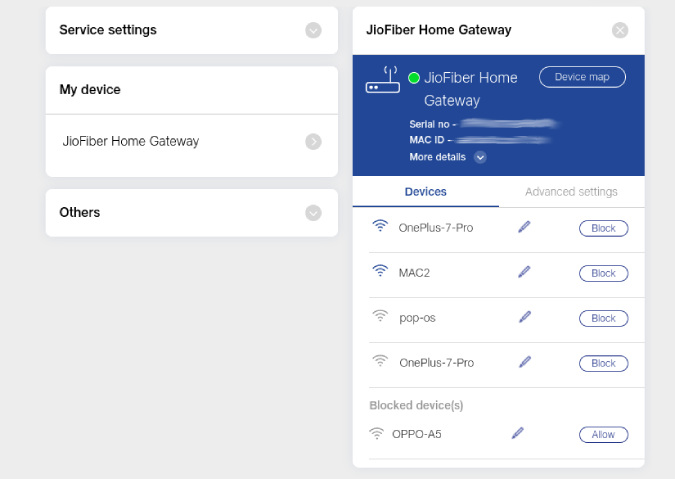
3. Check Whether You Are Blocked on Your Router Network
There is always a chance that someone might have exploited the router’s security and blocked your Chromebook. It is easy to check the block list on your router’s admin panel.
To access the router settings, do a quick Google search for the default IP address, username, and password of your ISP. Then use these details to sign in. Now you should find the blocklist under wireless settings, network settings, or administration settings. If there aren’t any devices blocked, then it’s fine. If you find any blocked devices, check if it’s your device. You may also find these settings on the app provided by the ISP.
4. Change DNS Provider
DNS is kind of a phonebook for the internet. You are probably using DNS provided by your ISP which is not always the best choice. If you are facing constant Wi-Fi issues on Chromebook, changing DNS may help.
Go to Chrome OS settings > Wi-Fi and select the Wi-Fi network that you want to change the DNS of. Scroll down and click Network. Now, under Name Servers, you have three options — Automatic name servers, Google name servers, and Custom name servers. Automatic uses DNS provided by ISP. But you can also set Google name servers (8.8.4.4 and 8.8.8.8) which are a bit faster and more reliable.
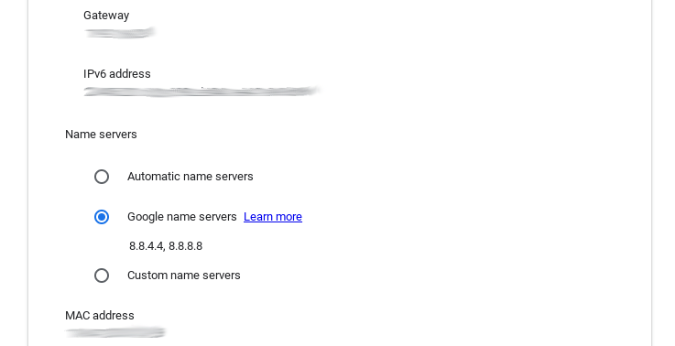
Or, you can set it to Custom and enter 1.1.1.1. It will connect to Cloudflare name servers which are free and fast.
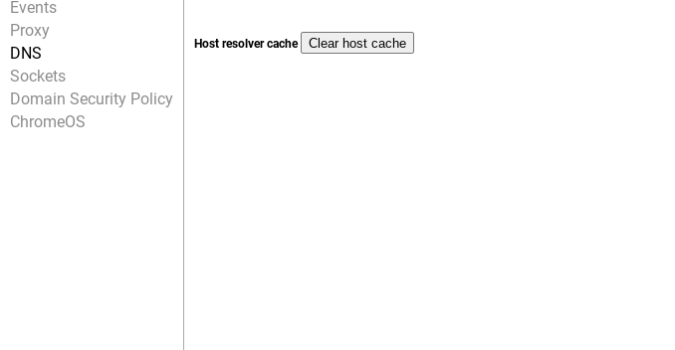
5. Flush DNS Cache
A DNS cache is a temporary database maintained by a computer’s operating system that contains records of all the recent visits and attempted visits to websites and other internet domains. To remove the cache stored on your Chromebook, copy this URL and paste it in the Chrome browser’s address bar, and press enter.
chrome://net-internals/#dnsNow you will see a button called Clear host cache to clear DNS cache.
6. Update Chrome OS
It’s not new for the Chrome OS to receive some buggy updates that later have to be fixed with a patch update. The version that you are using maybe causing Chromebook Wi-Fi but no internet problems. Connect to another Wi-Fi to update ChromeOS to the latest version. If you cannot connect to any Wi-Fi network use USB tethering to update the OS using your mobile data.
7. Do Not Use Hidden SSID Name
Chromebooks have problems with hidden SSID networks. Hidden SSID means your network will not show the name when scanning for the Wi-Fi networks, but the network itself is still on. If enabled, you need to manually enter the SSID name and password to connect to the network. Hidden SSID will not be enabled by default. But if your Wi-Fi network doesn’t show up upon scanning, you may have enabled it on your router settings.
In router settings, you can turn off the Hidden SSID option under the Network page. (This process may be different on your router settings page as each ISP has a different interface).

8. Login With the Main Account
Oftentimes, I face Wi-Fi issues on my Chromebook while using secondary accounts. The Chromebook will not connect or will disconnect repeatedly when the same Wi-Fi network is not connected to the main primary account. So if you are using a secondary account on your Chromebook, make sure that you are connected to the same Wi-Fi from your main account and turn on the toggle beside Allow other users of this device to use this network option.

9. Run Chrome Connectivity Diagnostics
You can also try Chrome connectivity diagnostics Chrome extension to troubleshoot the problem. This will show what is causing the issue and help you to fix it with instructions. Just download the extension and open it from the Chrome OS app drawer. The extension will scan for the network issues and notify you if it finds any.
Install Chrome Connectivity Diagnostics Chrome Extension
10. Powerwash Chromebook
If you are sure that there isn’t any problem with the router and cannot find any issue with your Chromebook either, then the only thing left is to powerwash the Chromebook. Considering that all your apps, settings, and even wallpaper are always backed up, you can powerwash the Chromebook and login back in with your Google account to get back up all data. Chrome OS doesn’t back up files you have stored, so backup the files before power washing.
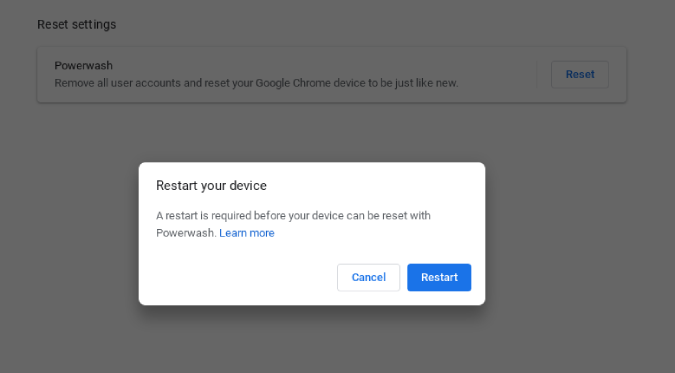
To powerwash, open Chromebook settings > Advanced > Reset settings and click on the Reset button beside the Powerwash option. It can take up to a minute to powerwash a Chromebook and it will restart again for you to sign in.
Wrapping Up
I blocked my own Chromebook in the router settings accidentally. If none of these solutions are solving the issue, it could be a hardware problem. Contact the ISP if the problem is with the router. If you have a problem with Chromebook, get the in-built Wi-Fi card checked.
Also Check: