Ever since the pandemic, Virtual meetings have become an important part of our everyday lives. While you can count on your favorite web browser Chrome and services like Google Meet, Zoom, and Microsoft Teams, there can be times when you face a few hiccups here and there. One such issue is when the camera and microphone stop working on Chrome. Not being able to use your camera and microphone properly shouldn’t keep you from attending virtual meetings or online classes. In this guide, we’ll share a few troubleshooting tips that should fix the camera and microphone not working issue on Google Chrome for good. So, let’s check it out.
Table of Contents
1. Check If Camera Is Being Used
Google Chrome cannot access your camera and microphone if they’re already being used in another app such as Camera, Skype, Microsoft Teams, or any other app for that matter. So, you can start by closing the apps that might be using your PC’s camera and microphone and see if they work fine in Chrome now.
2. Restart Your PC
Next, you can try restarting your PC. If the issue is caused by a background process or a minor glitch, restarting your computer should take care of it, and you’d be able to use the camera and microphone on Google Chrome.
3. Allow Chrome to Use Camera and Mic
If restarting the PC doesn’t help, then you can dig a little deeper and check to see if you’ve allowed Chrome access to use the camera and microphone on Windows. Here’s how:
1. Press Windows key + I to launch the Settings app.
2. Switch to the Privacy & security tab on your left. Now scroll down to the App permissions section and go to Camera.
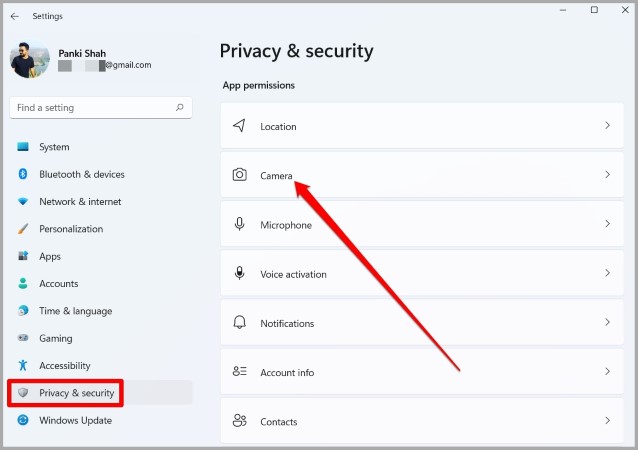
3. Make sure that your PC is allowed to access the Camera.
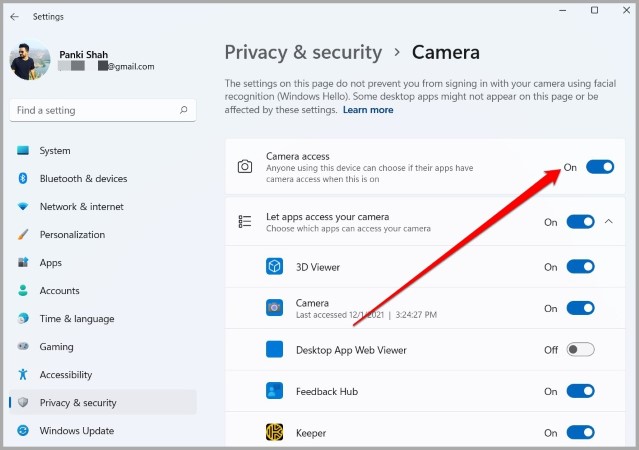
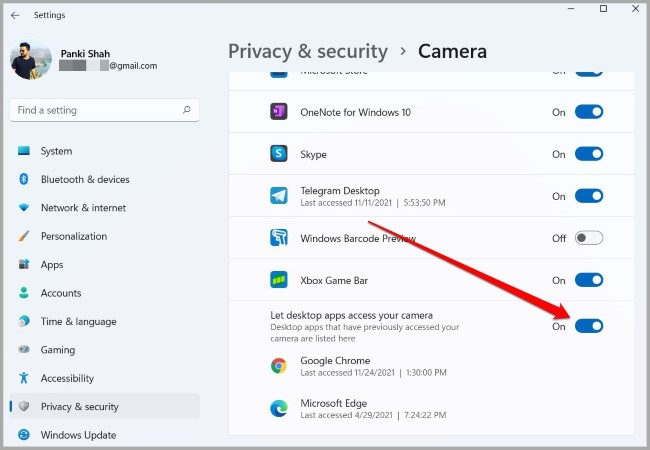
4. Additionally, you’ll also need to verify that the desktop apps including Google Chrome are allowed to access the Camera.
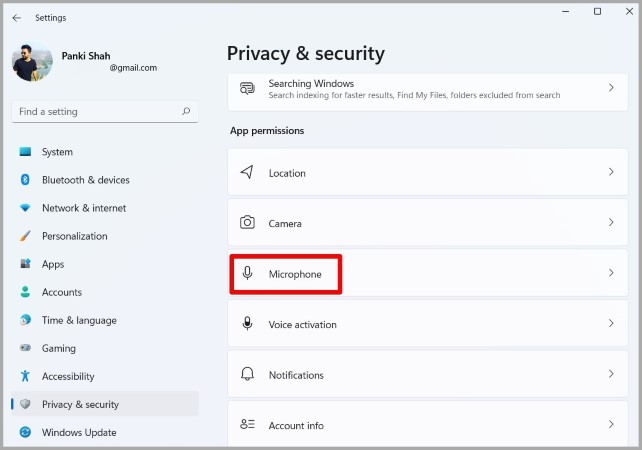
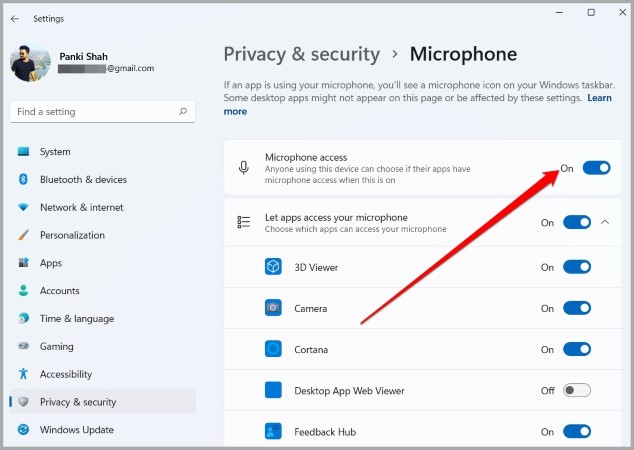
5. Now go back to Privacy & security page and click on Microphone under App permissions.
6. Make sure that you’ve allowed your PC and other desktop apps permission to access the Microphone.
Now go ahead and restart Chrome to see if the camera and microphone are working fine now.
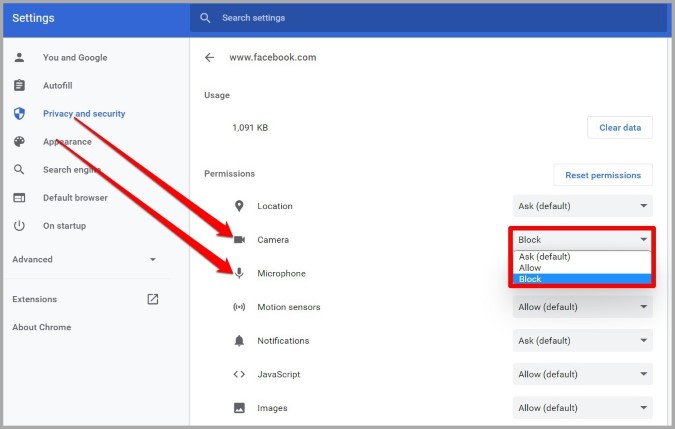
4. Check Site Permissions
If you can’t seem to access the camera or microphone in Chrome despite allowing the necessary system permissions, you need to check the Site permissions in Chrome. Here’s how.
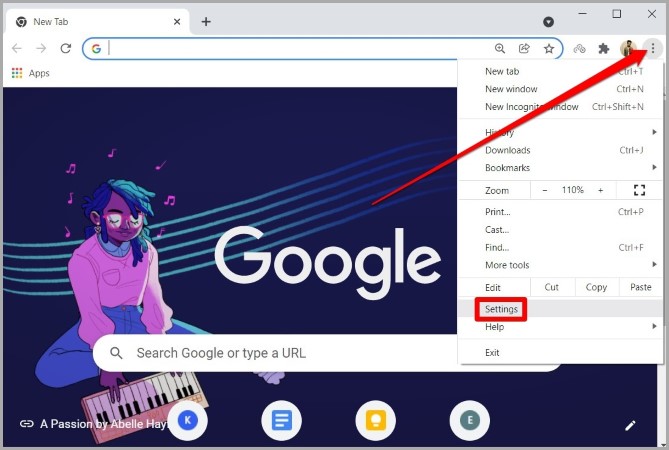
1. Launch Google Chrome. Click on the three-dot menu in the top right corner to open Settings.
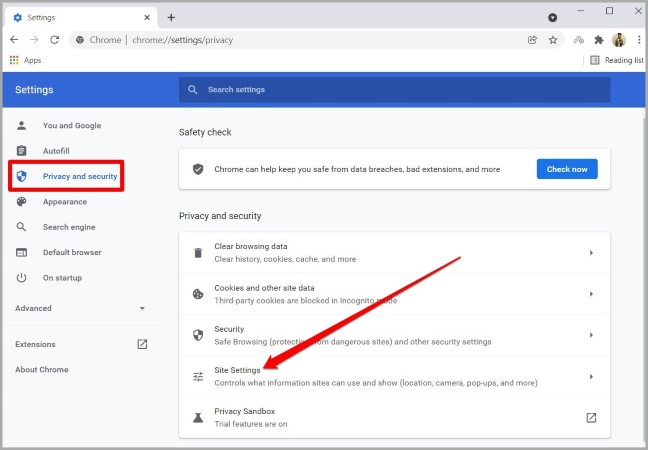
2. Now switch to the Privacy and security tab on your left and select Site settings.
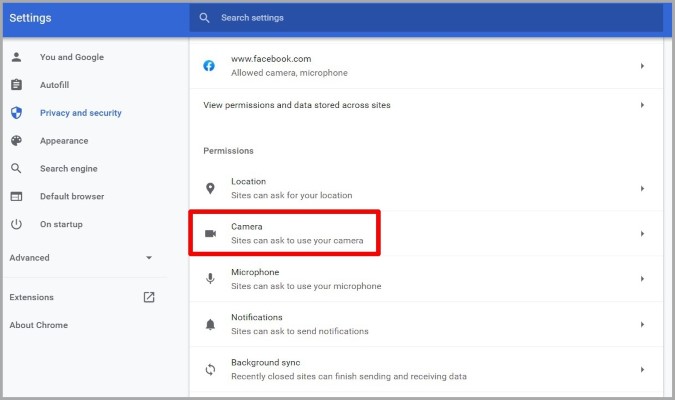
3. Scroll down to the Permissions section and click on Camera.
4. Select the site that you wish to allow access to the Camera.
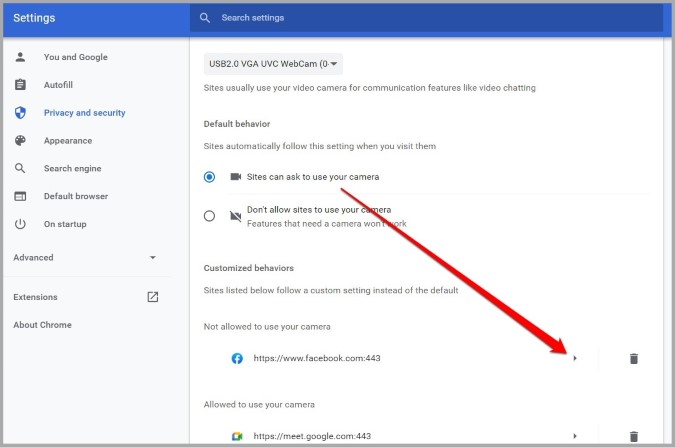
5. Now change the Camera and Microphone permission to Allow for that site.
5. Disable Antivirus
If the issue persists, then you can try checking the settings of the antivirus program installed on your PC. Some antivirus programs carry a privacy setting that disables apps on your PC from accessing the camera or microphone. If that’s the case, you need to dig through the settings of your antivirus program and disable it.
6. Disable Extensions
Support for third-party extension support is probably one of the biggest reasons why people choose Chrome over its competition. But sometimes, these extensions can also interfere with browser processes and end up creating issues such as this one.
To make sure, you can try using Chrome in incognito mode. If you’re able to access the camera and microphone in there then the issue is definitely due to one of the extensions.
To disable extensions in Chrome, type in chrome://extensions in the address bar and press Enter.

Now disable all the extensions from here. After that, turn them on one by one to find which one of them was causing the issue.
7. Clear Cache and Cookies
Just like most browsers, Chrome also stores cache data to improve your browsing experience. But once that data gets old or corrupted, it can conflict with Chrome’s operation and lead to such issues. If that’s the case, you can try clearing cache and cookies on Chrome to see if that resolves the issue.
1. Launch Google Chrome and press Ctrl + Shift + Del shortcut to open the Clear Browsing Data panel.
2. Use the Time range option to select All time from the drop-down menu. Mark the checkboxes that read Cookies and other site data and Cached images and files. Lastly, hit the Clear data button.
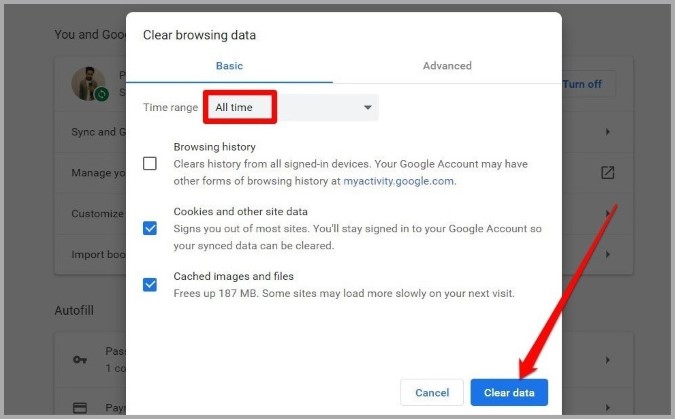
Once cleared, go ahead and see you can use the camera and microphone in Chrome.
8. Try Another Browser
If the issue persists, then you can try using another browser like Microsoft Edge or Firefox to see if you’re able to access the camera and microphone there. If it works, then you’ll have to reset Chrome using the next method. In other cases, if you’re having trouble using the camera and microphone on other web browsers as well, then the problem might be with your PC rather than Chrome. Thus, you can skip the following method of resetting Chrome and run the Windows troubleshooter using method 10.
9. Reset Chrome
If other browsers are able to use the camera and microphone just fine, then you might have to take the hard step of resetting Chrome itself. Do note that resetting Chrome will remove all your extensions, cache, and history on Chrome. Here’s how to do it.
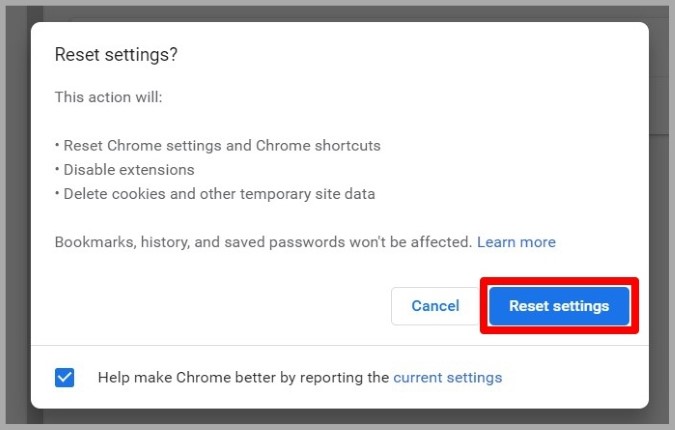
1. Launch Google Chrome, type in chrome://settings/reset in the address bar up top, and press Enter. Now click on Restore settings to their original defaults.
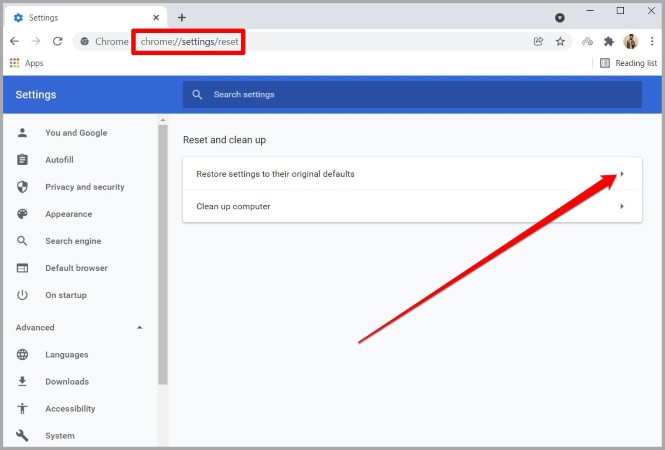
2. On the confirmation pop-up box, click on Reset Settings to confirm.
After resetting Google Chrome, check if the camera and microphone are working fine now.
10. Run Camera Troubleshooter
If you’re still not able to use a camera and microphone in Chrome, then the issue could be at system level. Thankfully, Windows 11 carries a troubleshooter for most of its utilities. You can try running the camera and microphone troubleshooter to allow windows to detect and fix issues on its own. Here’s how.
1. Press Windows Key + S to open Windows Search, type in troubleshoot settings, and press Enter.

2. Go to Other troubleshooters.

3. Now click on the Run button next to the Camera and follow the on-screen instructions to begin troubleshooting.
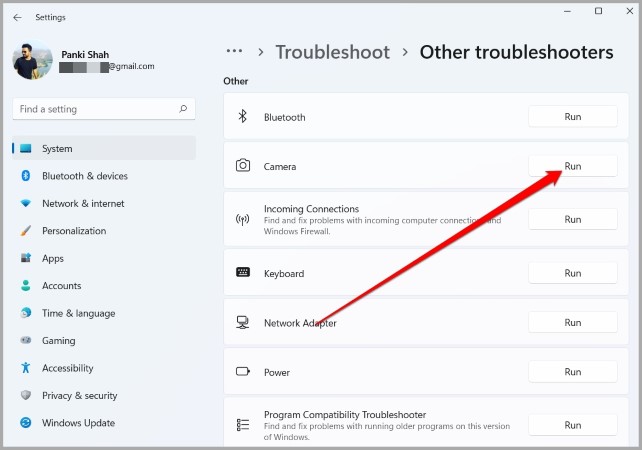
4. Now go back and run the troubleshooter for Recording Audio as well.

11. Update or Reinstall Camera and Microphone Drivers
More often than not, such camera and microphone problems can also occur due to outdated or incompatible drivers. If that’s the case, you can try updating them by following the steps below.
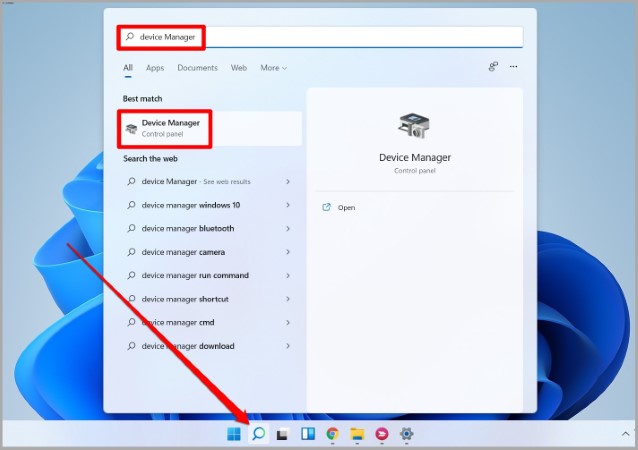
1. Click on the Search icon from the Taskbar, type in device manager, and press Enter.
2. Expand Cameras, right-click on your webcam and select the Update driver option. Now follow the on-screen instructions to update them.
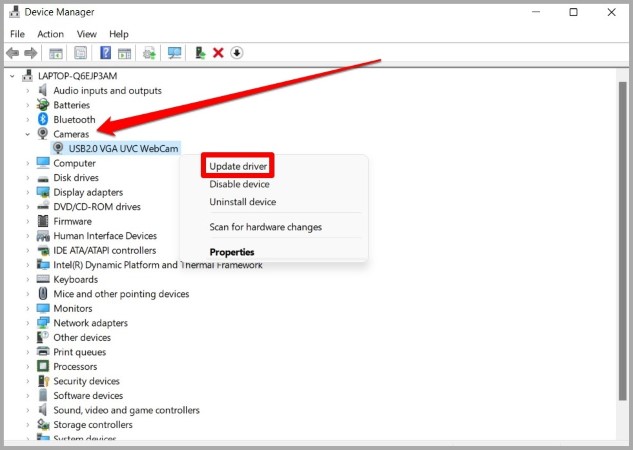
3. Now in the Device Manager window, expand Audio inputs and outputs. Right-click on the Microphone option and choose the Update driver option.

If the problem persists, then it might be the case of drivers being corrupted. Thus, you’ll need to follow the steps above and uninstall them. Once removed, reboot your PC to let Windows install them again.
Wrap Up: Google Chrome Camera or Microphone Not Working
So that was it. Hopefully, the above solutions have worked out for you well while fixing the camera and microphone issues in google chrome and you’re back to attending your virtual meetings.
Also Read: How to Secure Google Chrome Browser