Recently, I stumbled into an error in the Uber app stating “Google Play services keeps stopping”. The Uber app wouldn’t function unless I fixed it. So, I took a dozen steps, and finally, I was able to resolve the issue. If you are in the same shoes, here are a few ways to fix Google Play services to keep stopping error on Android phones.
Fix Google Play Services Keeps Stopping
What Is Google Play Services
Before we head on to solve the issue, we need to understand the essence of the problem. What exactly is Google Play Services and can your device function without them?
Foremost, akin to the popular belief, Google Play Services is a lot different from the Google Play Store. The Google Play Store is a central shop where you can download, buy, and update apps.
On the other hand, Google Play Services is the underlying framework that is used by other Android apps to interact with you. For instance, Uber uses Google Play Services API to know your device location. Having said that, you do require both the apps for your Android phone to function properly. Now, let’s start with the fixes.
On a side note, if you have a newly rooted device or are using a custom ROM, jump to this section for a quick fix.
1. Check Storage
The most common reason for the Google Play Services to cease functioning is low internal storage. If you are low on internal storage, the Google Play services won’t be able to store cache and data. Hence, it would not function properly and thus the ‘Google Play Store Services keeps stopping’ error. We need to check our Android’s internal storage and clear some of the memory.
To do that, head over to the Settings app. Next, type storage in the search bar and tap on the results.

Under the Storage menu, you can see the storage stats of your device. If you tap on the Manage Storage button, it’ll take you to the Google Files app for a general clean-up.

If you can’t figure how to clear your storage, I would recommend using a third-party storage cleaner app. These are more precise, helpful, and prevent accidental deletion of important data.
After you’ve cleared the storage, Google Play Services should work fine.
2. Check Your Internet Connection
Foremost, check if you have a working Internet connection. If that’s sorted then at times, it’s possible that your Wi-Fi or Internet connection is blocking Google IPs. So, we need to shuffle a bit. If you are on Wi-Fi, switch to mobile data. If you are on mobile data, switch to Wi-Fi.
In case, things still don’t work, at times, Google Services also suffer downtime. So, it’s a good idea to check if Google Services are up and running at the moment. The best way to check them is the IsItDownRightNow web app.

3. Update All Apps
If the Internet isn’t the issue, we can check with the Android apps on your phone. We need to check that Google Play Services or the app in fault is updated to the recent version. It might seem a small thing but apps do run into bugs. So, by updating the apps, we ensure that the bug in the app is not the fault.
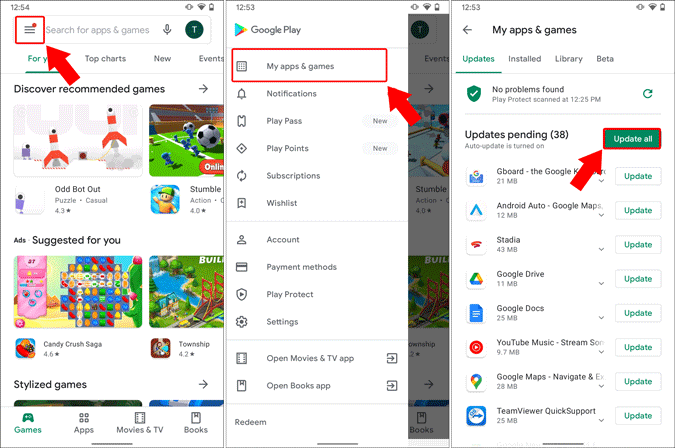
You can easily update all your Android apps via the Play Store. Just head over to the Play Store, and tap on the hamburger menu at the top-left corner. Next, tap on the My Apps & Games option. On the My Apps & Games page, tap on the “Update all” button to update all the apps.
Once you have updated all the apps, restart your device and verify. If things don’t work, we can move to the next step.
4. Check Play Services Permission
Google Play Services require entire device access to function normally. By default, it has all the permission set to “Allowed”. However, due to some notorious third-party apps or the privacy guard, permissions could have been modified. This would cause the dreaded “Google Play Services keeps stopping” error.
Hence, we have to re-check permissions. To do that, head over to the Settings menu and search for Google Play Services and under that, tap on Permissions. On the App permissions page, scroll to the bottom to check if any permission is in the denied state.
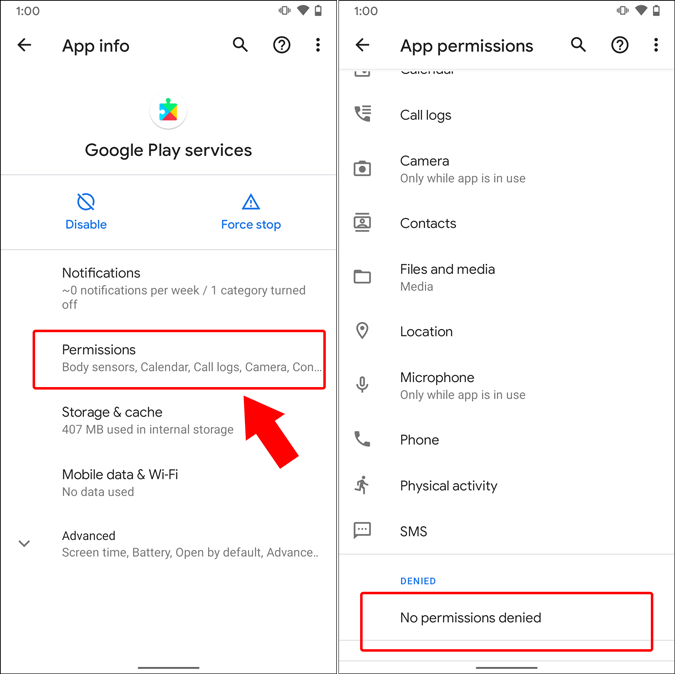
In case you find permissions in the denied state, tap on the permission and allow it. Next, restart the device and check if your device works properly now.
5. Force Stop Play services
If permissions weren’t the cause, we would have to force stop the Google Play Services. Sometimes, the Google Play Services end in a loop or simply bumps into an error. To rectify the error, we have to force stop Play Services and restart it manually.
Head over to the Settings menu. Tap on the search bar at the top.

Next, type “Play Services” on the search bar. From the search results, tap on Google Play Services and under menu, tap on the Force stop button.
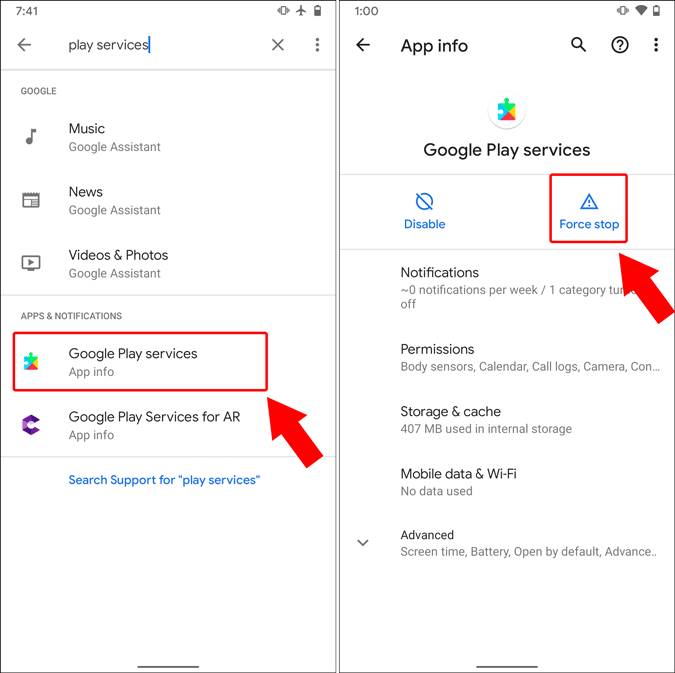
Similarly, you also have to Force stop Google Play Services Framework app. Google Play Services use this app internally and it’s important to force stop it as well. Once you are done, restart your device.
6. Clear Cache
If force stop and a restart don’t fix the problem, we need to clear cache and data from Play Services. This would give Google Play Services a fresh start.
To do that, head over to Settings and search for Play Services. From the search results, tap on Google Play Services, and in the menu, tap on Storage & cache option.

Under the Storage page, tap on the Clear cache and then Clear Storage button.

On the Google Play Services storage menu, tap on the “Clear All Data” button. Once you see the pop-up, tap on the OK button.
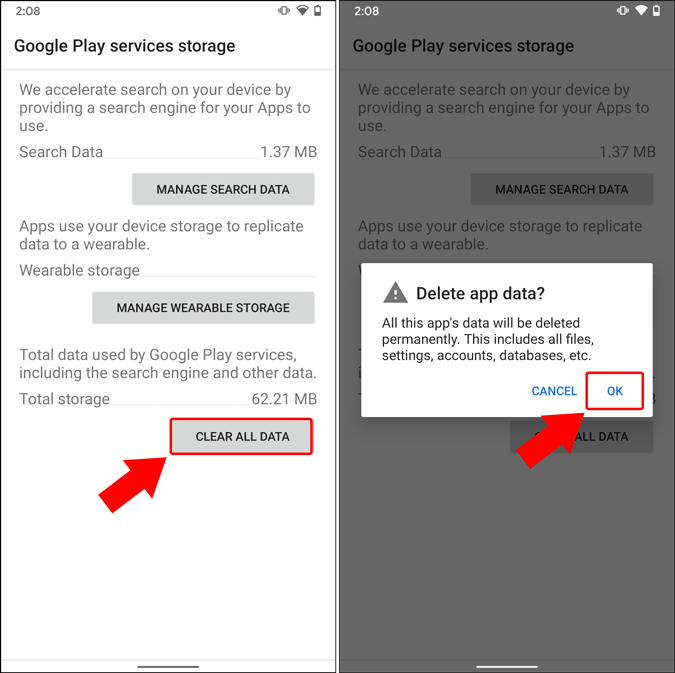
Next, your Settings menu will crash and force close. You need to wait for a couple of minutes and then restart your device. This will cause Google Play Services to rebuild their cache and data and in turn fix the issue.
7. Reset Play Services
The next step would be to reset the Play Services app. To do that, head over to Google Play Services in the Settings menu.
On the Google Play services page, scroll to the bottom and tap on “App details”. On the Play Store page, tap on the Uninstall button.
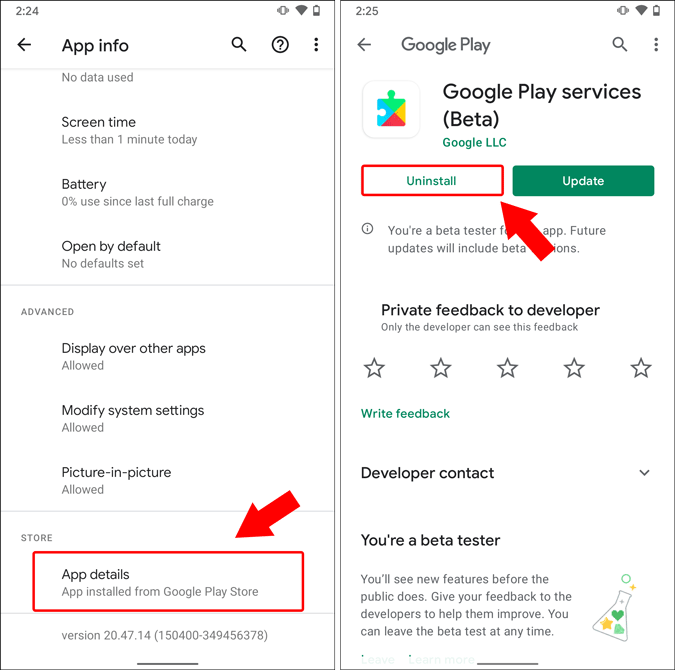
Once you hit uninstall, it will basically uninstall all previous updates. Next, tap on the Update button on the same page to update Google Play Services to the latest version.

Now, restart your device and see if it works fine.
8. Sideload Play Services
If the update doesn’t work, we can try fixing the issue by sideloading the Google Play Services app. It’s pretty easy.
Foremost, uninstall Google Play Services from the Google Play Store using the above-mentioned method. Then head back to the Google Play Services page in the Settings menu.
On the Google Play services menu, tap on the Disable button on the left. When you get a pop-up, just tap Disable app.

You’ll be bombarded with notifications from other apps failing because they can’t connect to Play Services. Ignore them for a moment and head over to APKMirror to download the latest Google Play Services version. In my case, I am on Android 11, so, I am downloading the latest Google Play services as per the date and Android version.
Download Google Play services from APKMirror

After downloading the APK file, tap on it to install the app. On the pop-up, click on the Install button.
On a side note, if you have never sideloaded an app on Android, you’ll be presented with a pop-up to allow Chrome to install apps. Just tap on Settings > Allow Chrome to install apps.
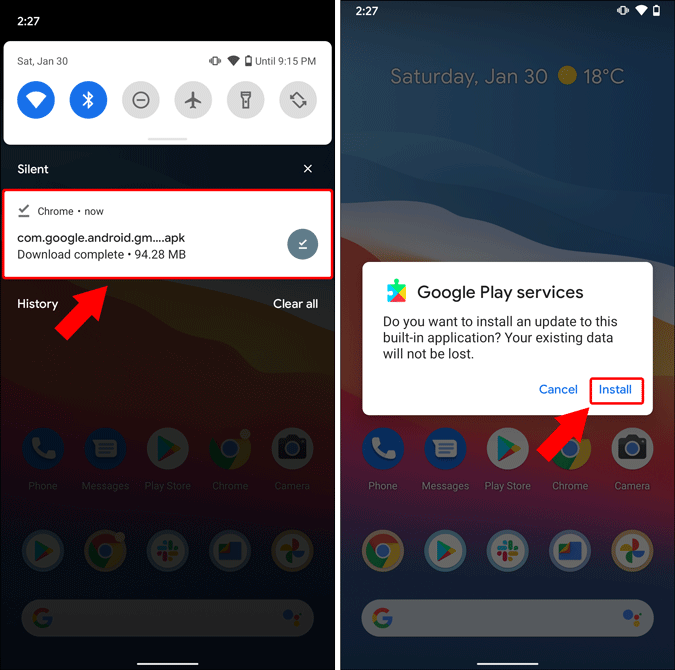
Once you have sideloaded the Play services app, restart your Android device and see if your phone function properly.
9. Factory Reset
If the above methods weren’t able to fix the ‘Google Play Services keeps stopping’ issue, unfortunately, we would have to do a factory reset. At times, a faulty Android update can cause things to go haywire. The fix to this is a clean factory reset. But, before you do that, make sure to backup your Android device.
Next, head over to Settings, type “factory reset” on the search bar. Form the results, select the “Erase all data (factory reset)” option.
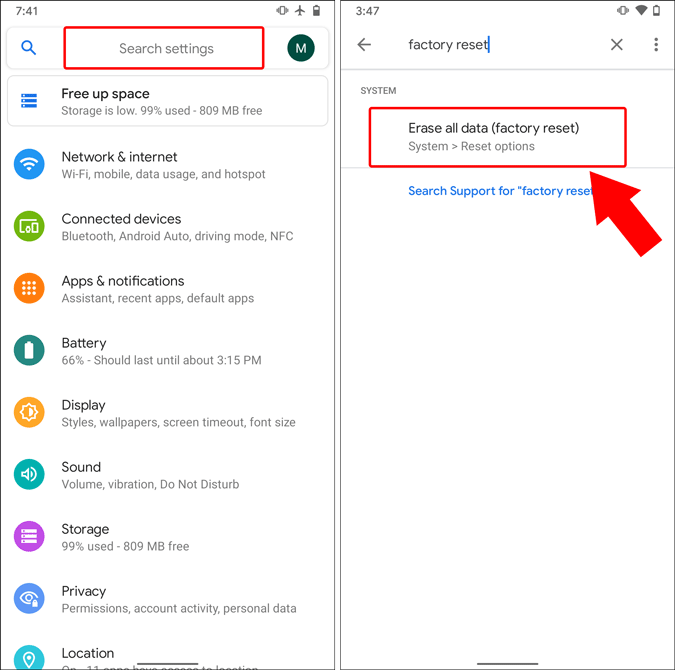
On the Reset options menu, tap on “Erase all data (factory reset)”. On the next screen, tap on the “Erase all data” button.

10. Download GApps
Now, if you are using a custom ROM or have flashed a stock firmware recently, there is a chance that the ROM you are using doesn’t have GApps. In simple words, the ROM you are using hasn’t installed Google Play Services or the Google Play Store, and apps running aren’t able to communicate with the Android device.
In that case, you can download GApps from The Open GApps Project. Select the appropriate GApps version as per the Android variant. Once you have GApps installed, things should function normally.

Closing Words: Play Services Not Working
The problem on my device was fixed after sideloading a Google Play Services variant from APKMirror.
In case, none of the above fixes work for you, you can try and replace the device if it’s under warranty. If it’s an older Android device, you can try going with a custom ROM. Akin to popular belief, custom ROMs for older devices are more stable and frequently updated.
Also Read: 8 Alternatives to Google Play Store