Windows 11 comes with some cosmetic changes and some useful feature additions. One of them is the Snap Layouts which we first saw a glimpse of in PowerToys. Now, Snap Layouts has been baked right into Windows 11. But several users have complained that Snap Layouts is not working for them on Windows 11. What could be the reason?
Fix Snap Layouts Not Working in Windows
The feature is only available to Windows 11 users so Windows 10 and previous versions will never get it (we have a solution for that!). If you are using the Insider Preview build, it is possible that there is some bug that’s breaking Snap Layout’s functionality. Wait for the final build to release. If that’s not the case, continue reading the post to learn how you can fix Snap Layouts not working error in Windows 11 OS.
Also Read: Best Windows Snap Screen Alternatives
1. How to Enable and Customize Snap Layouts
Snap Layouts has to be enabled from Settings. It is also possible that due to a recent update or some bug, the feature has been disabled on your Windows 11 computer.
Press Windows key+I to open Settings and go to System > Multitasking and enable the toggle for Snap windows.

Once enabled, hover mouse over the maximize/minimize button in any open window to be greeted with 4 different snap layout options.

You can further customize how and where Snap Layouts function from the same Settings window where you first enabled it. Click on the downward-facing arrow next to it to view options.

You will notice that there are options to disable Snap Layouts in certain situations like when you hover over maximize button, for instance. Maybe that’s why it was not working correctly for you?
2. Try Keyboard Shortcuts
Like many other Windows 11 desktop features, there are keyboard shortcuts to access and use Snap Layouts. There are two actually. The first is Windows key+Z which mimics the mouseover function and will reveal the snap layout options.
The second is using the Windows key+arrow keys. This will immediately resize and snap the window to the side of the screen. Which side? It depends on which arrow key you press. This is a quick way to snap windows. Try it now.
3. Firefox Incompatibility and Fix
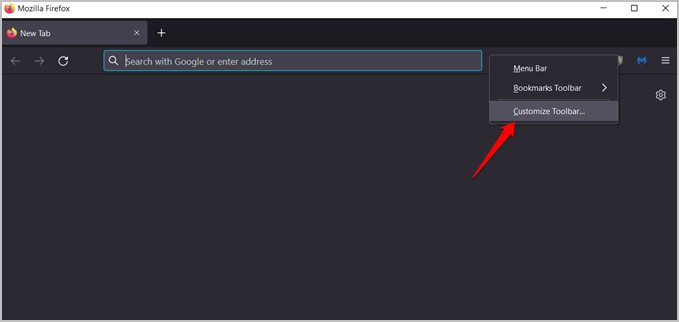
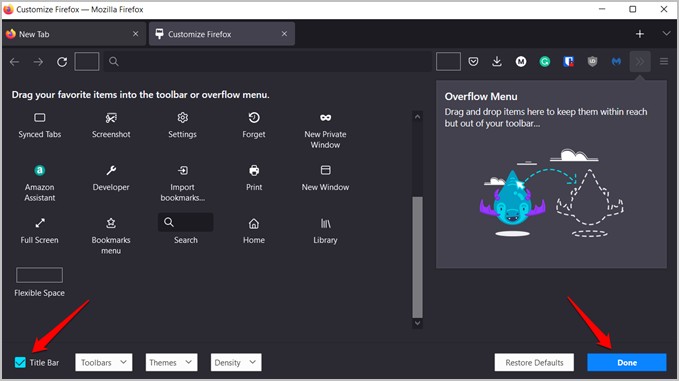
Several users discovered that Windows 11 Snap Layouts doesn’t work in Firefox browser but works fine in other browsers or any open windows. The reason being Firefox comes with its own ‘custom box’ to control window size and position. You will need to use native toolbar instead.
1. Right-click on the toolbar in Firefox and select Customize Toolbar.

2. Now select Title Bar checkbox in the lower-left corner in the next window and click on Done to save changes.

Check again if Snap Layouts is working in the Firefox browser on Windows 11 computer.
4. App Conflict
We saw how Firefox is incompatible with Snap Layouts out of the box and has to be tweaked a little to make it play nice. It could be possible that similar conflicts may exist in other apps too. Note that Windows 11 is still in its infancy and it may take some time well after the final build is released to the masses before bugs are ironed out. One way to check this theory is to check if Snap Layouts is working in another app window or even File Explorer.
5. Update Windows
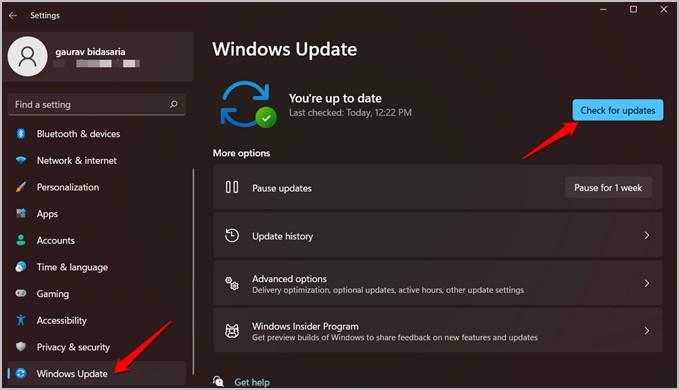
If it is a bug indeed, Microsoft may be working on a fix already. Check if there is an update available and if yes, update to the latest version.

Press Windows key+I to open Settings and select Windows Update from the left sidebar to check for updates. You can also click on Check for updates button to check manually.
6. Run Troubleshooter
Windows 11, just like Windows 10, comes with a built-in troubleshooter to troubleshoot different but common PC problems. One such troubleshooter is for Windows apps.
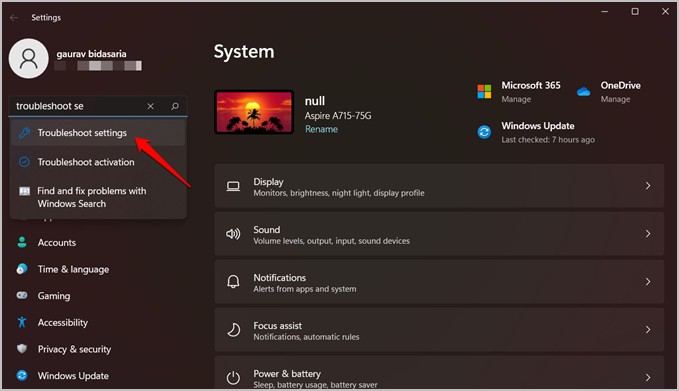
1. Press Windows key+I to open Settings and search for Troubleshoot settings and click on it and go to Other troubleshooters.

2. Here you will find a list of all the things that you can troubleshoot. Find and run Windows Update to find and fix problems caused by recent update.

3. Follow on-screen instructions after that and try if Snap Layouts is now working or not.
7. Use PowerToys
As we discussed in the opening paragraph, Snap Layouts first made its debut with the open-source app from Microsoft called PowerToys. It comes with a host of experimental features that includes Snap Layouts — they call it FancyZones though.

In fact, I prefer Fancy Zones over Snap Layouts feature because it allows me to customize the zones and add and remove zones on the fly to create my own customized versions.

Why be limited to just four predefined layouts when you create as many as you want and how you want it?
Bonus: Touchscreen Behavior
PowerToys allow the maximum number of Snap Layouts or should I say FancyZones. Snap Layouts typically displays only 4 layouts. However, when using a touch screen Windows device, you will see only 2 layouts. This is not a glitch but it is how it works. Reasons could include screen resolution or app incompatibility with Snap Layouts in touchscreen format.
Note: Some users have reported that Snap Layouts doesn’t support screen size lower than 9″. Microsoft is yet to confirm anything.
Wrap Up: Snap Layouts Not Working on Windows
These were some easy to perform fixes. I like how a cool feature from PowerToys has been implemented in the broader Windows ecosystem. But I still like PowerToys’s flexibility and ease of use. Also, you can use that app on any version of Windows and not just 11. Hello, Windows 10 and 7!
Also, PowerToys comes with a number of other handy tools that are yet to see the light of day and maybe, they will never break out of their current shell. As for me, I have disabled Snap Layouts and instead use FancyZones.
Also Read: How to Enable and Customize the new On-Screen Keyboard on Windows 11