At a dedicated Windows event last week, Microsoft officially took wraps off the Windows 11 OS. With the Windows 11 OS, Microsoft is taking a tough stance on minimum system requirements and supporting a handful of CPUs based on performance and security. The company also launched the PC Health Check app (now removed) to check your computer’s compatibility with Windows 11. If you are getting ‘This PC Can’t Run Windows 11 Error’ on your computer, it’s time to fix the error using a couple of ways.
How to Fix ‘This PC Can’t Run Windows 11’ Error
There could be two reasons why your PC can’t run Windows 11. Either the TPM 2.0 chip is installed but disabled by default or it is not installed on the motherboard altogether. We have written a separate guide on how to find and install the correct TPM 2.0 module on your Windows computer. In this guide, we will show how to enable the module.
Before we go ahead and troubleshoot the ‘This PC Can’t Run Windows 11’ error, let’s first learn about the relevant system requirements set by Microsoft.
- Processor: 1Ghz or faster with minimum 2 cores
- System architecture: 64-bit Display: 720p (1280×720 px) with a screen size of minimum 9-inch
- Graphics card: DirectX 12 compatible graphics with WDDM 2.x
- RAM: 4 GB
- Storage: 64 GB
- Firmware: Secure Boot enabled UEFI
- Trusted Platform Module: Version 2.0
The processor part is tricky here. You need to visit the official Microsoft site to check the compatibility with Intel and AMD processors that can run Windows 11 without any issue.
Don’t worry even if your laptop/desktop CPU isn’t listed here. We will bypass the limitation later in the article.
Check Windows 11 Compatibility with a Third-Party Software
Microsoft’s official PC Health Check app was basic at best. It simply showed a ‘This PC Can’t Run Windows 11’ error without any explanation of what the error pertained to. As of now, the company has pulled the app and promised to relaunch with more useful information.
Until then, you can use an unofficial third-party app called WhyNotWin11 from GitHub. Follow the steps below.
1. Visit the GitHub page below and install the app on your computer.
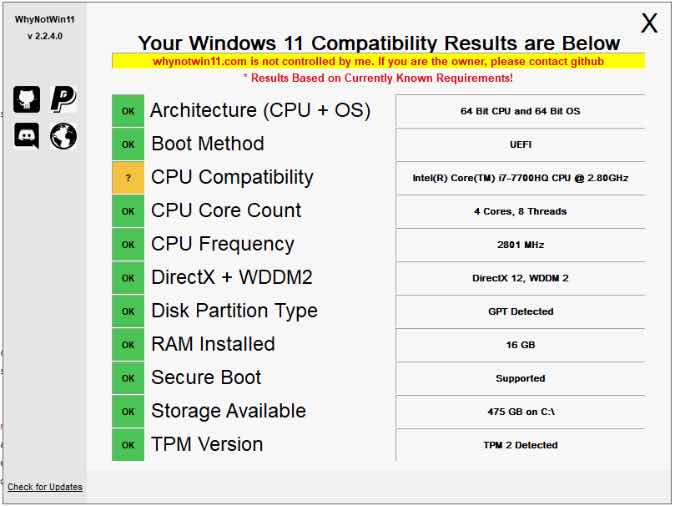
2. Open the WhyNotWin11 on your computer and let it scan your PC.
3. Within a minute or two, you will see a detailed breakdown of hardware/software that’s missing or disabled to run Windows 11 OS.

Among them, checkout TPM version and Secure Boot. If TPM is disabled, you can easily enable it from Windows UEFI settings menu.
Most modern PCs do come with TPM support out of the box. Chances are, your OEM has decided to disable it by default. You can enable it and set your computer ready for Windows 11 update later this year. Here’s how to do it.
What Is TPM
Before we show you how to enable TPM from the Windows BIOS, let’s first learn a bit about what exactly TPM is and why Microsoft is pushing it as a must-have requirement for Windows 11.
A TPM aka Trusted Platform Module is a microchip that’s installed to deliver hardware-level security. In theory, it’s similar to the Apple T2 chip that comes pre-installed on modern MacBooks.
A TPM chip makes sure to encrypt data that’s being transmitted from and to the computer. It stores all the critical data such as passwords, login info, payment details and blocks any unauthorized access to it.
How to Enable TPM and Secure Boot in UEFI
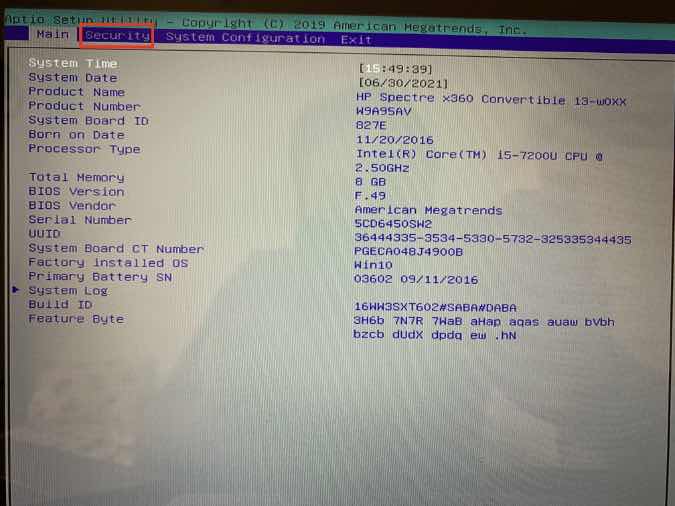
To enable TPM or Secure Boot in PC’s UEFI menu, you need to Shut Down the PC. Based on your PC/laptop manufacturer, you will need to keep pressing a special key to go to the UEFI menu.
For our HP Spectre laptop, it was an Esc key. Some OEMs also flash the required key to press when booting up the system.
Now go through the steps below.
1. Navigate to the Security tab. Your device interface might look a bit different than our screenshots.

2. Look for TPM State under the Secure Boot Mode menu.

3. Enable it.
4. Slide to the Boot menu.

5. Enable Secure Boot from the Boot menu.
Make sure to save changes by using the F10 key and exit the mode. Your computer will restart automatically.

Upon startup, open the WhyNotWin11 app and you will find your system to be compatible with Windows 11.
But let’s say you are using an old Intel 7th or 6th gen CPU on your computer. In such cases, Microsoft is keeping a tight lip on official Windows 11 support. However, there is a way to bypass the limitation.
The company has released Windows 11 to the Dev channel on the Insider Program. Using that, you can install Windows 11 on your PC even if it doesn’t meet all the requirements. Here’s how to do it.
Enroll for Windows Insider Program
First, you need to sign up for the Windows Insider Program using the Windows settings app.
1. Open the Settings app on your Windows computer (Use Windows + I keys).

2. Go to Update & Security > Windows Insider Program menu.

3. Click on Get Stared on the right side and select your Microsoft account.

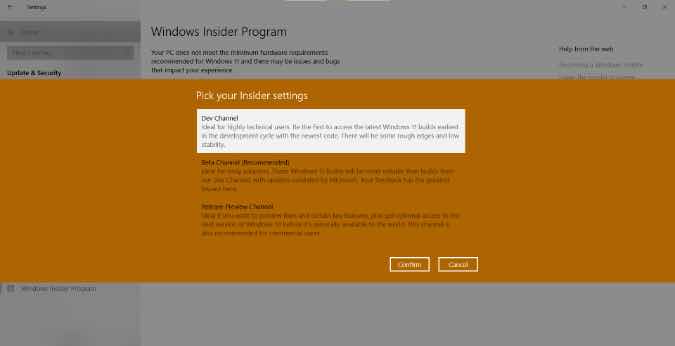
4. Hit Continue and Windows will ask you to select Insider settings.

5. Select Dev Channels and confirm your decision.
6. Agree to the terms & conditions and reboot your PC.
Upon startup, you can go to Windows Settings > Update & Security > Windows Update and you will see Windows Insider build ready to download.

Wrapping up: Fix ‘This PC Can’t Run Windows 11 Error’
There is a lot to like about Windows 11 upgrade. Microsoft’s new OS carries beautiful aesthetics, animations, new icons, a brand new Microsoft Store with Android app support, and many productivity features.
It’s understandable that the company wants to set the Windows 11 criteria a bit higher than the past OS versions. If you are getting the ‘This PC Can’t Run Windows 11’ error, you can check the system UEFI and make relevant changes.
Enthusiasts and developers can go ahead and install the Windows 11 Insider Preview right now using the mentioned method above.