Getting Some settings are managed by your organization doesn’t always mean that your home computer is linked to an organization you don’t know about. It can also imply that you or another user of your computer have/has previously made some Registry or Group Policy changes related to Windows Update, and as a result, it is displaying the message. You need to check some specific Local Group Policy Editor settings and Registry Editor keys/REG_DWORD values that can be accountable for getting this red-inked message on the Windows Update page in Windows Settings.
Why Some Settings are Managed by Your Organization Appear on Windows Update Page
Let’s say you disabled Microsoft Defender on Windows 10 using Group Policy. If you open the Windows Security section in Windows 10, you may get a message like this. Similarly, it is possible to change or tweak various Windows Update-related settings via the Local Group Policy Editor and the Registry Editor. If you have done anything in those utilities, the Some settings are managed by your organization message may appear.

To fix the issue, it is very important to find all the GPEDIT and REGEDIT settings. Fortunately, we have created a list of settings that may be responsible for this message. However, the Windows Update page shows an option called View configured update policies.
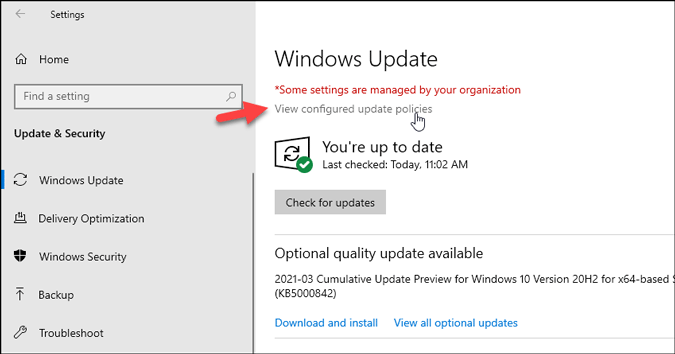
If you can find this option, it becomes even easier for you to find the respective setting. You can simply open the specific settings (as mentioned below) and make the required change. However, if you can’t find this option, the following methods will come in handy.
Fix Some Settings are Managed by Your Organization in Windows Settings
Here is a list of all Group Policy and Registry Editor settings as well as some other tips and tricks to get rid of this error. Before getting started with the list, you should know that the following changes may revert the customization you made earlier related to Windows Update. Also, it is important to check the Windows 10 edition since the Local Group Policy Editor is not available on Windows 10 Home. To verify that, open This PC, right-click on an empty area, and select the Properties option.
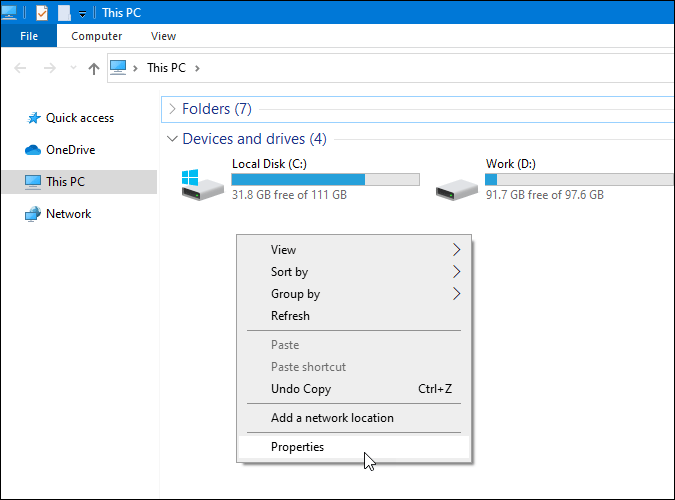
Here you can find your Windows 10 edition, such as Windows 10 Home/Pro/Enterprise.

If you have Windows 10 Home, you have to follow the Registry Editor method since your PC doesn’t have the Local Group Policy Editor. However, if you have Windows 10 Pro or Enterprise, it is required to check both.
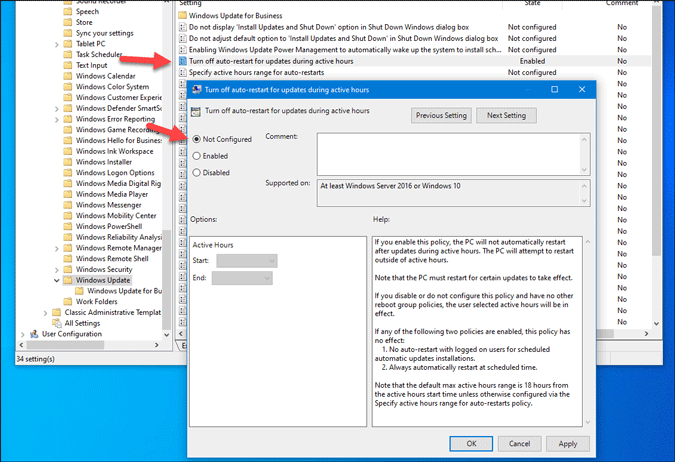
1. Check Local Group Policy Editor Settings
To get started, press Win+R, type gpedit.msc, and hit the Enter button to open the Local Group Policy Editor on your computer.

Once it is open, navigate to the following path-
Computer Configuration > Administrative Templates > Windows Components > Windows UpdateAfter that, check the following Local Group Policy Editor settings.
- Turn off auto-restart for updates during active hours
- Specify active hours range for auto-restarts
- Allow updates to be downloaded automatically over metered connections
- Specify deadline before auto-restart for update installation
- Configure auto-restart reminder notifications for updates
- Turn off auto-restart notifications for update installations
- Configure auto-restart required notification for updates
- Configure Automatic Updates
- Do not allow update deferral policies to cause scans against Windows Update
- Remove access to “Pause updates” feature
- Remove access to use all Windows Update features
- Do not include drivers with Windows Updates
- Configure auto-restart warning notifications schedule for updates
- Update Power Policy for Cart Restarts
If the setting’s State is showing Enabled or Disabled, double-click on it, select the Not Configured option and click the OK button to revert the setting to factory default.
2. Check Registry Editor Settings
Whenever you change something in the Local Group Policy Editor, it reflects the same in corresponding registry files. Therefore, checking the registry files (Keys, sub-keys, REG_DWORD, String Values, etc.) is equally proficient as checking the Group Policy settings.
Here we have listed all the REG_DWORD values and the locations so that you can quickly check to hide the message.
- SetActiveHours/ActiveHoursStart/ActiveHoursEnd
- SetActiveHoursMaxRange/ActiveHoursMaxRange
- AllowAutoWindowsUpdateDownloadOverMeteredNetwork
- SetAutoRestartDeadline
- SetAutoRestartNotificationConfig
- SetAutoRestartNotificationDisable
- SetAutoRestartRequiredNotificationDismissal/ AutoRestartRequiredNotificationDismissal
- NoAutoUpdate/AUOptions
- DisableDualScan
- SetDisablePauseUXAccess
- SetDisableUXWUAccess
- ExcludeWUDriversInQualityUpdate
- SetRestartWarningSchd/ScheduleRestartWarning
- SetEDURestart
You can find these REG_DWORD values in the following location:
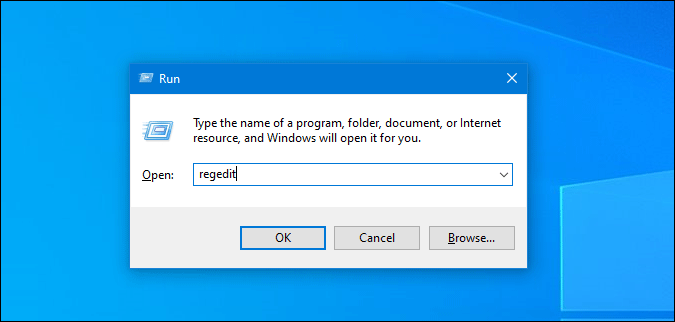
HKEY_LOCAL_MACHINE\Software\Policies\Microsoft\Windows\WindowsUpdateTo navigate to this location, you have to open the Registry Editor. For that, press Win+R, type regedit, hit the Enter button, and click on the Yes option on the UAC prompt.
The Value data may appear as 0 or 1 or 2, and they define different things for different REG_DWORD values. However, if you see any of the aforementioned REG_DWORD value in the WindowsUpdate key, you need to delete it to remove ‘Some settings are managed by your organization’ message.
Precaution: Before making any change in any registry file, it is highly recommended to create a System Restore point and back up all registry files.
To delete a RED_DWORD value, right-click on it, and select the Delete option.

Following that, click the OK button to confirm the deletion.
After removing the REG_DWORD value, restart your computer or sign out and sign back in to your account.
3. Set Your PC as a Home Computer
If you have previously connected to another computer in the same network, the default setting may treat your PC as part of a business network even when you are no longer connected to the second computer. To verify this setting, follow these steps-
1: Search for “advanced system settings” in the Taskbar search box and open.

2: Switch to the Computer Name tab, and click on the Network ID button.
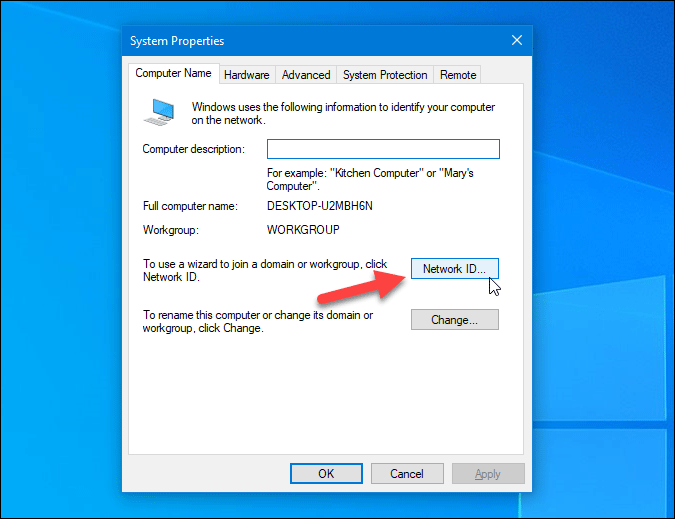
3: Select the This is a home computer; it’s not a part of a business network option, and click the Next button.

4: Once the changes are successfully made and reflect on the screen, restart your computer.
4. Change Diagnostics & Feedback Settings
Your Windows 10 computer sends data to Microsoft to improve the user experience and their future products. Depending on the settings, your PC may or may not send specific data such as device information, settings, capabilities, websites you visit, apps you use, etc. At times, you may not want to share all that information with Microsoft. Although it is not possible to completely block Microsoft from gathering this information, the Required diagnostic data option can help you up to some point.
However, the same setting or option may generate the ‘Some settings are managed by your organization’ error message too. Therefore, it is wise to toggle this setting – no matter which one you currently have.
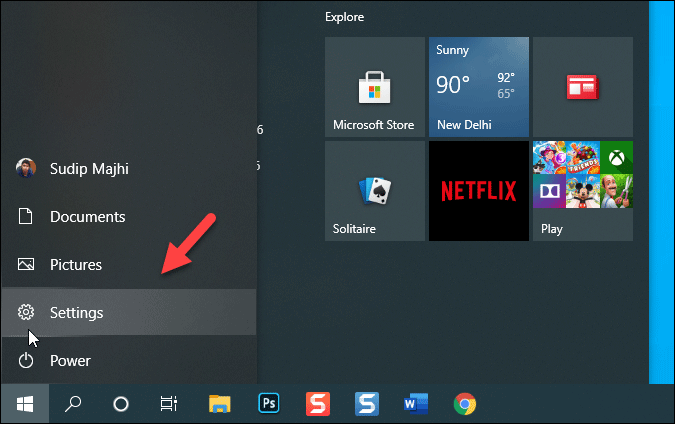
1: Open the Start Menu, and click on the Settings gear icon.
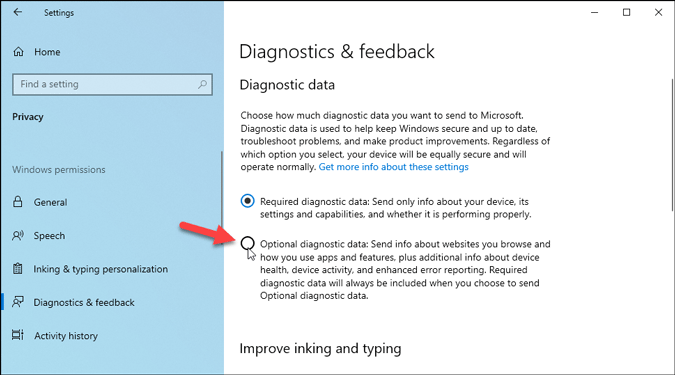
2: Go to Privacy > Diagnostics & feedback.
3: On your right-hand side, you can see two options, and one of them is already set – Required diagnostic data and Optional diagnostic data. No matter which option you are on, switch to the other option, restart your computer, and check if the message still displays or not.
Wrapping up: Why is Windows Update Showing Some Settings are Managed by Your Organization
Getting the ‘Some Settings are Managed by Your Organization’ message is not detrimental at most times. It is a visual representation or notification of settings that you/another user changed earlier via the Registry Editor and the Local Group Policy Editor. Therefore, changing those settings back to the factory defaults helps you get rid of this message within moments.