“Why is my keyboard not working on Chromebook?” Is that the question that brought you here? Don’t worry. Problems in the Chromebook keyboard are easy to fix. Whether your Chromebook keyboard is typing wrong letters, the keyboard keys are sticking, or you are facing other issues with the keyboard, this article shall help you. Let’s fix the Chromebook keyboard not working issue.
How to Fix Keyboard Not Working on Chromebook
1. Restart Chromebook
Before you jump into the troubleshooting methods described below, you must restart your Chromebook once. If it’s a minor issue caused due to an app or something similar, a quick reboot should fix it.
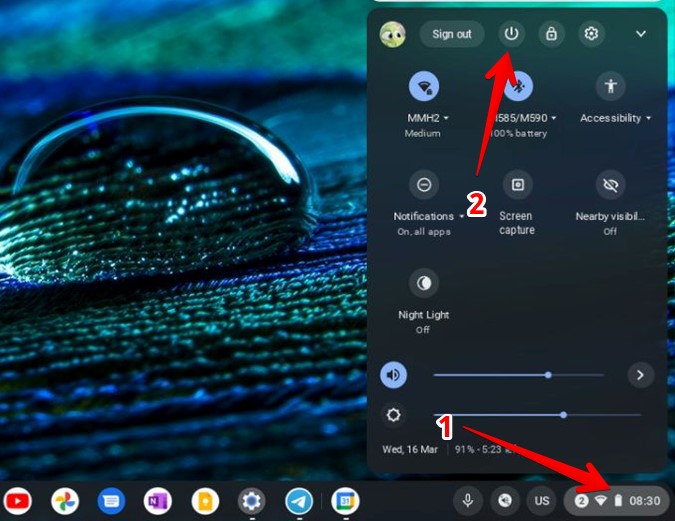
To restart the Chromebook, you need to turn it off using the Shut Down button instead of closing the lid. For that, click on the time in the Chromebook’s shelf to open the Quick settings panel. In the panel, click on the Shut Down button. That will turn off the Chromebook. Then turn it on as you would do normally.
2. Reset Chromebook Hardware
Next, you must perform the hardware reset or EC (embedded controller) reset on your Chromebook. This will restart hardware items like keyboard and touchpad and as a result, fix issues in them. Do not worry as hard reset will not delete data or sign you out.
1. Shut down your Chromebook by clicking on the Shutdown button in the Quick Panel. Do not put Chromebook in Sleep or Hibernate mode.
2. Press and hold the Refresh key on the keyboard. Then, press the Power key while holding the Refresh key
3. When the Chromebook starts up, release the Refresh key.
3. Check Stuck Keys
Is there a particular key on your keyboard that isn’t working? It could be stuck. To fix it, repeatedly press it until it releases. You should also try cleaning your Chromebook’s keyboard by blowing air. That might help in removing small particles that could be stuck under the keys.
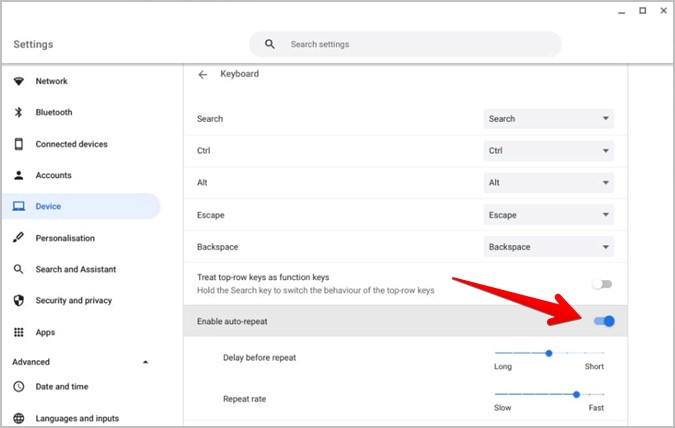
4. Turn off Auto Repeat
Generally, when you hold a key on your keyboard, it will type the character repeatedly. If this feature isn’t working or you feel that it’s a nuisance, you can enable or disable it as per your requirement as shown below.
1. Open Settings on your Chromebook.
2. Go to Device from the left sidebar followed by Keyboard.

3. Turn the toggle next to Enable Auto-repeat on or off. Alternatively, you can customize the behavior of auto-repeat using the options like Delay before repeat and Repeat rate.
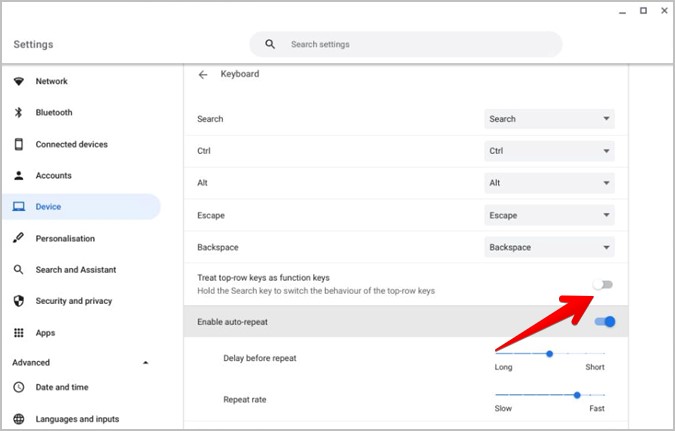
5. Turn off Function Keys
If the top row of your Chromebook’s keyboard isn’t working and you are unable to use functions like back, refresh, change volume, adjust brightness, etc., it’s because the top row keys have been turned into function keys. You must disable the associated setting to use the top row as regular keys.
Go to Settings > Device > Keyboard. Turn off the toggle next to Treat top-row keys as function keys.
6. Check Behavior of Keys
Chrome OS lets you modify the behavior of specific keys such as Search, Ctrl, Alt, Escape, and Backspace. If any of these keys isn’t functioning normally, it must be disabled or its behavior changed to a different function.
To check the keys, go to Chromebook Settings > Device > Keyboard. You will see the function of keys like Search, Ctrl, etc., mentioned next to them. Click on the box to modify the behavior of any key that isn’t working according to your preference.

7. Change Input Method
One of the main reasons for the Chromebook keyboard typing wrong letters is due to an incorrect keyboard layout or language selected in keyboard settings. To fix it, follow the given steps:
1. Open the Chromebook Settings.
2. Click on the Advanced option in the left sidebar to expand it.
3. Click on Languages and inputs followed by Inputs and keyboard.

4. Under the Input methods section, click on the US keyboard to enable it. You will see the Enabled label under the active keyboard. If you want to use a different keyboard like the UK or something else, select that. Click on the arrow next to the input method to customize settings like autocorrect, glide typing, sound, etc.

Tip: If your preferred method doesn’t show up, click on the Add input button to add it.
8. Turn off Sticky Keys
If keyboard keys are sticking but not physically, it’s because you might have accidentally enabled the Sticky keys feature on your Chromebook. When Sticky keys is enabled on Chromebook, you can use keyboard shortcuts one key at a time instead of pressing them altogether.
To turn off Sticky Keys, follow these steps:
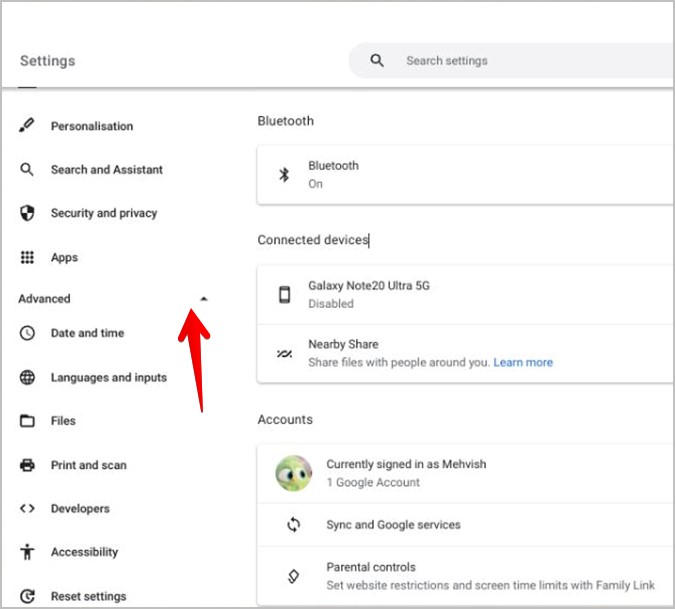
1. Open Settings on your Chrome OS and expand the Advanced section.
2. Click on Accessibility followed by Manage accessibility features.

3. Scroll down to the Keyboard and text input section. Turn off the toggle next to Enable sticky keys.

9. Use as Guest User
The official Google support page for Chromebook suggests testing the keyboard in the Guest mode, which allows you to use Chromebook without signing in. If the keyboard functions normally in the Guest mode, then you must delete the user account on your Chromebook and add it back.
1. To use Chromebook in Guest mode, you will need to sign out from your account. For that, click on the time at the bottom-right corner. From the Quick panel, press the Sign out button.
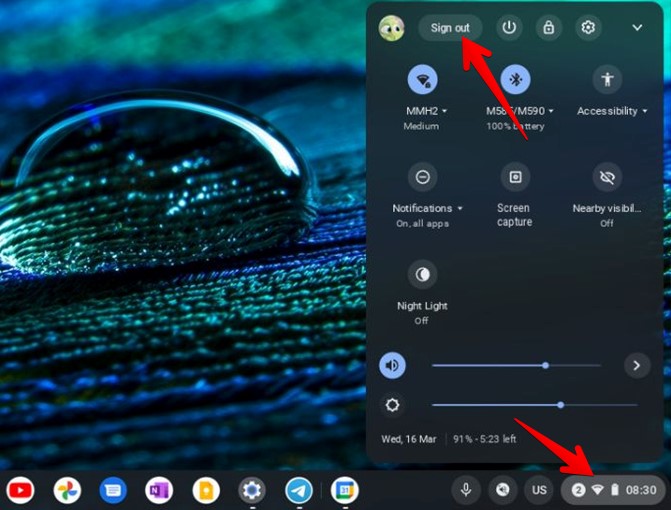
2. Once signed out, you will reach the lock screen. Click on Browse as guest to enter the Guest mode.

Note: If you don’t see the Browse as a guest option, your administrator (i.e., school or work) has turned off guest browsing.
3. Test the keyboard in Guest mode. Once done, click on time at the bottom and select Exit guest.
4. If the keyboard works in the Guest mode, delete the problematic account and re-add it. Learn how to sign out of the primary account on Chromebook.
Tip: Know how to set up Chromebook for kids.
10. Reset Chrome
Sometimes extensions or other settings could be causing problems with the Chromebook keyboard. If the above solutions do not work, you should try resetting the Chrome browser.
Please keep in mind that resetting Chrome will clear the startup page, pinned tabs, default search engine, new tab page, disable extensions, and clear temporary data like cookies. It will not have any impact on your bookmarks, history, or saved passwords.
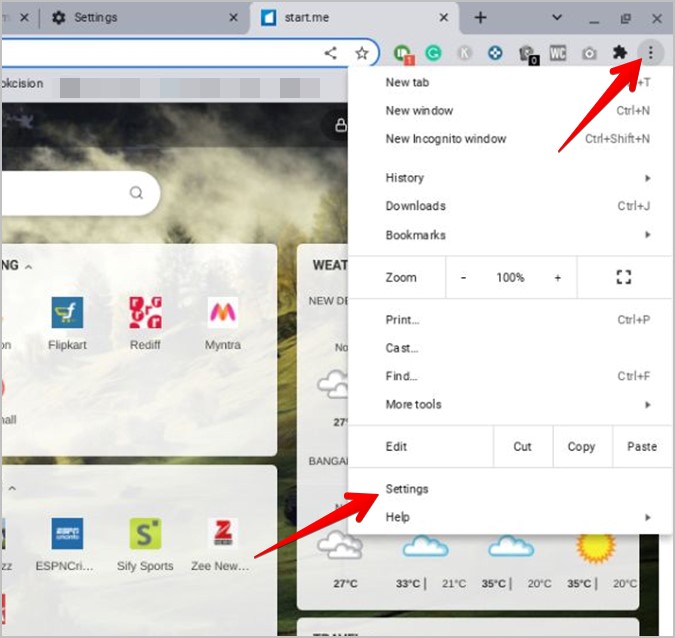
1. Open Chrome on your Chromebook.
2. Click on the three-dot icon at the top and select Settings from the menu.
3. Expand Advanced from the sidebar and click on Reset settings.
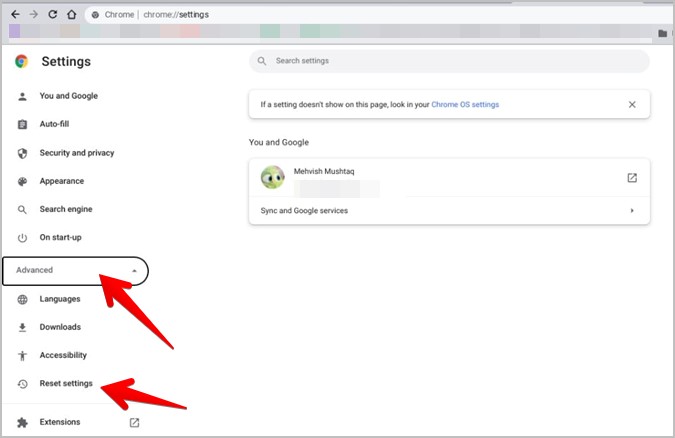
4. Click on Restore settings to their original defaults followed by Reset settings in the pop-up that shows up.

More Ways to Fix Chromebook Keyboard Not Working
If the problem persists, you can try factory resetting your Chromebook. If that also doesn’t fix the issue and you are willing to open your Chromebook, check the instructions mentioned in the Chromebook forum to clean the keyboard connector. Meanwhile, you can use Chromebook’s on-screen keyboard till the issue is fixed. Lastly, if your Chrome OS is slow, check out 15 ways to make Chromebook faster.