The archive feature is perhaps one of the best tricks Gmail has to offer. It is easy to use and also useful but most users don’t pay attention to it. This is the feature that can help you reach inbox zero. But a lot of people don’t use it and those who do are also misusing this killer Gmail feature. The ability to auto-archive emails in Gmail is what you should learn to apply. That will save you a lot of time as you won’t have to deal with all the emails that find their way to you. Deleting emails is not always an option which is why the archive feature exists in the first place.
Auto Archive Emails in Gmail
Gmail doesn’t have a direct way to auto archive emails however you can use filters to do the trick. The setup will take a few moments but once it is done, you will feel so much lighter at the end of the day and never miss that important email. After all, you don’t need to deal with all those emails and some of them like receipts and notifications can be left unread even.
Let’s begin.
Also Read: Why Is Gmail So Slow and What You Can Do About It
Create an Auto Archive Label
Gmail allows you to create filters using labels. Why not create one for auto-archiving emails too? This is the hidden feature I was talking about earlier. It is not very obvious at first but once you know, you know.
1. Open Gmail in your browser and click on the gear icon on the top right corner to select See all settings.

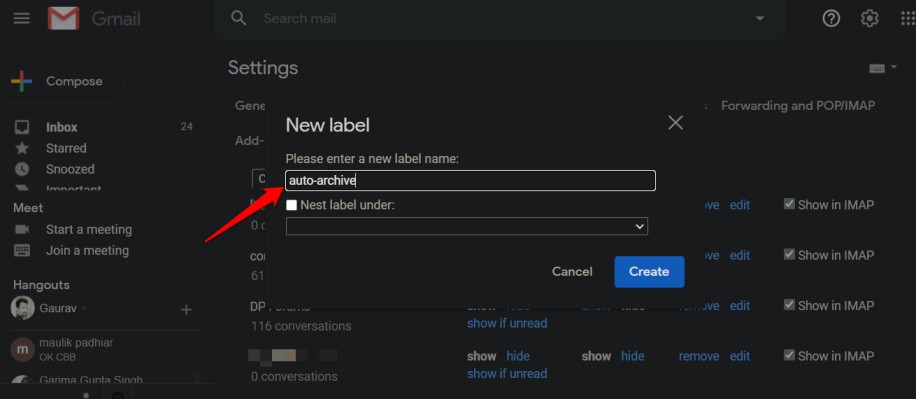
2. Scroll a little and click on Create new label button.

3. Name the new label as auto-archive and Save it. Click on Create button and don’t worry about the nest label feature.
There are no hidden lines of codes that you need to insert. Now, that the auto-archive label has been created, you can apply it to any email just like any other label but with a twist.
Also Read: How To Remove The Meet Tab From Gmail on Android & iOS
Using Auto-Archive Label in Gmail
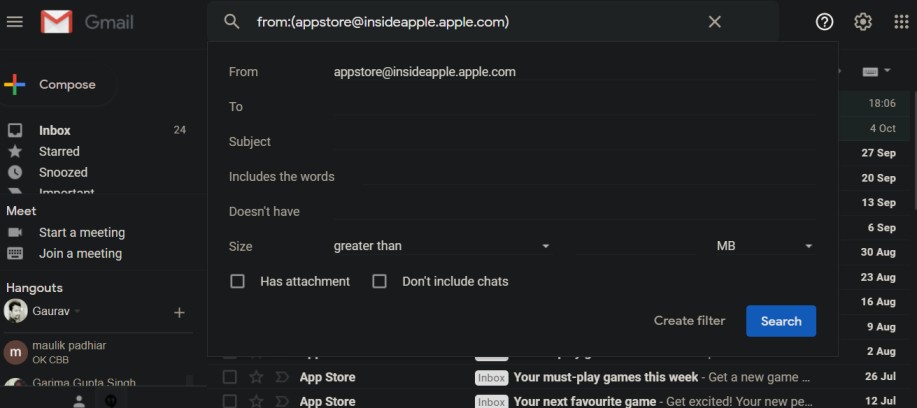
Some examples where you can use the auto-archive feature of Gmail are LinkedIn or Quora emails, newsletters, receipts, eCommerce orders, and so on. I will be using the Apple promotional email as an example. Open the email and click on the three-dot more menu icon to select Filter messages like these.

Noticed we didn’t apply the label directly using the label button? This gives you more control over what kind of emails will be auto-archived. Depending on the contents of the email and format, you can choose to filter by size, keywords/keyphrases, and so on.
Click on Create filter below to continue.

You will choose the auto-archive label and can also select a category if you wish. The category will depend on where you are receiving these emails. It could be Inbox or Updates, for example.

Make sure to select Create filter at the bottom to save changes. Now, all emails that satisfy the criteria you have set will be auto-archived in Gmail. If you are not getting the desired results, edit the criteria. It’s not that hard and you will get better at it with time.
There is no need to edit the auto-archive label in any way. All you have to do is create a new filter or edit an old one and apply the label.
Also Read: How to Quickly Check Mails on Gmail
Archive vs Delete
There is a subtle but very important difference between delete and archive features. When you delete an email, it is transferred to the trash folder where it will sit for 30 days before being deleted automatically and permanently. So, you have a buffer of 30 days to recover an email or attachment that you deleted accidentally or without much thought.
The archive won’t delete your email. It will simply put it into a locker. The email will disappear from your inbox allowing you to free your mind from it. You can retrieve it with a simple search and we all know Google is the king of search engines. Search operators or parameters work across all Google services including Gmail.
Also Read: 9 Best Gmail Add-Ons to Manage Mails Better
Retrieve Archived Emails in Gmail
The search operator you are looking for is ‘in:inbox your keyword here’. What this will do is search for the keyword across all emails in your inbox which also includes archived emails. Yes, archived emails are still part of your inbox but you can’t view them which helps with the declutter process. The only way to truly reach inbox zero.
There are other search operators that you can use too like using ‘and’ and ‘or’ to filter or combine emails. We have written an in-depth guide on how to retrieve archived emails in Gmail so please read that post. There are a lot of other tips and tricks you will find there.
Wrapping Up: Auto Archive Emails in Gmail
Well, now you know. The steps are pretty simple to follow but the feature is hidden deep within the Gmail ecosystem. The two primary aspects of the equation are labels and filters. It is a one-time process though so once you have created the label, you are done. Just make sure you are getting the desired results as per the criteria you have set.