The Samsung Gallery app is one of the best native gallery apps. It gives tough competition to numerous third-party gallery apps. Not only it does a great job as a gallery app but it offers delightful photo editing capabilities on Samsung Galaxy phones. You can crop pictures, add photos to another picture, resize, change background effects, and much more. Let’s explore how to edit photos on the Samsung Galaxy Phone using Samsung Gallery.
Samsung Gallery Photo Editing Tips
You will find most of the editing options when you press the Edit icon on a photo.
1. Crop Photo
You can crop freely or choose from the available standard options. Open the photo to crop in Samsung Gallery and tap on the Edit icon. By default, the photo will open the free crop mode. Use the photo edges to crop the photo as per your need.

To crop in standard sizes, tap on the Free text under the first tab. Select the crop size.

2. Rotate and Flip Photo
Often some Gallery apps miss out on the basic things. Fortunately, Samsung Gallery isn’t one of them. You can easily rotate and flip photos using this app.
Go into the editing mode of the photo. Tap on the Rotate and Flip icons under the first tab to rotate and flip the photo respectively.

3. Resize Photo
The Samsung Gallery app also offers the ability to resize photos. When the photo is in the edit mode, tap on the three-dot icon at the top and select Resize. Choose the resize percentage from the available options.

4. View Original Photo
At any point, while editing the photo if you want to compare it with the original photo, simply touch and hold the photo. That will show a preview of the original photo.
5. Change Intensity of Filters
Samsung Gallery offers several interesting filters right inside the app. With the photo in the editing mode, tap on the second tab next to the Crop tab. Here you will find various filters. Tap on the one to apply to your photo. Use the slider under the filter to adjust the intensity of the filter. If you want to remove the applied filter, tap on the first filter known as the Original.

6. Download New Filters
If you don’t like the existing filters offered by the Samsung Gallery app, you don’t need to switch to a third-party photo editor. You can download more filters in the Samsung Gallery app. For that, go to the Filter tab under the photo editing mode. Scroll to the extreme right end of the filter list. Here you will see a Download icon. Tap on it. You will be taken to the Camera and photo effects screen where you will find a variety of filters. Install the ones that you like.

7. Add Picture on Top of Another Picture
Many photo editors fail to offer the functionality to add a watermark to your photo or layer photos on Android, Gladly, Samsung Gallery is capable of letting you add a photo on top of another photo using the Stickers feature.
Open the photo in editing mode. Tap on the Sticker tab at the bottom and hit the Gallery icon. You will be able to select a new photo that you want to add to the existing photo. Tap on the photo to add it. Once the photo is added, you can reposition, resize, and rotate. Similarly, you can add multiple photos to one photo.

8. Doodle on Photos
If you want to draw on your photo, you can easily do that from the Samsung Gallery app. While editing the photo, tap on the Doodle tab at the bottom and choose the brush color from the available options. Alternatively, tap on the Color picker icon to choose a color from the photo.

You can even change the brush size and style. Simply, tap on the Brush icon to do so. Similarly, you can adjust the eraser size. Tap on the Eraser icon twice to enable the size setting.

9. Add and Style Text
On the photo editing screen, go to the Text tab to add text to your picture. Start typing the text in the available box. You can change the text color, font style, alignment, and background color from the available options on the screen.

10. Add Color Pop-up Effect
You might be aware of the color pop-up effect where one item in the picture is colored and the rest is monochrome. You can add the same effect within the Samsung Gallery app.
Go into the editing mode of the picture and tap on the three-dot icon at the top. Choose Spot color from the menu.

Tap on the item whose color you want to show. If some other items also show up in color, you can remove the color using the eraser tool at the bottom.

11. Create Collage and GIF
These two are the only features that you will find outside the editing mode. Open the Samsung Gallery app and tap on the three-dot icon at the top. Choose to Create from the menu followed by GIF or Collage depending on your need. Then select the pictures that you want to use for your GIF or Collage and edit as per your requirement.

12. Change Background Effect
For photos taken in the Portrait mode, you get the ability to change the background blur and even the effect. Open the Portrait mode photo in the Samsung Gallery app. You will see the Change background effect option at the bottom. Tap on it. On the next screen, using the available options at the bottom, you can change the background effect. Check out background eraser apps for Android.

13. Keep Original Photo After Editing
Typically, when you are done editing a photo in the Samsung Gallery app, you will tap on the Save option at the top. However, doing so will replace the original copy with the edited photo. If you want to save the edited photo while preserving the original copy, tap on the three-dot icon inside the edit mode. Choose Save copy from the menu instead of the Save button.

14. Revert to Original Image After Editing
In case you do press the Save button instead of the Save copy button, don’t worry. You can still get back your original picture using the Revert feature. Basically, the edited imaged can be reverted to the original photo after editing. For that, open the edited photo and go into editing mode again. You will see that the Revert option at the top is activated. Tap on it to get the original image. As obvious, you will lose all the modifications that you have made to the picture.

Fix: Unable to Edit Photos in Samsung Gallery
If you are getting the “To use this feature, you need to allow permissions in setting” error while trying to edit pictures in Samsung Gallery, worry not. You just need to grant the Photo Editor app the necessary permissions.
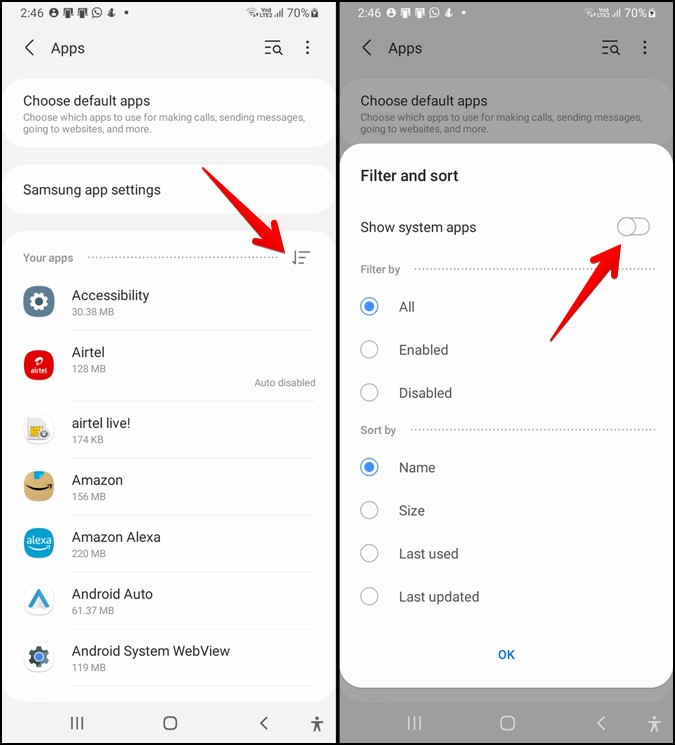
For that, open Settings on your phone and go to Apps > System apps. If you don’t see the System apps option, tap on the three-dot icon at the top and select System apps. Or tap on the Sort option and enable the toggle next to Show System apps.
Look for Photo Editor under System apps. Tap on it. Then tap on Permissions and allow Storage permission. Similarly, enable Storage permission for the Sound picker app. That should fix the problem of cannot edit photos in Samsung Gallery.

What’s More in Samsung Galaxy Phones
On some Samsung Galaxy phones, you will also have the features to remove blemishes and objects from your photos. You can even create live wallpapers on Samsung phones. Also learn the best tips to take screenshots.