Google Lens is nothing but Google Search and other related services like translation, OCR, etc. with images all rolled into one. Simply open the Lens app and point your camera at any object like plants, animals, etc. to identify and learn more about it. You can scan a dress, furniture, or toy to find and buy that exact thing. You can also translate any unknown language to the one you can read, copy text from anywhere, and so much more. In this article, we will explore all the ways to access Google Lens on Android and iOS, and how to use it efficiently.
Table of Contents
1. Google Lens App (Android)
Android users can simply install the Google Lens app to access and use Lens on the go. Though Google Lens is baked directly into the Google app and Android OS, installing the standalone app gives easy access to the feature than any other way we tried. Just open this link to download Google Lens from Play Store and install it.

You can also place it on the home screen for faster access.
2. Google App (Android and iOS)
Another easy way to access Google Lens is from the Google app. On Android, Google is a native app that comes preinstalled and on iOS, you can install the Google app from the App store.
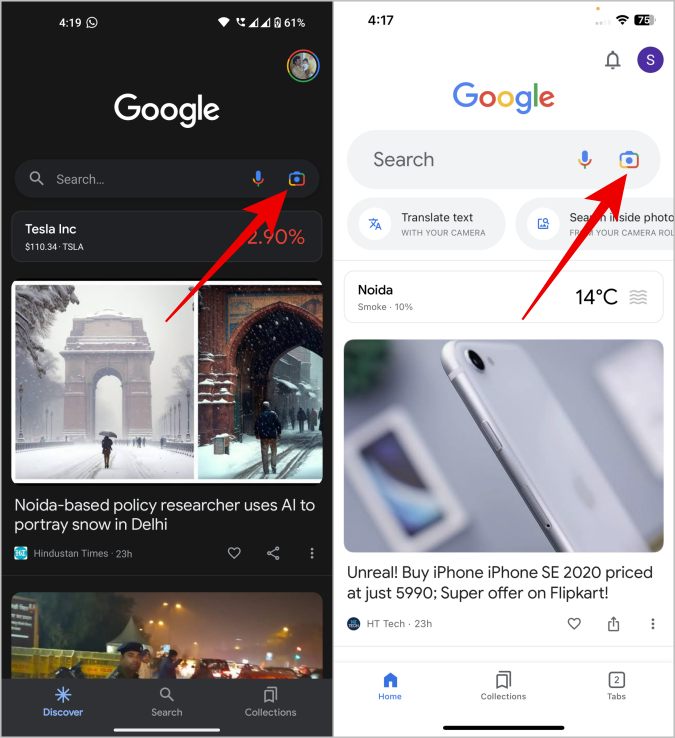
Now open the Google app and tap on the camera icon in the search bar. This will open Google Lens instantly.

3. Google Assistant (Android)
Google Assistant is already enabled by default on Android and works from almost anywhere. Though iOS has Google Assistant, it is different and also makes it harder to access Google Lens.
First, open Google Assistant by saying the “Hey Google” keyword or swipe from the bottom corners diagonally. Here, you will see the Google Lens icon at the bottom. Tap to access Google Lens.

Google Assistant has a different design depending on the Android version you are on and the Google Assistant version you have. So if you cannot find the lens icon in Google Assistant, just say “Open Google Lens” to access it.
4. Google App Widget (Android and iOS)
Google app supports widgets on both Android and iOS. On most Android phones, the Google search widget is placed on the home screen by default. In case it isn’t or has been removed, you can add it by long pressing on the home screen and then tapping on the Widgets option. In the widgets panel, search for Google and tap to add it.

In the drop-down, long-press on the Search option and place it on the home screen to access it.

On iOS, long press on the home screen and tap on the Plus icon at the top left corner. Here search for Google and tap on it.

Then swipe right and tap on Add widget option. This will add the widget to your home screen, now you can drag-n-drop the widget to your desired position.

From now on, simply tap on the widget’s Lens icon on Android and iOS to open it immediately.
5. Camera (Pixel and OnePlus)
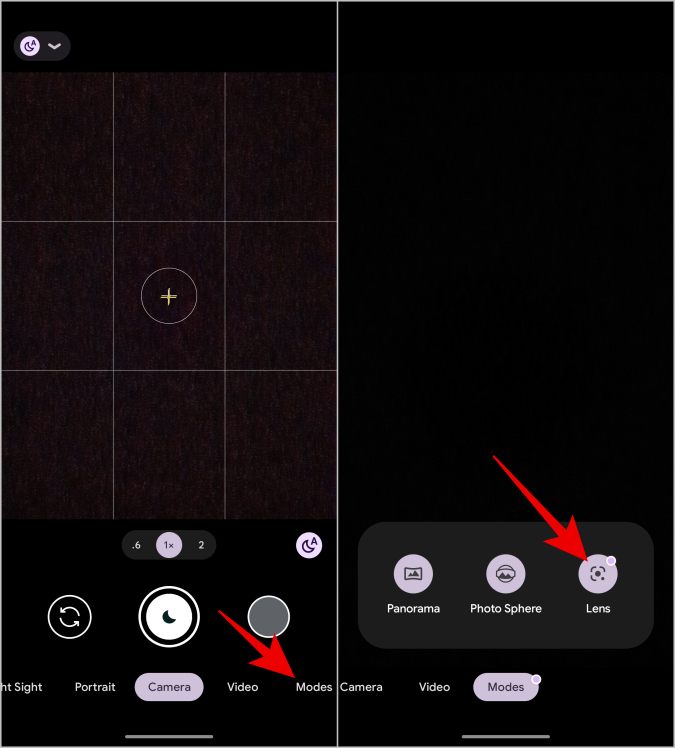
OEM brands with stock Android like Pixel, OnePlus, and a few others have integrated Google Lens directly into their Camera app. To access and use Lens, open the Camera app, select the More option, and here you should find the Lens mode.

Selecting it will open Google Lens immediately. Samsung Phone has Bixby Vision instead of Google Lens. It offers a similar service and experience but by Samsung.
6. Google Photos (Android and iOS)
Google Lens isn’t just for scanning the real world. You can also scan images stored on your device like photos and screenshots. Open the Google Photos app (download for Android | iOS) and open any image that you want to scan using Google Lens.

Once the image is open, select the Lens option at the bottom, and tap on it. This will open Google Lens and starts scanning objects in the image you have selected.
How to Use Google Lens on Android and iOS
Whether it is Android or iOS, once you open Lens, the UI experience remains consistent across the mobile OS. Here’s how to use Google Lens effectively with some examples.
Upon opening the app, you should see all your photos stored on the device. Select any to begin scanning. Tap on the drop-down icon at the top to select photos from a different folder.

You can also use the camera to scan objects in real time. Simply point the camera at something that you want to scan and tap on the Search icon (magnifying glass icon) to scan.

1. Search option will try to identify objects or subjects in the photo, return with possible answers, and also show more similar photos.
2. Text option will extract the text from the photo and allows you to copy the text and also send it to the desktop. Also, you can listen to the text as Lens is equipped with text-to-speech technology.

3. Translate option will translate the text from one language to another. While scanning, you can select the input and output language or it can identify the language being scanned automatically too. As expected, you also have options to copy and listen to the translated text.

4. With the Homework option, you can scan questions like math problems and get instant answers.

5. Shopping option scans the product and gives you links to where you can buy the exact product in the same color and pattern.

6. Places option is good for scanning and searching famous monuments and places. Lens will lead to a Google Search page so you can search and learn more about it.

7. With the Dining option, you can scan a food item to get restaurants and hotels that have similar food or you can also scan the menu of any restaurant to find the best dish in that restaurant by reviews.
Once done scanning, swipe up and click on the Add to your search button.

From here, you can give additional input. For example, scan a dress and add any color input. It will show you the results of the same dress in the color you asked.

Google Lens on Android and iOS
Apart from these features, Google Lens also has many other tricks up its sleeve like the ability to scan QR Codes, listen to books, save calendar events, etc. There are many more, you can check them out in the Google Lens tips and tricks article.