When it comes to backing up Android smartphone, there are a ton of software, both free and paid, that makes backing up data as easy as possible. However, most backup software is quite bulky, comes with quite a few unnecessary features, and not that user-friendly. Not to mention, some software even backup the data in proprietary format forcing you to use the same software to restore the backup.
The good thing is, as an Android user, you don’t necessarily have to use third-party software to backup Android and its data. Let me show you how.
How to Backup Android
When it comes to Android backup, I generally divide it into five parts. i.e. contacts, messages, photo and videos, apps and app data, and other files. The good thing about this approach is that all your eggs are not in one basket and the restore process is seamless too. I will show all these parts for a full backup experience.
1. Backup Contacts
If you are using Android that means your contacts list is automatically backed up to Google servers, at least until you manually disable the sync feature. So, in general, you don’t have to worry about backing up your contacts. If you are unsure whether your contacts are backed up or not, simply go to https://contacts.google.com and login to the Google account linked with your Android phone. You should see the contacts list.
If not, you can easily backup your contacts to Google with just a few taps. To do that, open Settings and go to “Accounts -> Google“. Here, select your email account. Next, toggle the switch next to “Contact” to the ON position. Tap on the vertical menu icon appearing at the top right corner and select “Sync now” option. This action backs up your contacts list to Google and is restored automatically when reset your device or on a new device.

2. Backup SMS
Android has no built-in way to backup SMS messages. However, there are some very good apps you can use to backup SMS on Android either to the cloud or to your SD card or computer. I’m choosing to backup SMS to Google Drive as it will be much easier to restore them when needed. In my case, I’m using SMS organizer, an awesome app with a ton of features.
To backup SMS to Google Drive, install SMS Organizer, launch the app and go to its settings. Now, go to “Backup and Restore” and tap on the “Google drive account” option. In the pop-up screen, select your Gmail account and tap on the “Ok” button and accept the permissions.
Now, tap on the “Back Up” button on the main screen and you are good to go. If needed, you can set the auto backup frequency by tapping on the “Auto backup” option.
Read: Top 5 Android Apps to Backup SMS and Call Logs
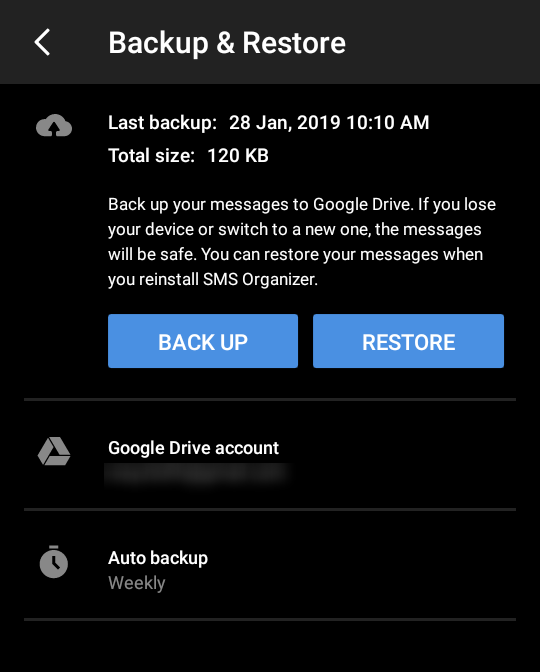
When you want to restore the SMS backup, simply tap on the “Restore” button and SMS Organizer will automatically download the latest backup and restore it for you.
3. Backup Photos and Videos
Almost every one of us takes pictures and videos with our smartphones. So, its only natural that you want to back up those precious photos and videos. Generally, the photos and videos are stored either in the internal SD card or the external SD card. No matter where they are stored in your phone, you can easily back them up.
Now, there are two ways you can back up photos and videos on Android. The first method is to use Google Photos which backs up all your media to Google Drive. If you let Google control the photo and video quality, you get unlimited storage so that you don’t have to worry about consuming your Google Drive space.
Unless you are taking 4K videos and super high-res photos with a ton of details, Google’s “High quality” photo and video storage is pretty good for most users. To learn more about how Google controls your photo and video quality for free unlimited space, click here.
Just install the Google Photos app, follow the instructions wizard and it will take care of the uploading and backup process. Depending on how many photos and videos you have, it can take some time to fully upload all the media.
The other way is to back them up to your computer or other external devices. For that, follow the below method.
4. Backup Internal/External Storage Files
If you have an external SD card in your Android smartphone then you can just pop it out, put it in an SD card reader and copy all its contents to your computer or other storage devices.
If you don’t have an external SD card, then the process is a bit different. Connect your Android smartphone to the computer via a USB cable. After connecting your device, if prompted, select the “Transfer files (MTP)” option. This option allows you to transfer files to and from the SD card. If you don’t select the MTP option, Windows might not be able to show the files and folders within your Android device.
Now, open Windows File Explorer using the keyboard shortcut “Win + E“. Here, you will find your Android smartphone listed next to the other drives. Open the Android drive, select all the files you see here, press “Ctrl + C” to copy. Paste them using the keyboard shortcut “Ctrl + V” in some folder on your computer.

It’s that simple to backup SD card on Android.
5. Backup Apps and App Data (no root required)
Android by default doesn’t provide any option whatsoever to quickly backup installed apps and app data. However, using Android Debug Bridge, you can easily backup apps and app data as a single file to your computer with just a single line of command. Once backed up, you can restore that backup file as and when needed to get back all your apps and their data.
First, you need to enable USB Debugging mode on your Android device. To do that, open the Settings app and go to the “About Phone” section. Here, scroll all the way down and tap on the build number 7 times to enable Developer Options.
Now, go back to the main settings screen and select the “Developer Options” option. Here, toggle the switch next to “USB Debugging” to ON position to enable USB debugging mode.

After enabling the USB debugging mode, download ABD for Windows and extract the contents of the zip file to “ADB” folder in C drive. Once extracted, this is how it should look like on your system.
Read: Top 15 ADB Commands Every Android User Should Know (PDF)

Now, connect Android Smartphone to your computer using a USB cable. Next, go to “C:\Adb\platform-tools” folder, right-click in the File Explorer and select “Open PowerShell here”.
In the PowerShell window, execute the below command. If your device is properly connected to the system, you will see your device listed in the PowerShell response.
./adb.exe devices

Once you’ve confirmed your device is properly connected, execute the below command to backup Android apps and app data.
./adb.exe backup -apk -shared -all -f ./backup.ab

On your smartphone, you will be prompted to accept the backup request. Just tap on the “Backup my data” button.

As soon as you tap on the button, the backup process will start. Depending on how many apps you have on your smartphone, it can take some time to complete the backup process. Once done, you will see a little toast notification on your smartphone. Since we are backing up all the apps and app data, the backup size will vary based on the number of apps you have. For instance, in my case, the backup file size is a little over 500MB.
You can find the backup file with the name “backup.ab” in the same folder as the ADB files. If needed, you can move that backup to the location of your choice.

When you want to restore, place the backup file in the same folder the adb files and use the below command. Just like before, you will see a prompt in your smartphone to accept the restore request. Tap on the “Restore my data” button.
./adb.exe restore ./backup.ab
That is all. It is that simple to backup and restore Android.