When you create a new Gmail account, Google offers you free 15 GB of storage. However, this 15GB is not just reserved for Gmail. Rather shared between Gmail, Google Drive, and Google Photos. So, if you are anyone like me, who use Google Photos and Google Drive religiously, you might have seen the error “Google storage full”. The sweet 15 GB of data is over and Google will no longer backup your photos, Gmail won’t allow you to send emails, etc.
To fix this you can either buy an extra 100 GB storage for as little as $2/month or start backing up to a different Google account altogether. But, before you board that train, there’s always scope to free up your storage by hunting down large files and attachment taking GBs of storage.
Well, here’s a detailed guide on how to do it. I’ll also mention the amount of storage I was able to recover after every step.
Before we begin
Let’s pinpoint the problem first. To check what’s taking up your Google drive storage head over to this link. The page shows the breakdown of the 3 major apps that take up Google Storage – Gmail, Google Photos, and Google Drive. For example, in my case, Google Photos and drive is taking up more than 12 GB of storage. Here’s a step by step guide on how I did it.

Step 1: Delete social & promotional emails
Let’s start with Gmail.
When I check my Gmail for the first time, it had about 3.5 GBs of data. To give you a perspective, my Primary Inbox had 800+ conversations whereas these social and promotions folder had about 10000+ conversation which is absurd in comparison. So, here’s how to get rid of them in a single click.
Foremost, head over to the social folder. You can find it under Categories just below the Drafts folder.

Within the social, click on the checkbox at the top-left side to select emails.

Once you click on the checkbox, you will have a small message just below the selection tool asking you to select all the conversations. For instance, I had 2,342 emails in the social folder. So, the link provides me the option to select all those emails by clicking on it.

When we have all the messages selected, click on the trash icon at the top and it’ll clear all the messages from the social folder.

Repeat the same process with the Promotions folder to get rid of other junk messages.
Step 2: Delete large attachment
Another major chunk of your mailbox space is taken up by attachments. To filter our emails with large attachments head over to the search bar and type the following and hit Enter.
has:attachment larger: 10 MB
Now, from the search results, carefully delete the Emails you think won’t be required in the future. If you get about 100+ emails for an attachment size of 10 MB, increase it to 100 MB, and see the results.
Step 3: Don’t Forget to Clear Trash
After all this cleanup, Gmail wouldn’t relieve your space immediately. These emails are moved to the Trash bin where it’ll be held for 30 days and then deleted. Hence, we would have to delete the emails immediately to free up space.
To do that, head over to the folders, navigate to the bottom and click on the More option. Once, you get the expanded list, scroll and click on the “Trash” folder.

Within the Trash folder, hit the checkbox button at the top-left and then click on “Select all * conversations in Trash”. Post that, click on the “Delete forever” button beside the checkbox icon. After that, the email will be deleted forever.

In about 5 minutes or so, check your Google one storage.
Storage Recovered: The entire mailbox cleanup helped me to recover about 1.5 GB of data from 3.5 GB.
Step 4: Delete large files on Google Drive
Let’s move to Google Drive.
An easy way to relieve storage from Google Drive is to delete the bigger files. To do that, visit this link which sorts Google Drive files in descending as per the file size.
If you end up deleting files, make sure you clear them from the Trash folder as well.

Storage Recovered: This leads to about 0.5 GB of cleanup. It wasn’t of much relevance as I had quite less amount of files on Google Drive.
Step 5: Delete by faces on Google Photos
Finally, it’s time to clean up Google Photos
The major chunk of your Google account storage is held by Google Photos since all the photos, videos, and media from your smartphone is getting backed up to Google Photos. But you don’t have to keep each media, especially video. Here’s an easy way to delete large files on Google Photos.
Click on the Albums option on the left side.
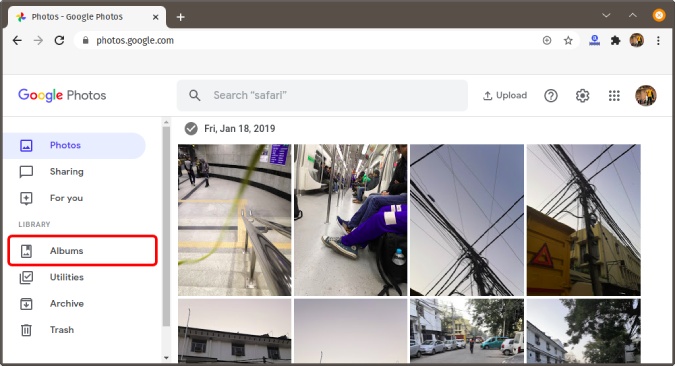
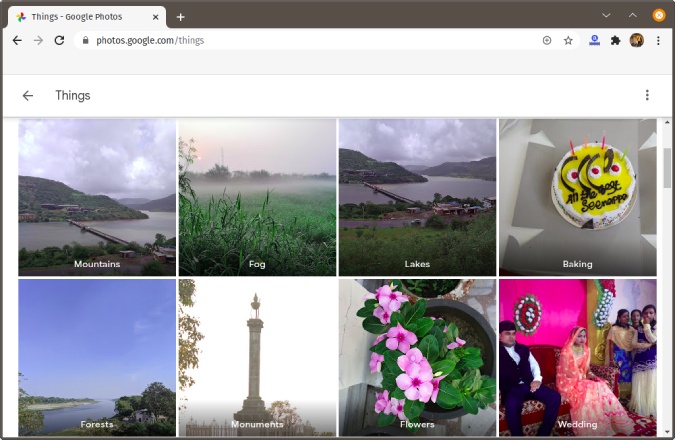
On the Albums page, you will have photo albums categorized by faces, places, objects, etc. Head over to the “People & Pets” album and you can clear off photos based on people’s faces. Additionally, there’s a “Things” album. It categorizes your photos based on objects and phototype like Screenshots, Forests, Trees, etc.
Step 6: Increase Compression
The last option is to compress photos already uploaded to your Google account. This would reduce the image size with no visual difference in quality. To put it into perspective, photos that are over 16 MP will be compressed to 16 MP. Videos that are higher than 1080p i.e. 4k or 8k, will be compressed back to 1080p.
To do so, head over to the Settings menu. The first option is “Upload Size For Photos & Videos”. Just beneath the option, you have a button called “Recover Storage”. Click on it.

Google Photos will show you the amount of storage you can recover by compressing from Original to High-Quality photos. In my case, it predicts me to save 10.2 GB of storage which is about 65% of my Google storage. Click on the “Compress” button and go ahead with the compression.

Storage Recovered: This cleanup recovered about 10 GB of data and it’s really significant.
Step 7: Third-party App Data
In case you use a lot of third-party apps that frequently upload and download files from Google Drive, they end up stacking a lot of data on Google Drive.
To clear off, head over to Google Drive. Next, click on the gear icon at the top-right corner beside the profile icon and select “Settings”.
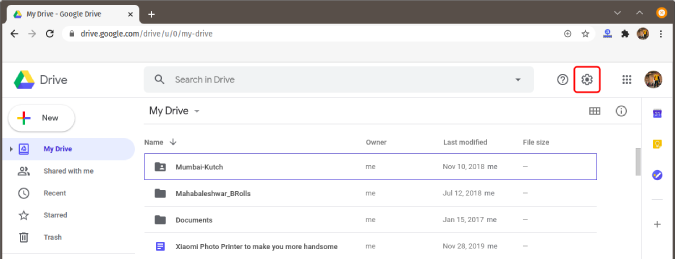
On the settings page, click on “Manage Apps”.
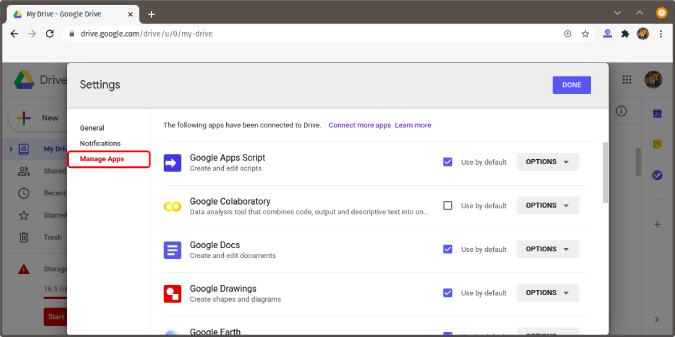
Under the Manage Apps sections, you will see a lot of apps that have access to your Google Drive storage. Besides the app, click on the “Options” button and select “Delete Hidden App Data”.

On the pop-up screen, you will see the amount of data being used by the app. In my case, I could find few apps consuming upto 20-30 MB of space. Else, it was just about an MB of space with apps like SMS Organizer.

Storage Recovered: Erasing hidden app data recovered around 50 MB of data. So, this step wasn’t of much use to me.
Step 8: Delete Backups
Most people, like me, use their Google Drive account to backup mobile data. In case you switch a lot of mobile phones or use Google Drive to backup Windows 10, your older backups could take up a lot of space. Head over to this link and maybe you can get rid of your older Android or Windows backup.
For instance, I used a Nokia device before I switched on to Samsung Note 9. So, Google Drive still held on to my Nokia backup since I never erased it. To do that, right-click on the backup file and click on “Delete backup”.

Storage Recovered: Now, erasing the old Android backup saved me around 0.5 GB of storage. In case you have a data backup of a Windows machine, it would be much more than 0.5 GB.
Closing Words
So, I started up with about 18 GB of Google storage and ended up deleted almost 12 GB. Let me know your experience in the comments below. For more issues or queries, let me know in the comments below.
Also Read: 10 Best Google Drive Tips and Tricks for Beginners and Pros