If your primary email is filled with junk and spam, then you must be in need of a new email id. And creating a new id can be a hassle. But if you have an Apple ID, then you can get a free iCloud email at no extra cost. Plus there are some extra perks of owning an iCloud email that we’ll be sharing here as well. Let’s first start with the steps on how to create an iCloud email on Mac and iPhone.
Table of Contents
Create an iCloud Email ID on MacBook
Before starting with the steps, please make sure that you’re correctly signed in with your Apple ID on your Mac and that it is up-to-date with the latest updates. So that you don’t face any interruptions along the way.
1. Go to your Mac’s home screen and click on the System Preferences icon in the dock.
Pro Tip: You can also open the System Preferences through Spotlight Search. Press Cmd + Space to open Spotlight Search, and then type System Preferences. Then click on the same to open it.

2. System Preferences window will open. Click on Apple ID in the upper right corner of the screen.

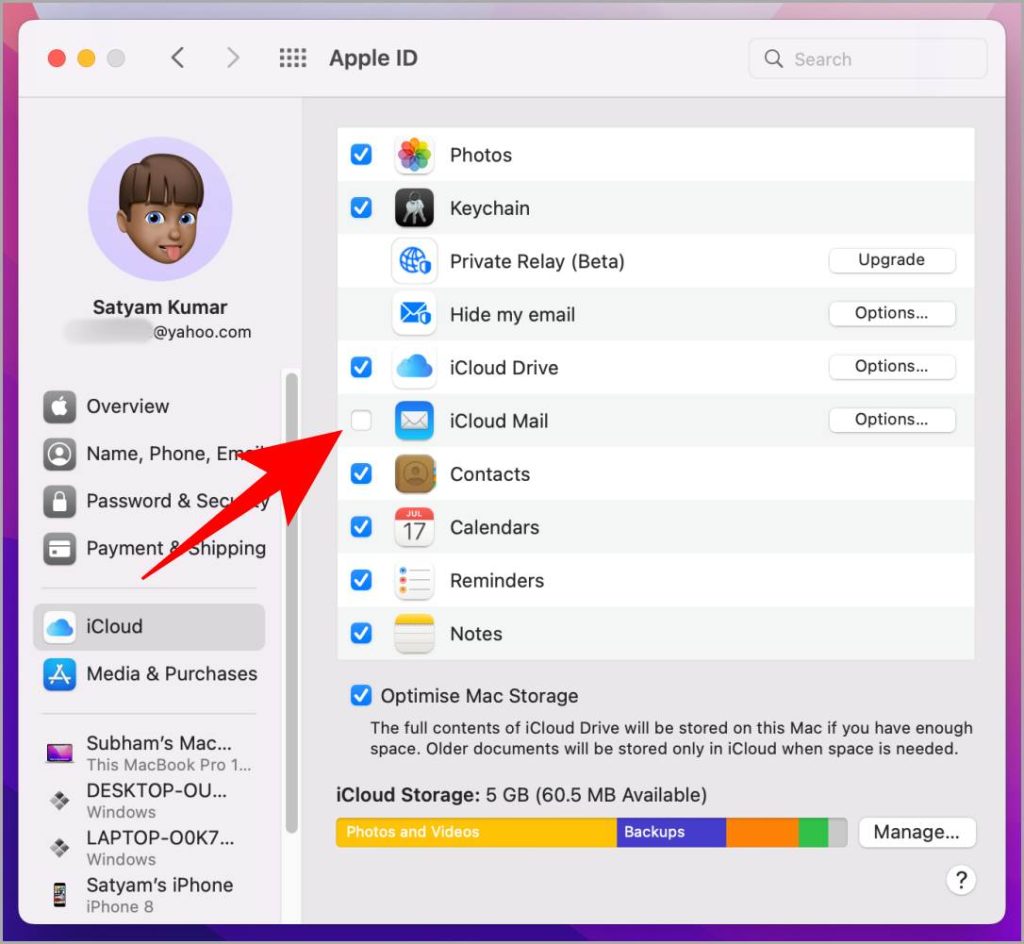
3. Click on the blank box in front of iCloud Mail in order to toggle it on.

4. A prompt will open and it will ask you to choose a username for your new iCloud email. Type a desired username and tap on OK.

5. It will ask you to confirm the creation of the iCloud email. Click on Create. And that’s it, now you have an active iCloud Mail id. You can use this ID to send and receive emails.

Must Read: How to Take and Highlight a Screenshot on Mac.
Create an iCloud Email ID on iPhone
If you don’t have a Mac, you can enable iCloud Mail on your iPhone also. Before proceeding further, please make sure that you’re signed in properly on your iPhone so that you can go through the steps listed below easily.
1. Go to the home screen of your iPhone by swiping up (or pressing the home button if you’re using iPhone SE).
2. Locate and tap on Settings app to open it.
Pro Tip: If you don’t have Settings on your home screen, then you can swipe left until you see the App Library. Then you can search for Settings in the top search bar.

3. Once Settings is open, tap on your name/Apple ID.

4. Tap on iCloud to further open the options.

5. Scroll down the iCloud settings page until you see the iCloud Mail option. Tap on it to toggle it on, and create an iCloud email id.

6. A pop-up will appear on the screen. Tap on Create.

7. Type a username you want to choose for your new iCloud email and tap on Next.

8. On the confirmation page, tap on Done. And that’s it, now you have your new iCloud Mail. You can use it however you want.

Bonus Perk
iCloud Mail allows you to create iCloud email aliases for free. And you can use those aliases accordingly, to sign up at various websites. To create an alias, you first need to open https://icloud.com/mail/ in your choice of browser.
1. Click on the Settings icon near the Mailboxes section, then click on Preferences to open the iCloud Mail preferences.

2. In the Preferences pop-up, click on the Accounts section on the left side. Now click on Add an alias and fill in your details and follow the prompts. You can create up to 3 aliases in one iCloud Mail for free.

FAQs
1. How can I access my new iCloud Mails?
You can check your iCloud Mails in the Mail app on Mac and iPhone and even on iPad. Plus you can even access iCloud Mails on any browser of your choice by visiting https://icloud.com/mail/.
2. Can I turn on iCloud Mail on my iPad?
Yes, you can definitely do this. And the steps to do so are completely identical to the Phone one.
3. Can I create an iCloud email account using an Android or Windows desktop browser?
No, you can only do so from an Apple device like iPhone, MacBook, or iPad. However, once an email id has been created, you can sign in to that iCloud email id using an Android email client like Spark or a Windows email client like Thunderbird.
Up in the Cloud
iCloud Mail is one of the most underrated yet useful features of iCloud. But once turned on, it can help you sort and prioritize your emails, without going through the hassle of creating a new email id. Just like other apps from the Apple ecosystem, iCloud Mail will be available on all your devices signed in with the same Apple ID.
Want to know how to schedule an email on Mac? Here are the 4 ways to schedule an email on MacBook. I hope this helped you get a new email id quickly.