There are so many things to love and hate about Windows 11 OS, but one thing that annoys everyone is Microsoft’s decision to show ads and promote other Microsoft services. The question is why Microsoft is showing these ads even after users pay for a Windows license. Fortunately, Microsoft allows you to disable these ads on Windows 11, but the process is needlessly complex. To make your life easier, we have listed down every possible way to block ads on Windows 11 everywhere.
Table of Contents
1. Remove Ads from Start Menu and System
When you install or set up your Windows 11 fresh, the first thing you will notice is lots of bloatware on your desktop screen, Start Menu, and App Gallery. These apps or software are nothing but ads injected by Microsoft or your device manufacturer. So it’s better to remove all those unwanted bloatware from your computer.
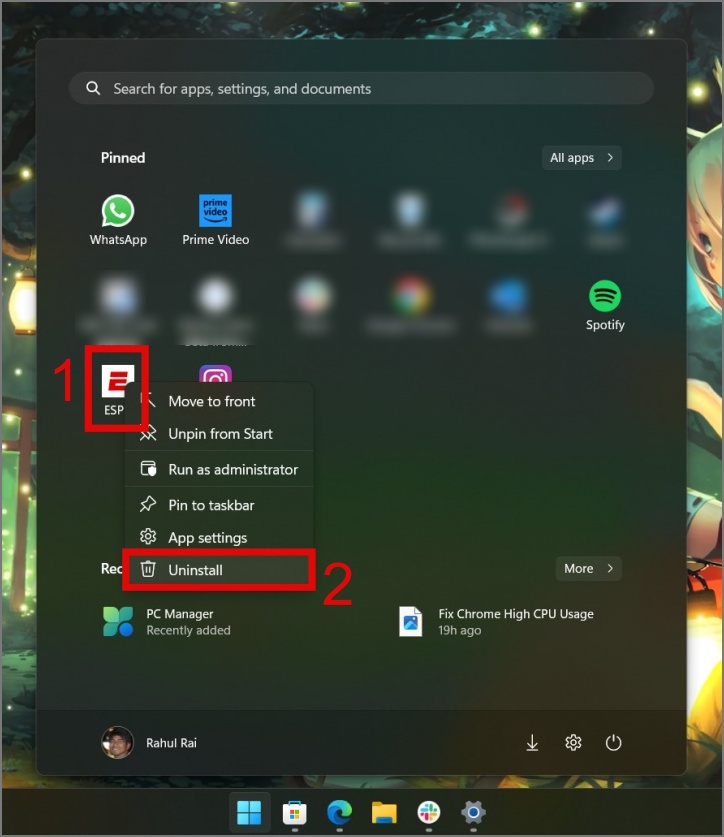
1. Press the Windows key or Start icon to open the Start menu and then right-click on the app that you don’t need.
Unfortunately, Microsoft doesn’t tell you which app is part of Windows OS and which one is promotional or sponsored.
2. Next, select the Uninstall option and, when a prompt appears, click on the Uninstall button.

3. If the bloatware is hidden inside the All Apps section, then simply go to the All Apps screen.

4. Select the bloatware app by right-clicking on it and then choose the Uninstall option.

5. Lastly, when prompted, click the Uninstall button.

Alternatively, you can also remove all the bloatware from Windows 11 by simply navigating to the Windows Settings (Windows key + I) > Apps > Installed apps.

Now click on the kebab menu (three-dot icon) next to the app you want to uninstall and select Uninstall option.

2. Turn Off Ads on Windows Lock Screen
Sometimes, you might see ads in a text format on your Windows 11 lock screen. Although they may not be explicitly labeled as ads, clicking on them will open the link in the Edge browser (indirect promotion), regardless of whether you have set another browser as your default. Luckily, you can easily disable these ads too. However, if you have set Windows Spotlight as your lock screen wallpaper, then it’s not possible to disable ads so better select the Picture or Slideshow mode.
Here’s how to remove ads from your Windows lock screen:
1. Go to Windows Settings (Windows Key + I) and navigate to the Personalization area and then select the Lock screen option.

2. Next, under the Personalize your lock screen setting, select either the Picture or Slideshow option.
3. After that, you will get a new option below – Get fun facts, tips, tricks, and more on your lock screen. Just disable it and you will no longer see ads on your Windows 11 lock screen.

As you can see from the image below, your lock screen looks much cleaner after disabling Windows Spotlight.

3. Disable Ads in Windows Search
Microsoft has not even shied away from displaying ads in its Search Home on Windows 11. On the right side, you will see a bunch of highlights related to news, games, images, etc. These types of content can be used for showing ads or luring you into downloading an app or game.
So to remove promotional ads or sponsored content on Windows Search, follow these simple steps:
1. Go to Privacy & security (under Windows Settings) and then select Search permissions.

2. Now disable all the options under Cloud content search. Next, scroll down and disable Show Search highlights.

Here is how the Windows Search looks before and after ads were disabled.

4. Remove Widgets Board Ads From Taskbar
Most of you won’t consider Windows Widgets board as a form of advertisement but indirectly, Microsoft uses these widgets as a way to force users to try Edge browser and other Microsoft services. While there is no way to stop Microsoft from injecting ads like this, you can at least remove the Widget icon from the Taskbar.
Here’s how to do that:
1. Navigate to Windows Settings (Windows+I) > Personalization > Taskbar.

2. Now simply toggle off the Widgets option under Taskbar items.
5. Disable Personalized Ads on Windows 11
Every Windows 11 PC has a unique Advertisement ID which app developers and Microsoft both can use to show you personalized ads. Though this method won’t remove ads from Windows 11, at least, you can disable them to feel less intrusive.
And if you don’t want your data to be used for tracking your behavior and showing targeted ads, then follow these simple steps:
1. Go to Windows Settings, select Privacy & security, and then choose the General setting under Windows permissions.

2. Now toggle off all the options (refer to screenshot).

6. Disable Notification Ads on Windows 11
Sometimes you might receive notifications on your Windows 11 PC in the form of tips, tricks, suggestions, and features. These notifications might not be a big deal for many users, but it’s another way for Microsoft to force you to switch to Edge or Bing or promote its other services.
So if you don’t want to see these needless notifications, here’s a step-by-step process for you:
1. Open the Windows Settings, select System, and then choose Notifications.

2. Scroll down and click on Additional settings. After that, uncheck all the options under it.

7. Disable Diagnostic Data to Stop Personalized Ads
To enhance the security and performance of Windows 11, Microsoft collects usage data from users in order to identify and fix bugs. However, Microsoft can also use these pieces of information to show you targeted ads. You may turn off the Diagnostics Data on your Windows PC.
Here’s how you can do that:
1. Press Windows Key + I to open Windows Settings and go to Privacy & security and then select Diagnostics & feedback.

2. After that, toggle off these two settings — Send optional diagnostic data and Tailored experiences.
3. You can also opt to delete the existing diagnostic data.

8. Disable Device Usage to Stop Targeted Ads
Microsoft also shows tips, ads, and recommendations based on how you plan to use your Windows PC such as gaming, school, creative, business, etc. So if you don’t want to be targeted with personalized advertisements, you can turn off all these options on Windows 11 computer.
Here’s how it works:
1. Open Windows Settings, click Personalization and select Device usage.

2. Later toggle off all the listed options, including gaming, family, creativity, and more.

Improve Windows 11 Experience by Removing Ads
Even after plenty of criticism, Microsoft keeps finding ways to insert ads into Windows 11. They were testing ads in File Explorer in Windows Insider but then decided against it later thankfully. Thankfully, Microsoft hasn’t restricted users from disabling such ads on Windows 11. Still, we wish there was one simple and straightforward method to remove or turn off all types of sponsor or promotional ads on Windows.
You can also check out our comprehensive guide on the effects of resetting your Windows 11 PC and the best Windows 11 apps for productivity.