One of the unique features of the Google Pixel is “Active Edge”. This feature lets you squeeze the bottom frame of the device to launch Google Assistant and silence alarms and incoming calls. But unfortunately, Google removed this feature from the latest Pixel 4a. Anyhow you can use a third-party app to get it. Here’s how.
Enable Squeeze for your Assistant on Pixel 4a
To enable the side Sqeeze action, you need to download an app called SizeSqueeze+. This app is specially made for Samsung phones and you do find Samsung exclusive features like enabling Bixby, launching Samsung Pay, etc. But in terms of functionality, this app works fine on any phone that has a barometer sensor including Pixel 4a.
To get started, Download the Side Squeeze + app from the APK Mirror and Open it. If you haven’t installed apps from the browser before, it will show a pop-up asking you to allow this source to download apps from the browser you use. Click on ok and allow the source to download the apps.

Now install the app and open it. The app provides you a welcome screen explaining all the features it has. Swipe left and click Finish to get started. Now it prompts for the accessibility permission in a pop-up, just click on ok and it will be redirected to accessibility settings.

In the accessibility settings, select the SideSqueeze+ option and enable “use SideSqueeze+” option. That’s it, you don’t need any other accessibility permission to use Google Assistant when Swiping.

Now get back to the SideSqueeze+ app, you can see another pop-up asking to opt-out of battery optimization. Click on ok and disable the app in the battery optimization settings. This will make sure that the app will not shut down in the background. Now the app also asks for various permissions, click on “Not Now” option, and leave them. You don’t need any of those permissions to run the app.

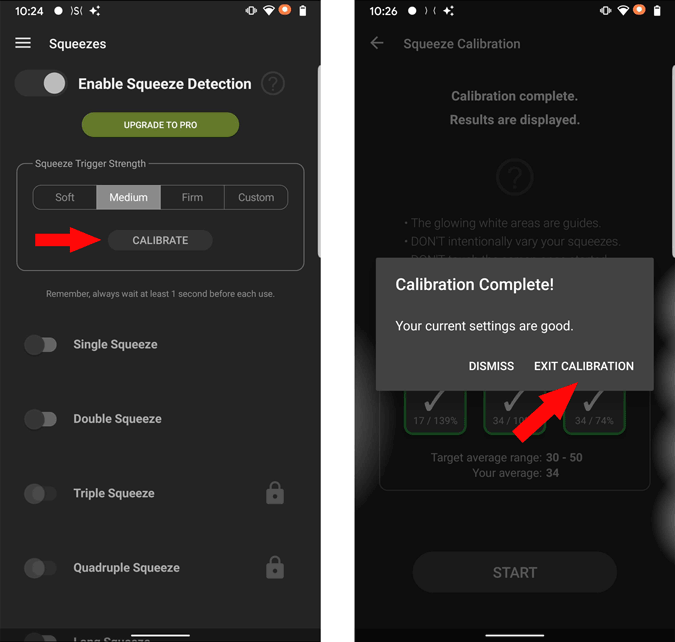
Now you need to calibrate your squeeze trigger strength. Let the strength option to soft and click on calibrate. Now press start to calibrate the Squeeze action for your phone. It asks you to squeeze the phone three times to calibrate the squeeze action for your phone. Anyhow, it may take multiple attempts to calibrate successfully. Once done, click on “Exit Calibration”.
Now on the squeezes page, enable a single squeeze option. After enabled, you can see an option called “Primary action while is on”. Enable it to select the action for the squeeze.
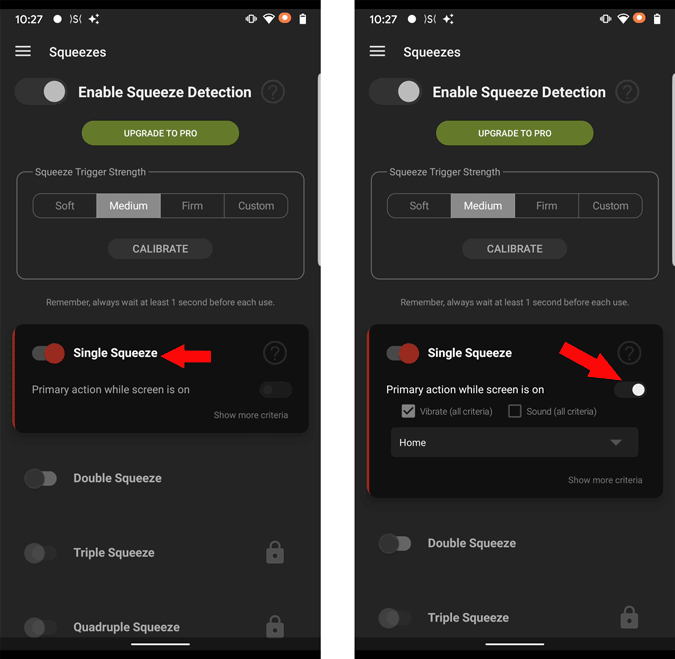
Now you can see a dropdown menu, click on it, and select the “Launch Google Assistant” option.

That’s it. Now you can squeeze and activate Google Assistant just like before. If you have a problem with the squeezing action, try different squeezing strength and calibrate.
Wrapping up
Though the app works completely fine, the action is a bit slow comparing to the in-built option with previous models. Anyhow, this app also allows you to set shortcuts for double squeeze and long squeeze. And you can upgrade to pro to even configure, triple squeeze, quadruple squeeze, and long-double squeeze.