Amazon’s Fire series tablets are an excellent option when considering reliable and budget Android tablets. However, there is a big catch with these devices. Amazon doesn’t allow Google Play Store on their Fire series tablets. So you are forced to download apps from the relatively limited Amazon Appstore. The methods that were available until now to install Google Play Store on Fire tablets were extremely tedious and cumbersome. But thanks to an anonymous developer named Datastream33, you can now install Google Play Store on Fire tablet easily.
Table of Contents
Before We Proceed:
There are some pre-requisites that you must meet before installing Google Play Store on your Fire tablet.
- Your Amazon Fire Tablet should be of a model from the below list.
| Device Name | Generation |
| Amazon Fire 10/10+ (2021) | 11 |
| Amazon Fire 8/8+ (2020) | 10 |
| Amazon Fire 10 (2019) | 9 |
| Amazon Fire 7 (2019) | 9 |
| Amazon Fire 8 (2018) | 8 |
| Amazon Fire 10 (2017) | 7 |
| Amazon Fire 8 (2017) | 7 |
| Amazon Fire 7 (2017) | 7 |
| Amazon Fire HD8 (2016) | 6 |
| Amazon Fire HD10 (2015) | 5 |
| Amazon Fire HD8 (2015) | 5 |
| Amazon Fire HD7 (2015) | 5 |
| Amazon Fire HD7 (2014) | 4 |
| Amazon Fire HD6 (2014) | 4 |
- You need a Windows computer and a working internet connection.
- A USB cable to connect the tablet to the computer.
Now let’s move on to the actual steps to install Play Store on your Amazon Fire tablet.
1. Enabling USB Debugging
1. Open the Settings app on your Amazon Fire tablet from the home page of the launcher.
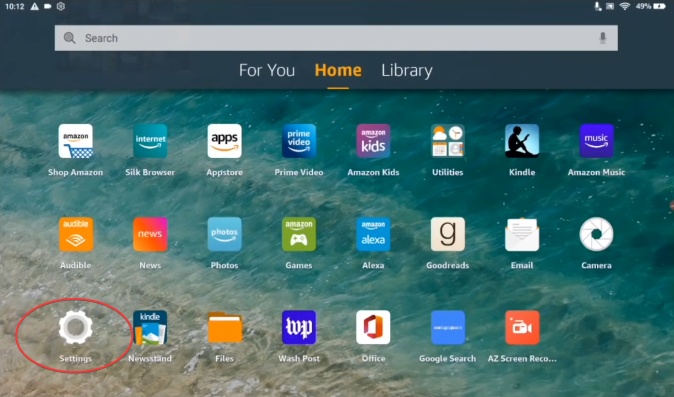
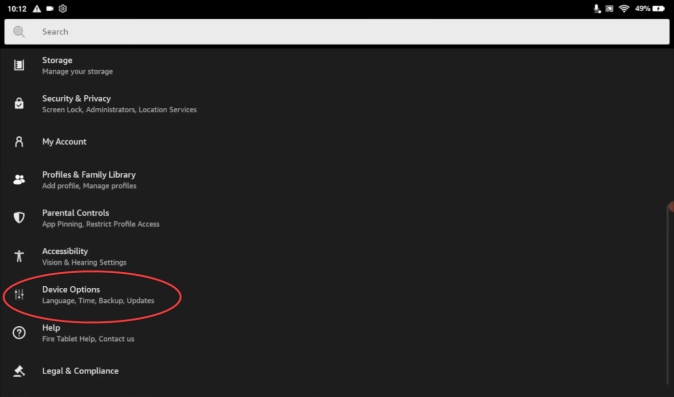
2. In the Settings menu, find Device Options and tap on it to open the menu.
3. In Device Options, tap on About Fire Tablet.

4. In About Fire Tablet, tap on Serial Number a few times until you get the message ‘You are now a developer’.

5. Go back to Device Options and tap on Developer Options.

6. Tap on the radio button next to Off to enable Developer Options.

7. Tap OK on the pop-up menu that appears next to confirm.

8. In the Developer Options menu, tap on the radio button next to USB debugging to enable the option.

9. Tap OK on the pop-up menu that appears next.

You have successfully enabled USB debugging on your Fire tablet.
2. Setting up Fire Toolbox Software
1. Boot your Windows PC and open your preferred browser.
2. Go to the official XDA page of Fire Toolbox by Datastream33.

3. Scroll down until you find the Downloads section and click on Download button below the Installer(.exe) listing.

4. Wait for the download to complete and click on it to start the installation process.

5. On the dialogue box that appears, click on Install for me/all users depending on your choice.

6. On the next dialogue box, click on next to Continue.
Note: We advise you to not change the installation location and stick to the default.

7. Click on Install on the next menu to install the toolbox on your Windows system.

8. Leave the Launch Fire Toolbox option checked and click on Finish to launch the Toolbox.

9. Click OK on the dialogue box that appears and proceed to click on Set Theme.

10. In the pop-up that follows, you will be notified to plug in your Fire tablet. Proceed to connect your Amazon Fire tablet to your PC using the USB cable.

11. You will be notified that your device isn’t authorized and that you need to authorize it first.

12. Your Fire tablet would have now received a prompt to Allow USB Debugging. Tap OK. You can also check the box Always allow from this computer to not repeat this step for future prompts.

13. Move back to your PC and click on Yes, I’ve used it before on the dialogue box that appears. Proceed to click on Google Services next.

14. In the next dialogue box that appears, click on the Execute Tool option.

15. The Toolbox will auto-detect your Amazon Fire tablet and then proceed to download and install the appropriate files for your device. After the process is complete, click on the OK button. Now you can disconnect the tablet from your PC.

Note: It is advisable to wait for at least ten minutes before opening the new Play Store app on your Kindle Fire tablet.
16. You can now log in using your Google account from the Play Store app that appears on the home screen.

Voila! and that is how you install Google Play Store on a Fire tablet. You can now install all your favorite apps using the Play Store and get additional functionality on your Fire tablet.
Playing With Fire
There exist numerous methods to install Google Play Store on the Fire tablet. However, Fire Toolbox provides the easiest and quickest way to get it done. Alternately, if you have an Amazon Kindle, learn these tips and tricks to get the most out of it.