There is a wide section of mid-range and entry-level Android phones that are often loaded with bloatware apps. Bloatware or unwanted apps are prevalent irrespective of the price range. Excluding a few flagship Android devices, all come pre-loaded with apps that aren’t useful and cannot be uninstalled either. Want to remove bloatware apps from Android? Here’s how to use Universal Android Debloater to uninstall bloatware apps.
Table of Contents
What Is Universal Android Debloater
Universal Android Debloater (UAD) is an open-source tool to effectively remove all the bloatware installed on your Android phone. Typically, you would use ADB from the terminal to run commands and install or remove app packages. But UAD removes the trouble of using the terminal for uninstalling app packages.
Note: You will still need to run a few commands to set up ADB but they are easy and we will guide you.
Instead, you get a GUI interface that is easier to understand and identify the app, rather than searching the phone’s storage using ADB and without rooting your phone. But UAD can do more. Here’s a list of what the tool is capable of:
- You can remove or uninstall as well as restore and enable system packages.
- It comes with multi-user support and even connects with multiple Android devices. Pretty handy if you want to remove the bloatware from all your Android phones.
- UAD supports popular OEMs, including Xiaomi, OnePlus, Samsung, Oppo, and more. If you use a phone purchased from a carrier like T-Mobile or Verizon in the US, it works with these Android phones too. You can check out the complete list of supported devices and carriers on its official GitHub page.
- It saves a log of all the tweaks you make to your Android phone. So, you have a checklist to go through, if you removed a package you didn’t intend to.
Things to Remember Before Using Universal Android Debloater
Universal Android Debloater’s developer created the tool so that it can minimize the chances of you bricking your phone. Once bricked, it can be extremely hard to bring the device back to a usable state. So, the worst-case scenario with UAD is that you might have to factory reset your phone. Here are some other noteworthy points to keep in mind before using this tool:
1. Back up your phone using the Settings app. If something goes wrong, you can use it to revert to the existing phone configuration and personal files. Move the backup file to an external storage drive or your computer.
2. Removing bloatware from your Android phone isn’t permanent. OEMs will auto-install the removed bloatware apps when you download and install a major phone update. So, you will have to use the UAD to remove these apps again after an update.
3. Do not try to remove every system app because you may end up removing packages that are necessary for Android OS to boot. The result will be an endless boot loop which will require a factory reset to make the phone work again.
Using Universal Android Debloater to Uninstall Bloatware
Debloating an Android phone is a three-part process. Firstly, you must enable USB debugging on your phone. After that, install ADB on your computer. Lastly, download and install the Universal Android Debloater app and use it to remove unnecessary packages.
1. Enable USB Debugging on Your Android Phone
Follow the below-mentioned steps to enable USB debugging on your Android phone:
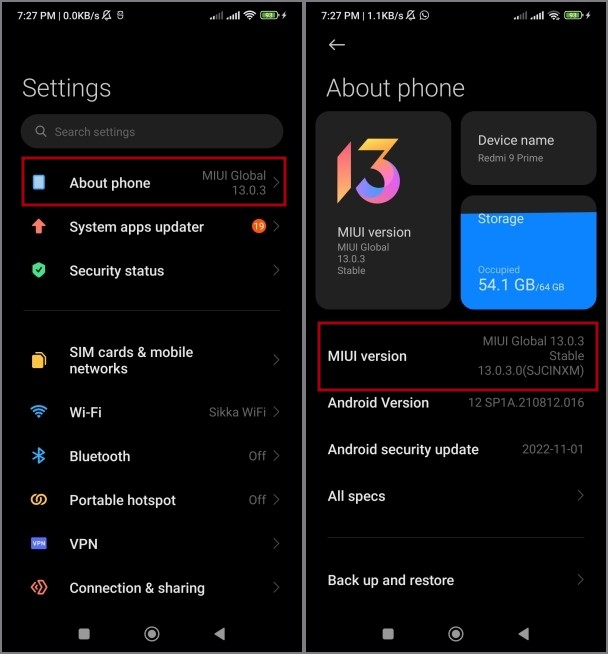
1. Connect your phone to a Windows PC using a USB cable. Open the Settings app on your phone. Tap on the About option.
2. Tap seven times on the MIUI version option to enable Developer options for a Xiaomi phone. Remember that the option to enable the Developer options section can slightly vary with each OEM. Samsung phone users will tap on Build Number.
3. Tap on the back button and then tap on the search bar. Type developer in the search bar and tap on the Developer options search result.
4. Scroll down and find the Debugging section. Click on the toggle next to USB debugging to enable the feature.

5. You will see a warning. Agree to the terms and tap on the OK button.

2. Download and Install ADB on Your Computer
After enabling USB debugging, you need to download and install ADB on your Windows PC. Here’s how:
1. Open any web browser and go to the XDA download page of ADB for Windows.
2. Download version 1.4.3 and run the file to begin the installation.
3. A terminal window will pop up. Type Y in the terminal and press Enter.
4. Again type Y and press Enter.
5. Type Y and press Enter again to install USB drivers.

6. An installer window will launch. Follow the on-screen instructions and install the drivers on your system.

7. Right-click on the Start button and select the Terminal option from the list.
8. In the Terminal app window, type the following command and press Enter to check if ADB works:
adb
9. After that, type this command and press Enter:
adb devices10. Adb will send a prompt on your phone to connect. Tap on OK.

11. After that, type this command and press Enter:
adb devices12. The command will display a list of attached devices. You won’t see the name of your device but a number.

3. Remove Bloatware Using Universal Android Debloater
Now, we have both ADB and USB Debugging active. The only thing left is to remove the bloatware from the phone. Here’s how to do it:
1. Visit the official GitHub page of Universal Android Debloater. Download the Windows version of the tool.
2. You don’t need to install the application. Double-click on it to launch the tool directly.
3. Your phone name will appear on the top bar. The tool will list all the packages on your system. Click on the All Packages drop-down and select the Enabled option.

4. Now, scroll down to locate the package you want to remove from the system. The package names will be a little long but will contain the app name in it. Or, you can use the search bar to find a specific package.
5. Click on the Uninstall button. It will remove the app from your phone.

6. To uninstall multiple apps at once, click on the check box in front of each app to select it. Then, click on the Uninstall selection button.

7. Check your phone and the selected apps will disappear from the app drawer. If you want to restore an app, click on the Uninstalled option to view the list. Then, click on the Restore button to reinstall the package.

Removing Bloatware on Android
Universal Android Debloater works flawlessly in uninstalling the bloatware that OEMs bundle with their phones. However, please stick to the recommended section only and remove those apps which you don’t need. Create a phone backup beforehand and don’t wander into the Expert or Unsafe section unless you have knowledge of which package is useful or non-useful.
If you see the apps again after installing an Android or phone OS update, launch the tool again and repeat the bloatware uninstallation process.
Ever been in a situation where you wanted to view the password of the Wi-Fi network your phone is connected to? Here’s how.