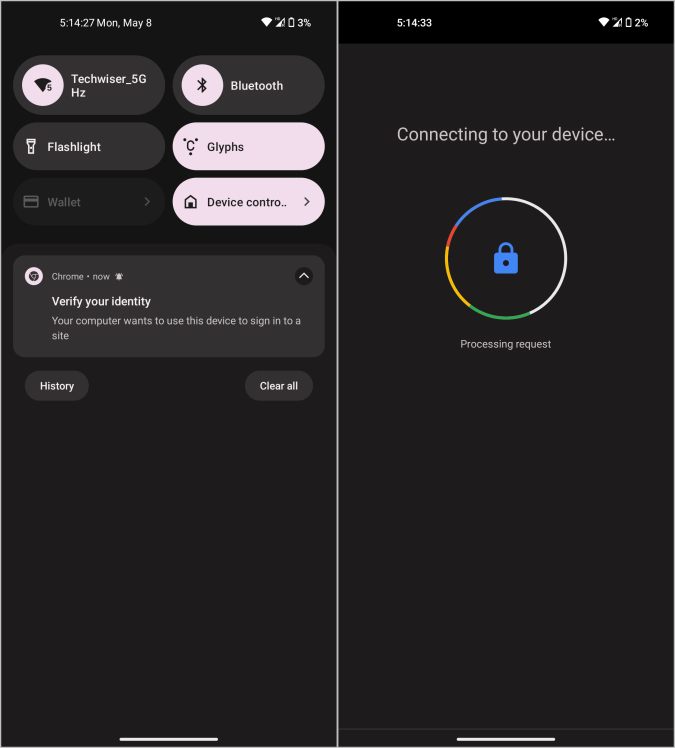
Passwords can be easily compromised either with a data breach, phishing attacks, or someone accessing your stored password. Especially considering most people use simple passwords like abcd123, they are not secure enough to safeguard online accounts. This is where the new Google Passkeys feature comes in that replaces passwords altogether. In this article, we will explain what is Google Passkeys and how to set up Google Passkeys for your Google account on both desktop and mobile.
Table of Contents
What Is Google Passkeys
Until now, to keep our online accounts safe, we are using passwords. As simple passwords can be easily compromised, you need to rely on a password manager to set up a complicated password and also remember it. Using even a complicated password is not secure enough because of data breaches, phishing attacks or even reusing the same password on multiple platforms.
To make them more secure, we can partner the password with two-factor authentication. This means, along with the password, you also need the two-factor authentication code that only your device can provide. So a hacker would also need physical access to your device in order to log in to your account.
This password + two-factor authentication combo is secure enough, but it is not seamless as you need to enter your password and also the 2FA code separately. This is why many companies along with Google, Apple, and Microsoft are introducing Passkeys.
Passkeys are nothing but using your device as a key to your online accounts. For example, if you have set your phone as a passkey to your Google account, it will store a private key on your phone and a public key on the Google server. Next time when you log in, you just have to use biometrics like a fingerprint scanner or face unlock on your phone to authenticate. Google will verify both the keys and log you into your Google account.
Advantages of Using Passkeys Over Passwords
- The generated key is strong and changes every few seconds making it hard to guess.
- The private key stays encrypted on your phone offline and will never leave your device.
- Users can simply use biometrics or device lock to log in.
- Keys will be different for every app or website you use passkey for.
- Easier to set up and use compared to passwords and 2FA.
- Only people who have access to your device can log in to your account.
How to Set Up Google Passkeys on Android
On Android, Google already saves your device as a passkey automatically. Anyhow, your device should be Android version 9 or above. You just need to enable the Passkeys feature in the Google account settings if you have not enabled it already.
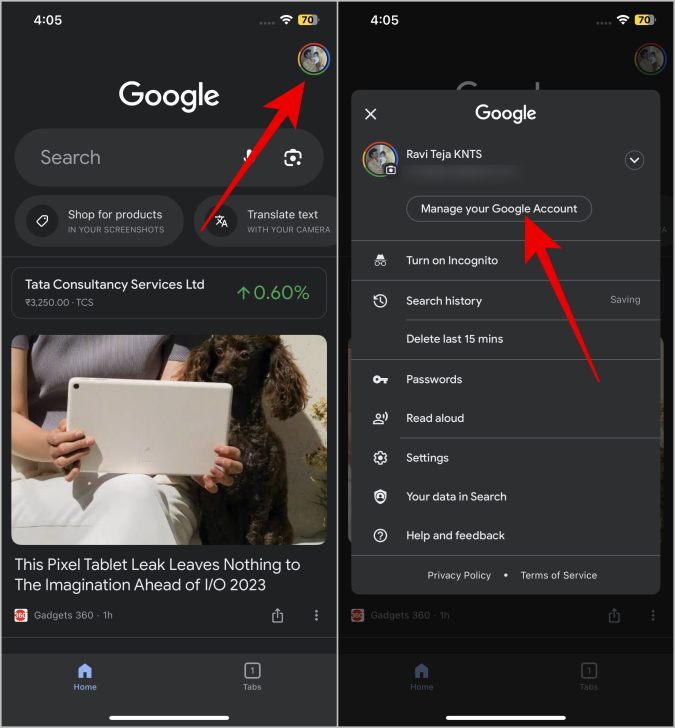
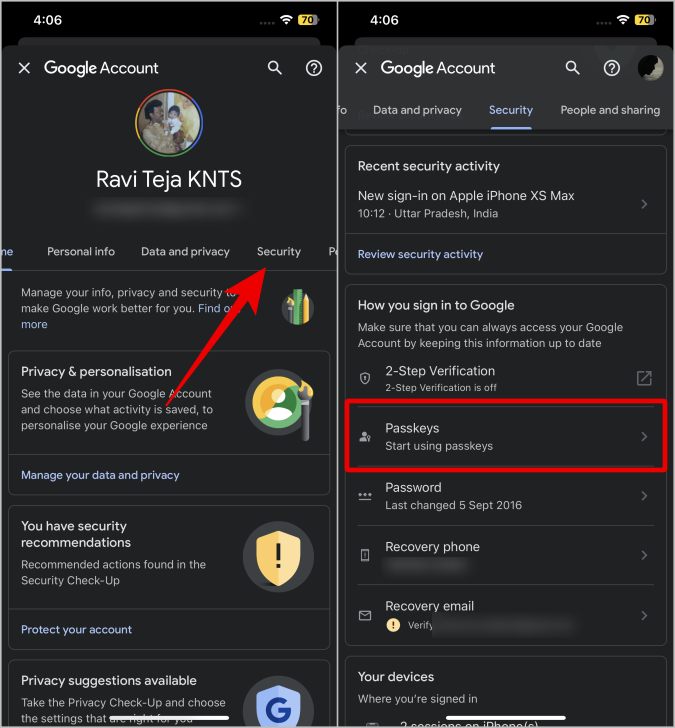
1. Open the Google app and tap on the profile icon at the top right corner. Now select the Google account that you want to enable the passkeys option. Then tap on the Manage your Google account button.
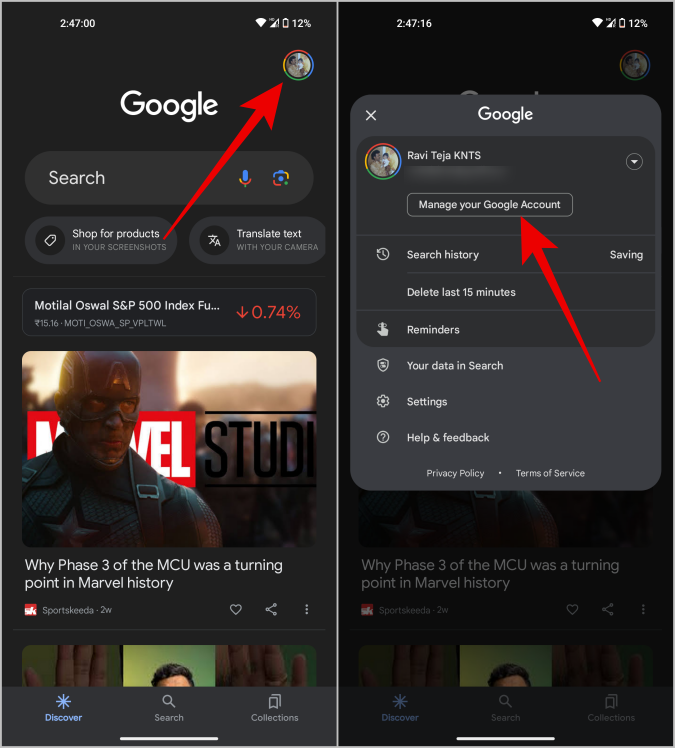
2. Now select the Security tab in the top bar, then scroll down and select the Passkeys option under How you sign in to the Google section.
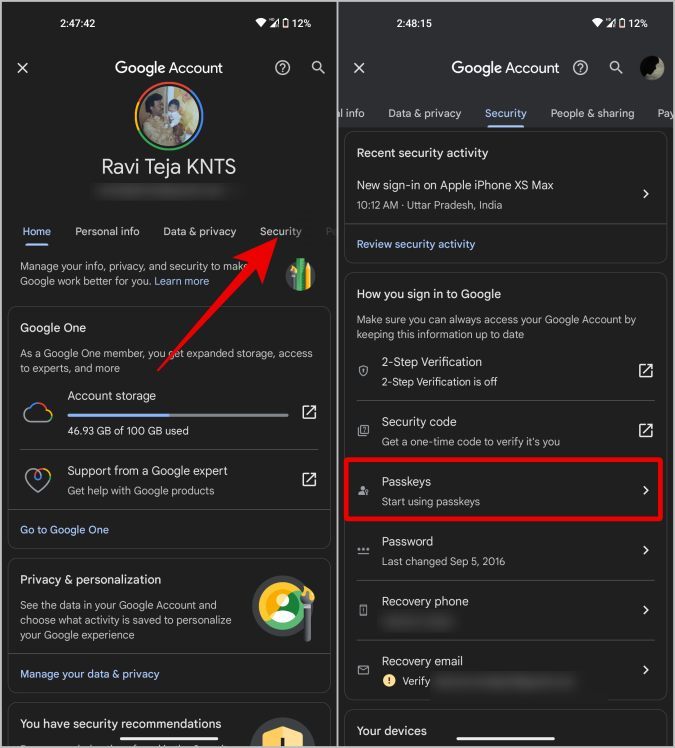
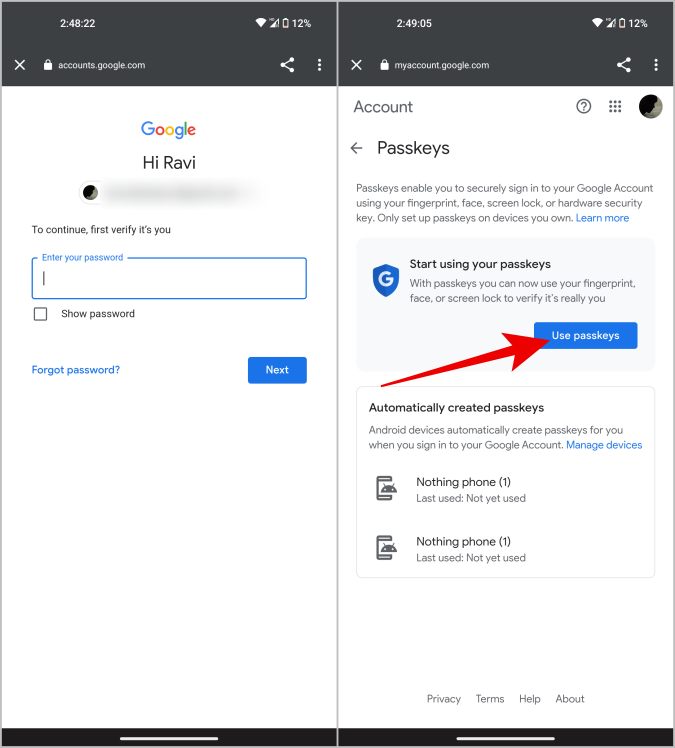
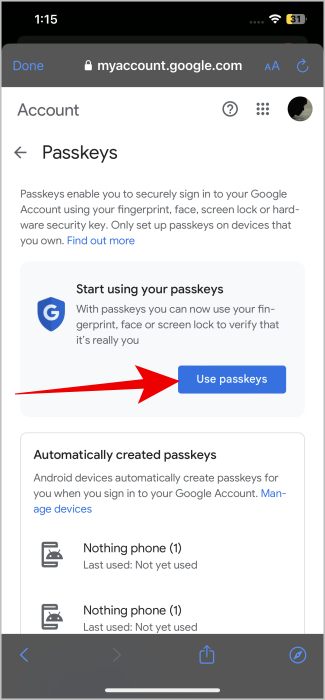
3. Enter your Google account password if prompted. You should already see your device under the Automatically created passkey option as Google automatically uses all the Android devices that you are logged in as passkeys automatically.
4. To enable the Passkeys feature, just tap on the Use passkeys button.
That’s it, you have set up the Google Passkeys feature on your account. All the Android devices that you have logged in with your Google Account will be automatically selected as passkey devices.
How to Set Up Google Passkeys on iPhone
The passkey setup on iPhone for your Google account is a bit different from Android as passkeys are stored in the iCloud Keychain. Also, you can set your iPhone as a passkey only if it’s running iOS 16 or above.
1. Open any Google app, and tap on the profile pic at the top right corner. Now select the Google account that you want to set the passkeys for. Then select the Manage your Google Account option.
2. On the Google account, select the Security tab at the top and then select the Passkeys option.
3. Enter the Google account password if prompted. Then tap on the Use passkeys button to enable the Passkeys option. Unlike Android, Google does not add your iPhone as a passkey automatically.
4. To add your iPhone as a passkey, tap on Create a passkey button at the bottom of the page. In the pop-up window, tap on Continue. You will get a pop-up again from Apple to store your Google Passkey on your iCloud keychain. Tap on continue in the pop-up again.

That’s it, you have set your iPhone as a passkey for your Google Account. Now just tap on the Done button to complete the process.
How to Set Up Google Passkeys on Windows PC
You can enable the Passkeys feature on any Windows computer that has Windows Hello as which is used as passkeys. In short, your Windows PC should have fingerprint or face-scanning hardware support to use your Windows laptop as a passkey. Also, your Windows PC should be running Windows 10 or above in order to set it as a passkey.
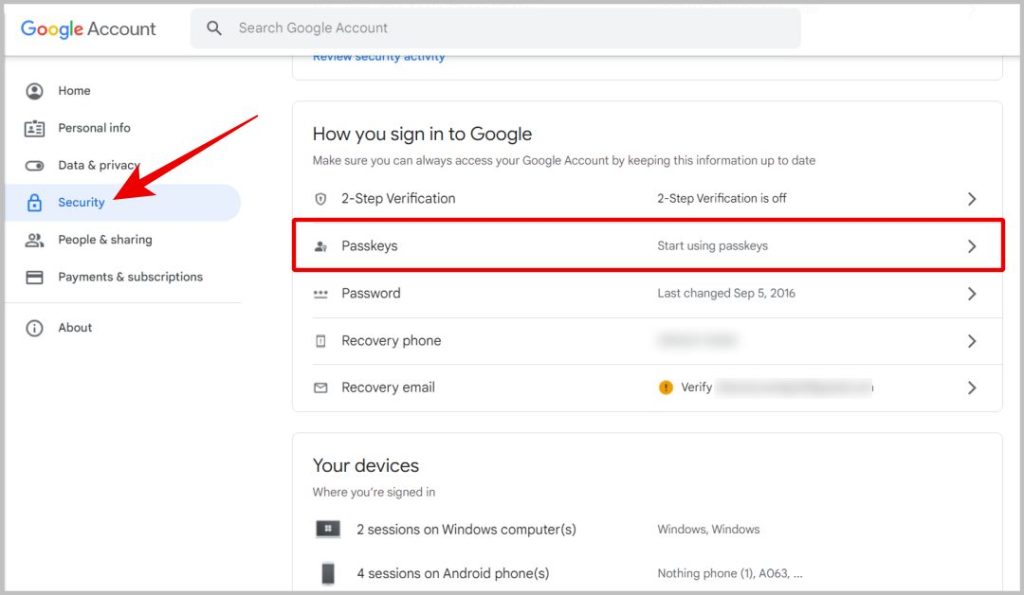
1. Open the Google Account web page on your preferred browser. (Update to the latest version of Chromium-based browsers in case you are having any issues setting up passkeys). Click on the profile pic at the top right corner and select the Google Account you want to set the passkeys for.
2. Now select the Security option in the left sidebar and then select the Passkeys option.
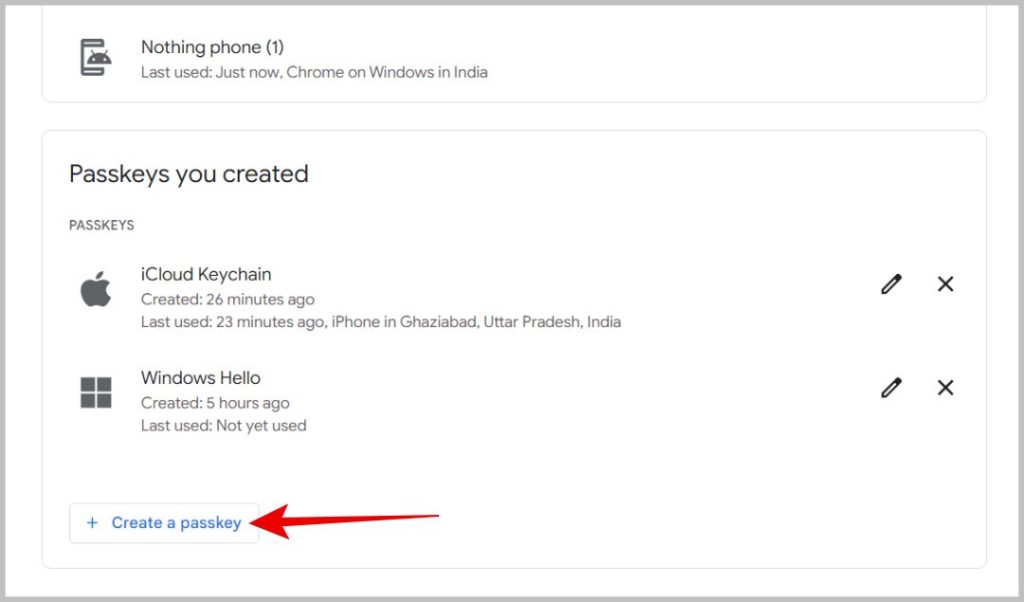
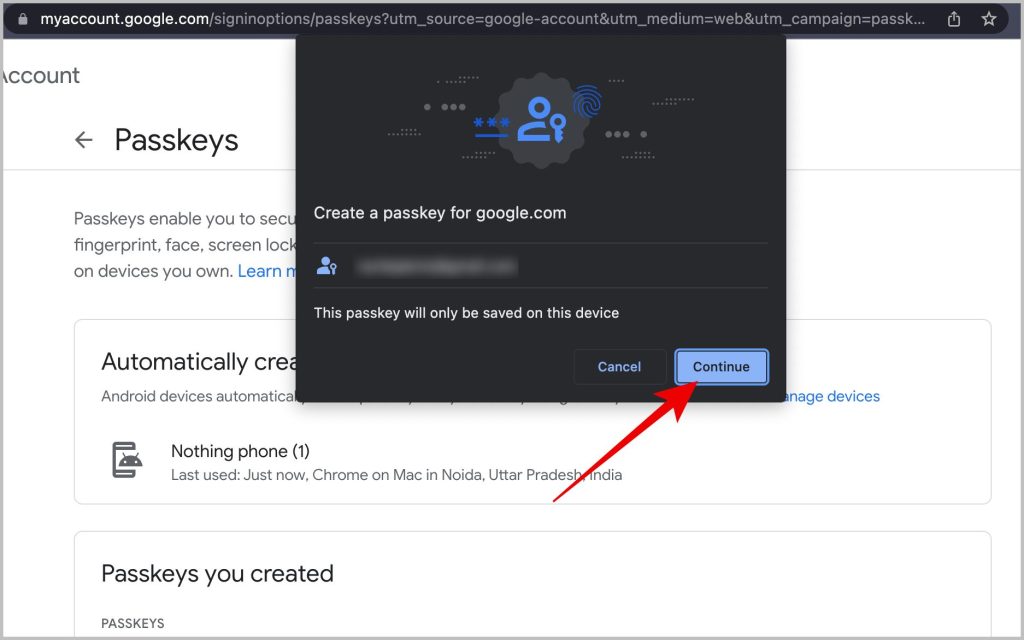
3. Enter your Google Password if prompted. Then click on the Use passkeys button to enable Passkeys if not enabled already. Now click on the Create a passkey button at the bottom of the page. In the pop-up, click on the Continue button.
4. Finally use your fingerprint scanner to confirm your Windows PC as a passkey.
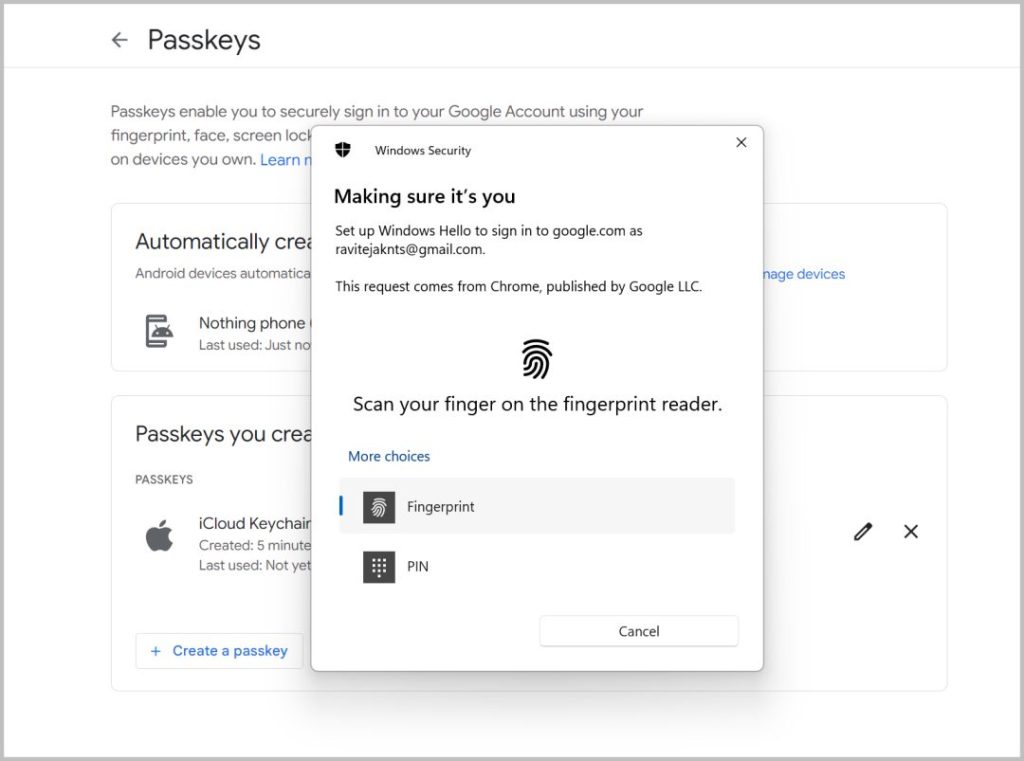
That’s it, you have set your Windows PC as a passkey. Just click on Done to complete the process. In case you are using a PC that does not support Windows Hello, you will get an “A passkey can’t be created on this device” pop-up notification.
How to Set Up Google Passkey on a Mac
Unlike Windows, you can use your Mac as a passkey even if it does not support any biometrics like Touch ID or Face ID. But, having biometrics does help to set up and log in to your device faster. Also, your Mac should be Mac OS Ventura or later.
1. Open the Google account web page on your preferred browser. (Update to the latest version of Chromium or Safari browser in case you are having any issues setting up Passkeys). Click on the profile pic at the top right corner and then select the Google Account that you want to set the passkey for.
2. Now select the Security option in the left sidebar and then select the Passkeys option. Enter your Google account password if prompted.
3. If you have not enabled the Passkeys feature already, click on the Use passkeys button at the top. Once enabled, click on the Create a passkey button at the bottom of the page.
4. In the pop-up, click on the Continue button.
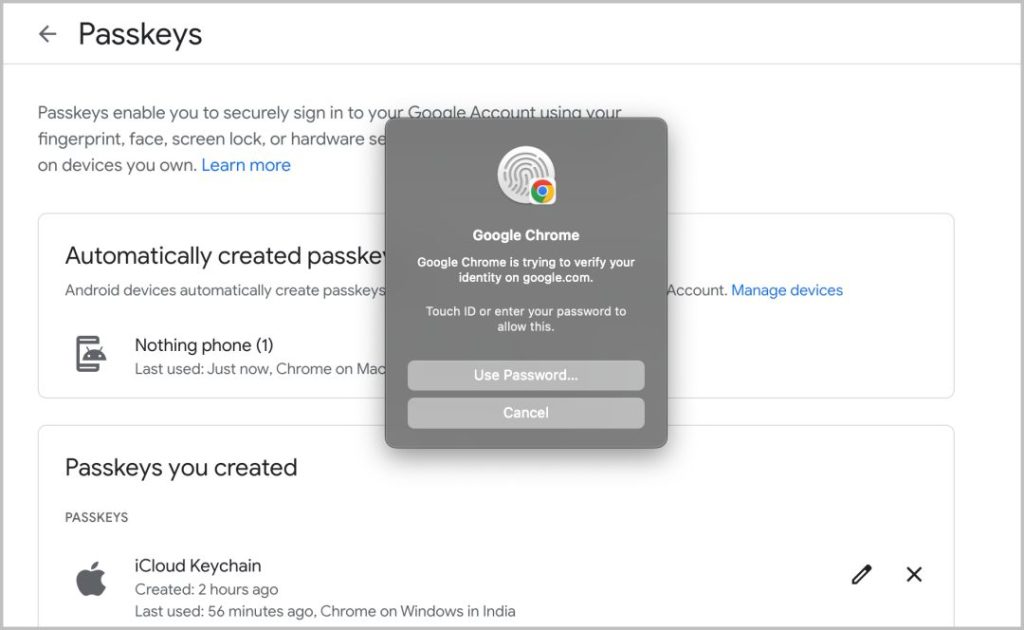
5. Then use your Face or Touch ID to authenticate. Unlike Windows, you can also click on the Use Password button to authenticate with a password on Mac.
That’s it, you have added your Mac as a passkey for your Google account. Complete the process by clicking on the Done button.
How to Setup Security Key as Your Google Passkey
Instead of phones, tablets, and laptops, you can use also use security keys as passkeys but you can only set them up on desktop or laptop computers.
1. On your Windows or Mac system, open the browser and open the Google account page. Now select Security > Passkeys.
2. On the Passkeys page, enable the Passkeys feature by clicking on the Use passkeys button if not enabled already. Then click on Create a passkey button at the bottom of the page.
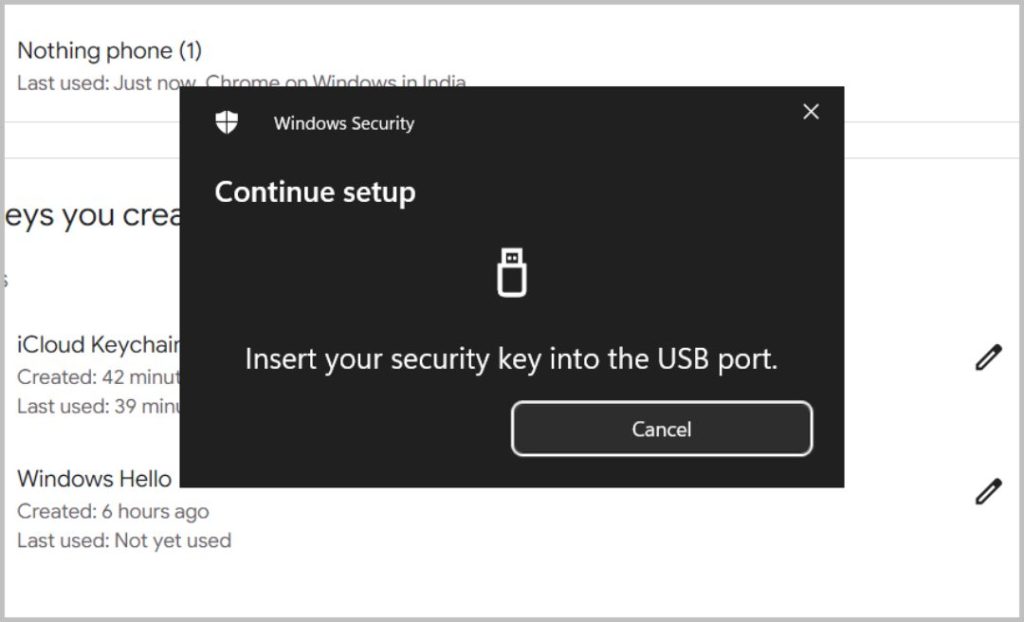
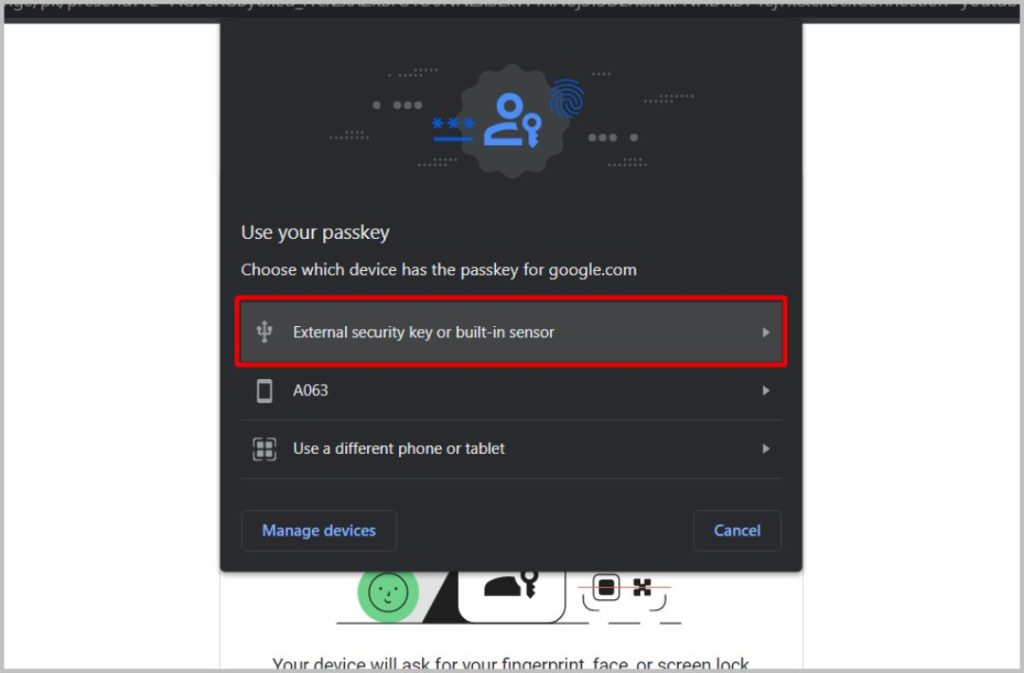
3. In the pop-up, click on the Use another device option. Then select the External Security key or built-in sensor option.
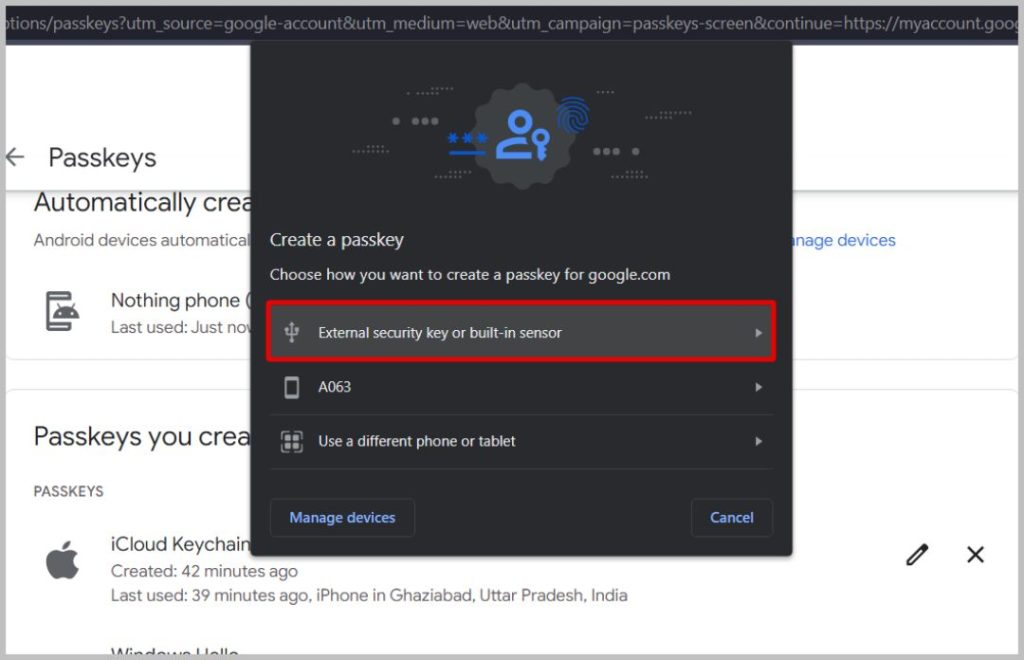
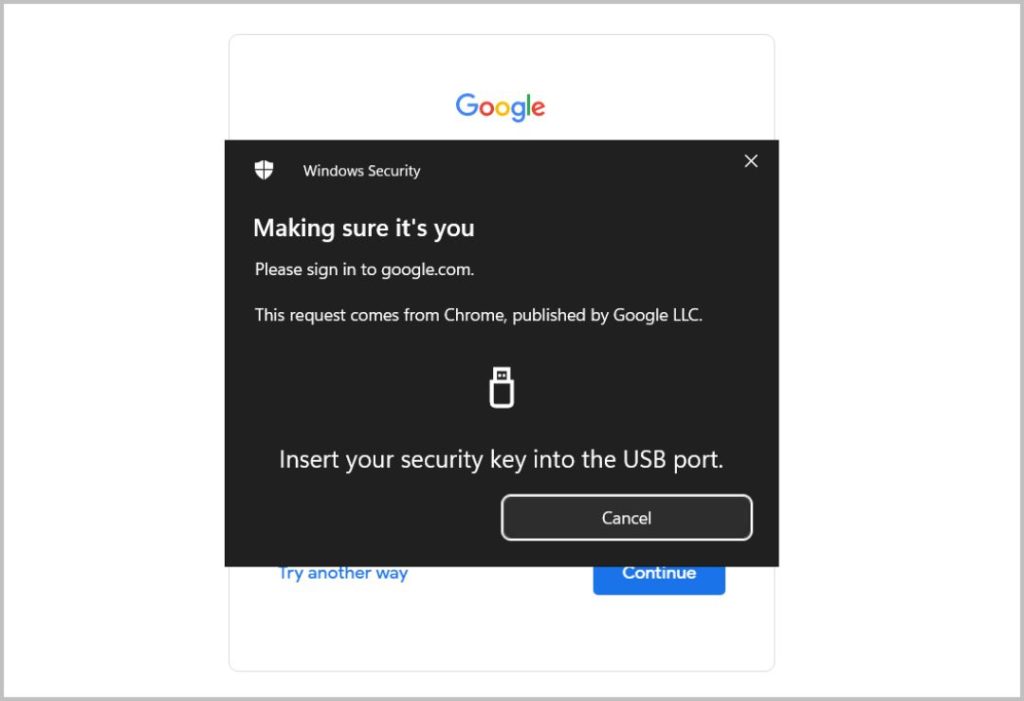
4. Now insert the security key into the USB port of your system and click OK to set that security key as a passkey.
How to Use Google Passkeys to Log in to Your Google Account
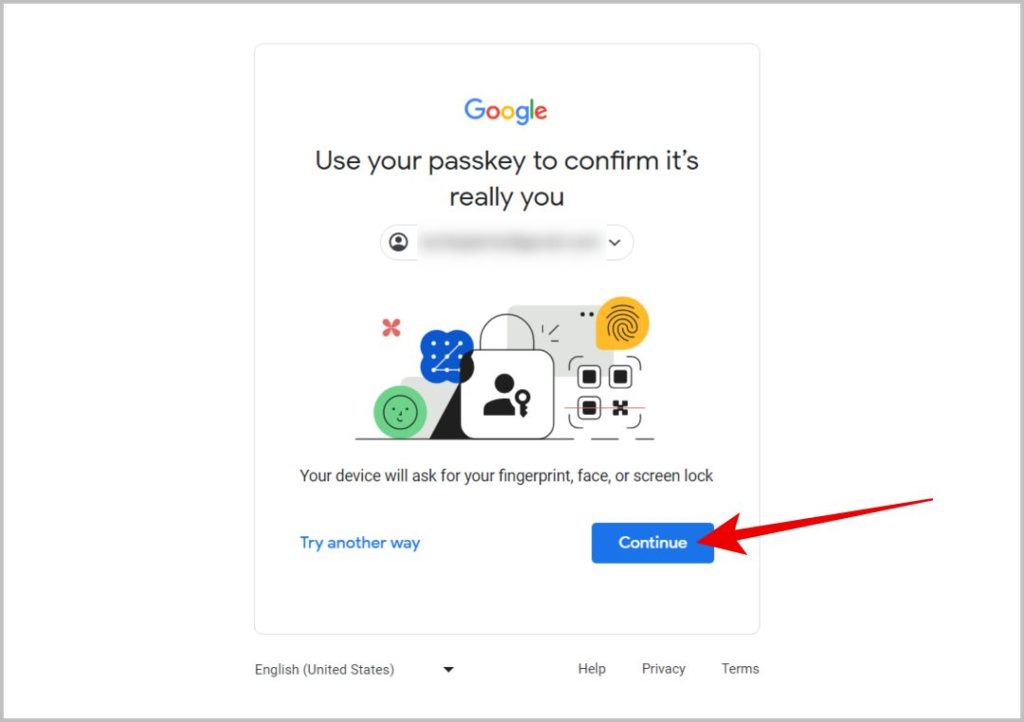
If you are trying to log in to your Google account on the same passkey device, you can just tap/click on the Continue button and then use your biometric or device lock to sign in. That’s it, you will be logged in to your account.
If you are trying to log in to your Google account on a new device or device you have not set as your passkey, then there are three ways to do it:
Method 1: QR Code
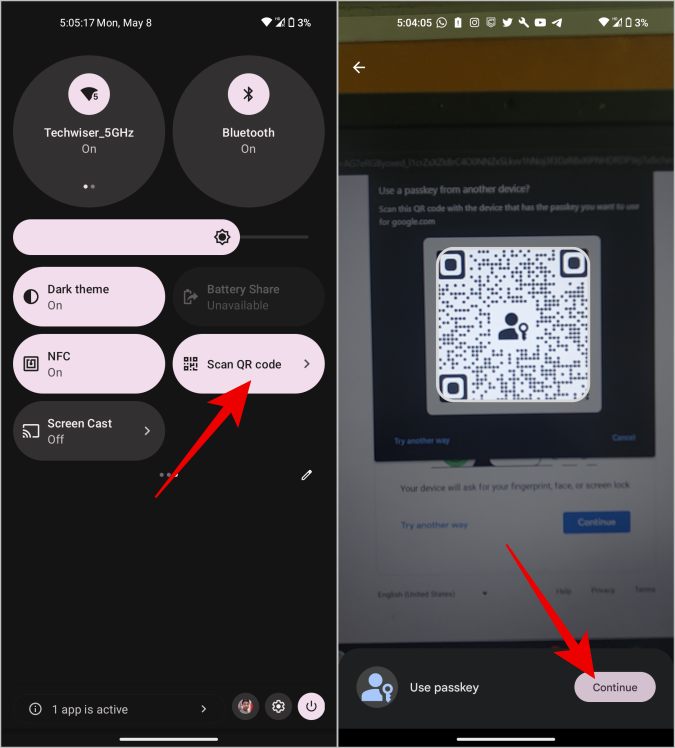
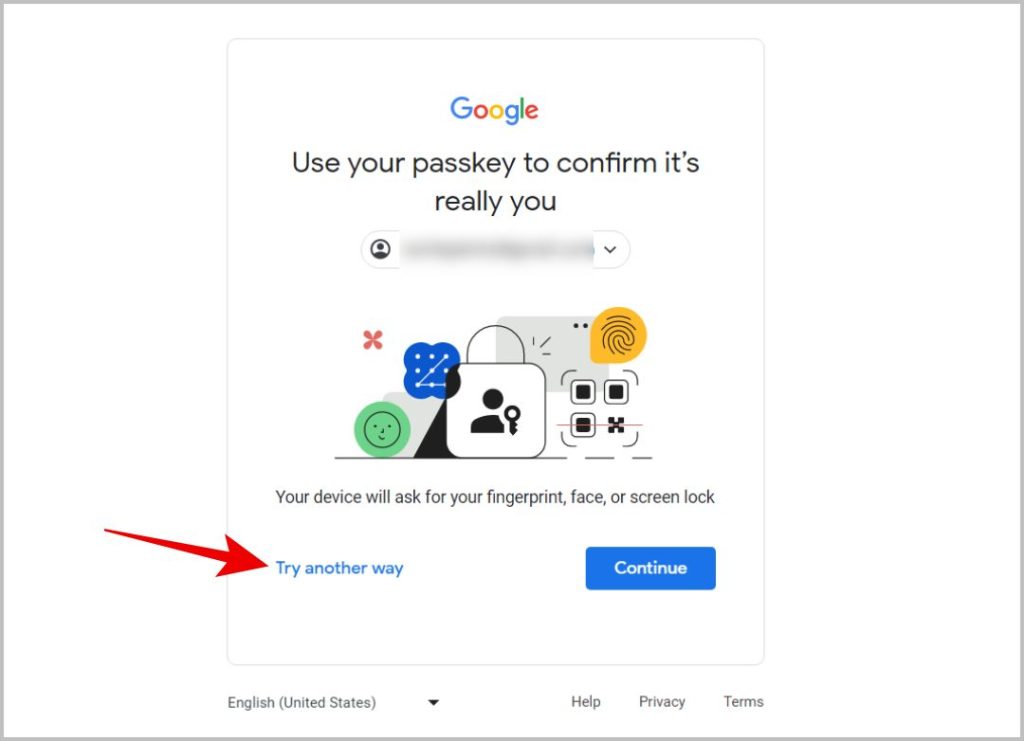
Try to log in like you normally do. Enter your username and on the next page, click on the Continue button to use your Passkey.
In the pop-up, select the Use a different phone or tablet option.

It should open a QR Code. Just scan the QR Code from your passkey device. Upon scanning, you can use your passkey device’s biometric to log into the new device.
Method 2: Link
This method will be useful if you are trying to log in on any desktop and want to use your Android passkey phone for authentication.
To log in, just use your username and then click on the Continue button to use your passkey. Then in the pop-up, select your passkey Android device. (You can only select an Android phone from here. If you are an iPhone user, you need to rely on the QR Code option only).
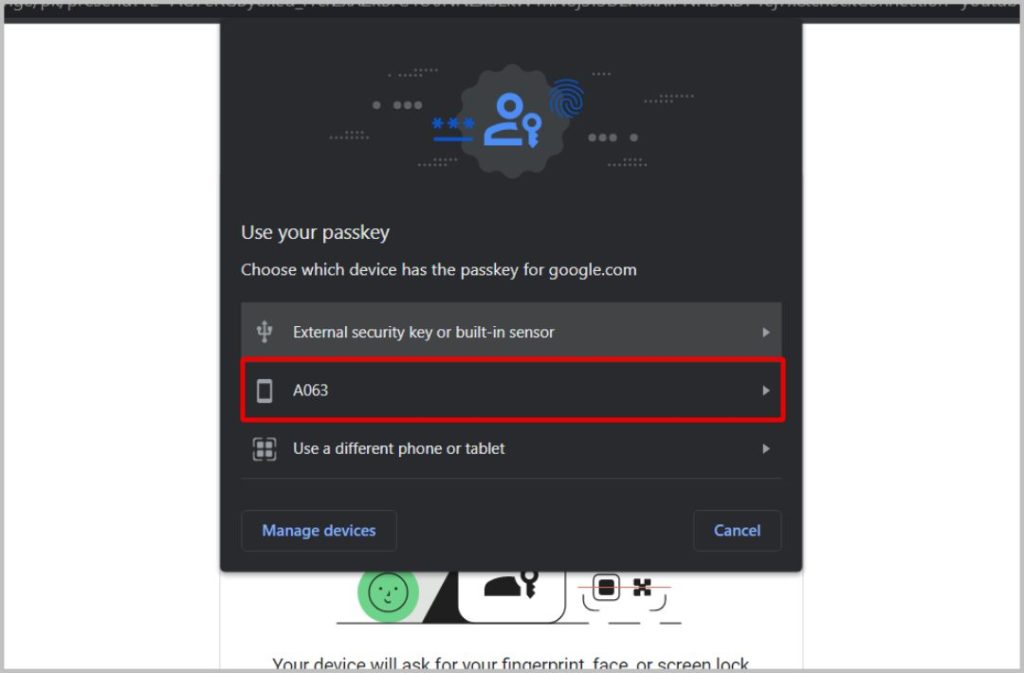
You will get a notification on your Android phone. Just tap on the notification and then use your phone’s biometrics to log in on the desktop.
Method 3: Security Key
As of now, you can only use security keys with desktops/laptops. On Android or iPhone, you have to rely on the QR Code method.
To log in using the security key on your desktop or laptop, select the External security key or built-in sensor option.
Then insert the security key into your system for authentication.
Bonus – How to Login to Your Google Account Without a Passkey Device
While this issue can be a major one in the coming years, as of now, Google has not replaced passwords completely. So even if you do not have your passkey device with you, you can use password+2FA to sign in.
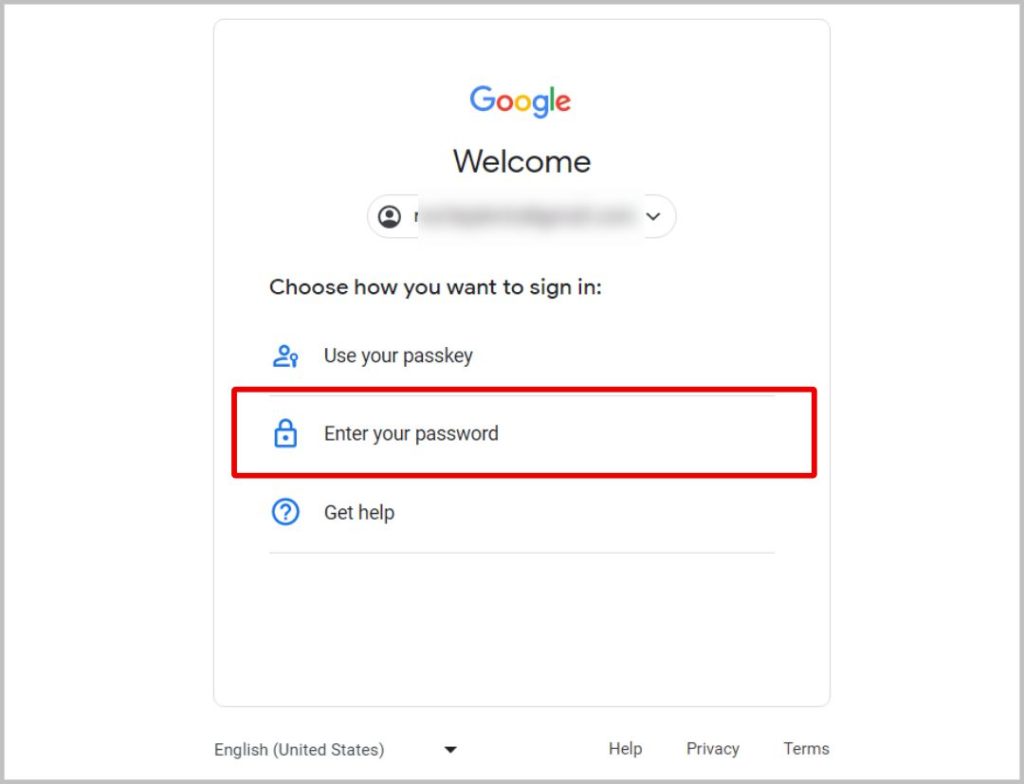
While logging in, instead of clicking on Continue, select the Try another way option.
Here select Enter your password to enter your password and log in to your Google account.
In case you have enabled 2FA on your account, then you also need to enter the 2FA code generated by the app you are using to log in. If you cannot access the 2FA code either, then check out How to login into your Google account without a verification code.
FAQs
1. How many devices you can use as Passkeys?
As of now, you can set up Google Passkeys on as many devices as you want. But, remember that people who can access those devices can also access your accounts easily. So only use devices that you trust as passkeys.
2. What happens if I lose my Google Passkey device?
You can remove the device as a passkey by opening your Google account page > Security > Passkeys and tapping on the X mark beside the device that you want to remove. From Android devices, Google Account page > Security > Manage all devices and sign out of the device that you lost. In case you are not able to log in, you can use your Google Account password to log in as mentioned above.
3. How to Disable Google Passkeys?
You can open the Passkeys webpage and click on the X mark beside the device you want to remove as a passkey. For Android devices, you can sign out of the device. Anyhow as of now, there is no way to just disable the passkey and go back to passwords completely.
4. What about apps and sites that I have signed into using Google account?
For now, you can simply use the Google sign-in option and there is no need to authenticate using a passkey or even use a password. However, in the future, as more sites implement Google Passkeys, you will be required to authenticate using biometrics on the device you have set up Passkeys.
Use Passkeys for a Passwordless future
Passkeys replace passwords and two-factor authentication enabling one simple action of using biometrics to authenticate. It is easier to use than passwords as you don’t have to remember anything or store your passwords safely. It is also more secure compared to a password as it cannot be leaked in a data breach and hackers need physical access to your device to log in to your account.