It’s quite complex to set up user accounts and files on a WD NAS with all the jargon and acronyms thrown around. For instance, folders are called ‘Shares’ and ‘User Profiles’ are called Share Profiles. In case you are confused with how to set up folder access and permissions, here is a brief how-to guide.
How to Setup Users, Permissions, Shares on WD NAS
As a standard process, you should never log in with the ‘admin’ account as the admin account has full privilege. This might lead to unnecessary deletion of files and folders. Creating a new user account and shared folders solves this issue.
To explain this better, let us take an analogy of a big house with 3 rooms inside it. Suppose 9 people live inside the house and share the rooms. Now, without any prior arrangement, it gets confusing on which user should occupy which room. Hence for better utilization, we have divide 9 people into 3 groups and each group gets a key to their specific room. They cannot access the other 2 rooms. This way there is no confusion. You can consider the house as your NAS, rooms as the shared folders, 9 people as users and the key as the password.
With that out of the way, let’s see how to create shared folders, users and groups on the WD NAS. To demonstrate this, we will set up a folder called “test”. Next, we will create a user “test_user” and “test_group” and provide appropriate access and permissions.
Set up a shared access
The easiest way to do set up shared access is via the WD web portal. Head over to it by typing the IP address of the WD NAS in the web browser. You can find the IP address on the NAS LCD display or under your network tabs.
On the dashboard, head over to the “Shares” tab on the top.

The Shares tab contains all the folders created on your WD NAS. If you are using your WD NAS for the first time, you will see a few default folders. In my case, I’ve already created a few folders.
Here, tap on the plus sign button at the bottom to add a new folder.

A popup will appear, add the name and description of the text. In case you have created a JBOD volume or you have RAID disabled, select the drive you want the folder to be created.
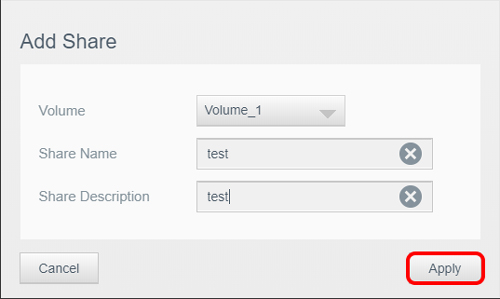
Once you click on ‘Apply’ a new folder will be created and you will see the folder summary. In summary, Turn Off the Public access to the folder by clicking on the toggle. If the folder is public, it would be accessible to everyone and don’t require special authorization. While giving users folder access, public folders won’t appear in the share access section.

Set up a User Group
Once you have created the folder, you need to assign users, who can access those folders.
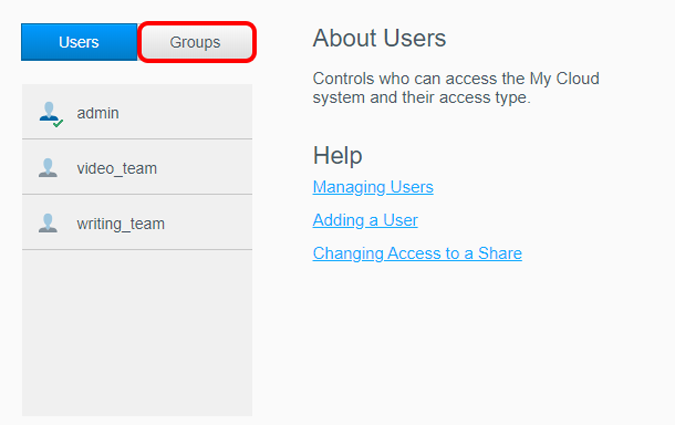
To do so, head over to the “Users” tab to create users and groups.

In the Users tab, you would see 2 sections: Users and Groups. On the basic level, both are the same with the only difference being that Groups can contain Users. You cannot log in with a group account and as a general guideline, permissions and access are provided to a group. So, when the next time you create a new user, you just have to add him to the group and all the permissions and access settings will be applied to him. In case, you don’t want to follow this guideline, move over to the user creation part.
Alternatively, you can create a test file with all the group configurations using the following command and upload it to the WD web portal. This comes in handy when you have to create multiple user groups.
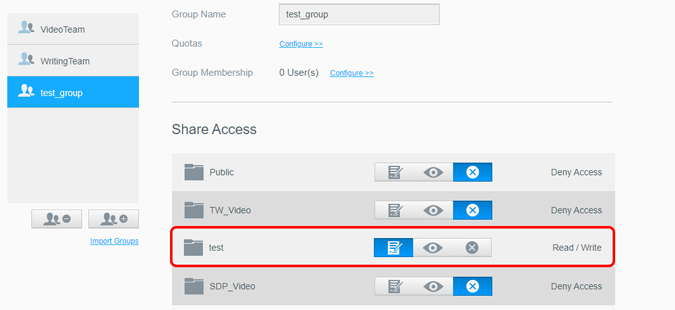
After you have created the user group, click on it to view a brief summary and user permissions. At the bottom, you will see a label called “Share Access”. Here, you will see all the private folders you have created. For these folders, you will have 3 permissions namely Read/Write, Read-only, and Deny Access. The “Read-only” permission lets the user view the content and permissions of the file and also copy-paste the file to different locations. You cannot delete or cut-paste the file. For that, you would need Read/Write access. Deny Access will restrict the user from opening the folder and its contents. In our case, we will provide “Read/Write” access to the test folder.
Set up a User Account
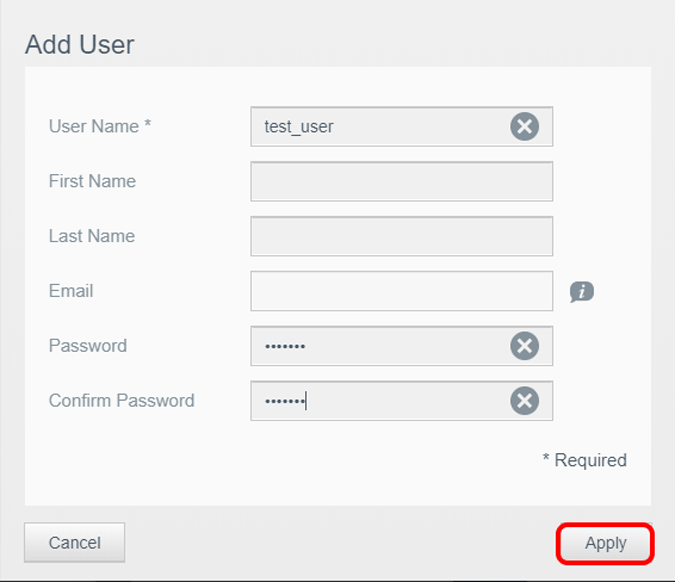
Finally, we will create a user account named “test_user”. To do that, head over to the User tab and click on the Add new user button at the bottom.

Next, you will have a popup wherein you have to provide the user-name, password, and few optional details. Post that, click on the Apply button.
Once the user is created, you can click on it to see the user summary. Here, you will see an option called “Group Membership” with 0 Groups written beside it. To add it to a group, click on the configure button and on the next pop up select “test_group” user group.
As soon as you create a new user account, WD creates a folder with its name. You can go ahead and delete this folder as it won’t affect the user profile functioning.

Post this, you should be able to access the test folder on the WD NAS. Test it out and make sure you don’t provide any share permissions, volume quota or access to the individual user account. This might cause discrepancies with the user group permissions.
For more information related to WD backups and storage, read our article on the right way to backup external drives on WD NAS. In case of any queries on WD NAS, let me know in the comments below.
Also Read: The Easy Way to Move Big Files Between Cloud Storage