Your iPhone is like a swiss army knife. One of the many things you can do with your iPhone is to use it as a hotspot to share your phone’s data plan with your computer. This is also known as tethering where you are sharing your iPhone’s internet with a Windows computer. There are a few different ways to tether iPhone hotspot with Windows computer. Let’s explore our options.
Table of Contents
Before You Begin
There are some essential points that you need to keep in mind before using your iPhone as a Wi-Fi hotspot to tether to Windows 11 via USB or Wi-Fi.
- When personal hotspot is enabled on iPhone, it will disconnect from any Wi-Fi you may have connected to.
- Your carrier network provider should support it but some don’t. If you don’t see Personal Hotspot option on iPhone, now you know why.
- You are sharing your iPhone’s data plan with Windows which is also called data sharing. So, you must be mindful of your plan’s data cap and expiry.
- Some carriers limit data that you can tether in a day or high-speed data that you can tether. Does your plan set such limits? Talk to your carrier.
- Using iPhone as a hotspot will consume not just data but also battery, and quickly. Your iPhone may get hot as well. We recommend sitting in a cool environment with a power source.
How to Setup and Enable Hotspot on iPhone
There are two ways to do it. One from Settings and one from Control Center. We will discuss Settings first because we also want to set a password so others in the vicinity don’t leach our data for free.
Settings
1. Open Settings and go to Personal Hotspot and enable Allow Others to Join.
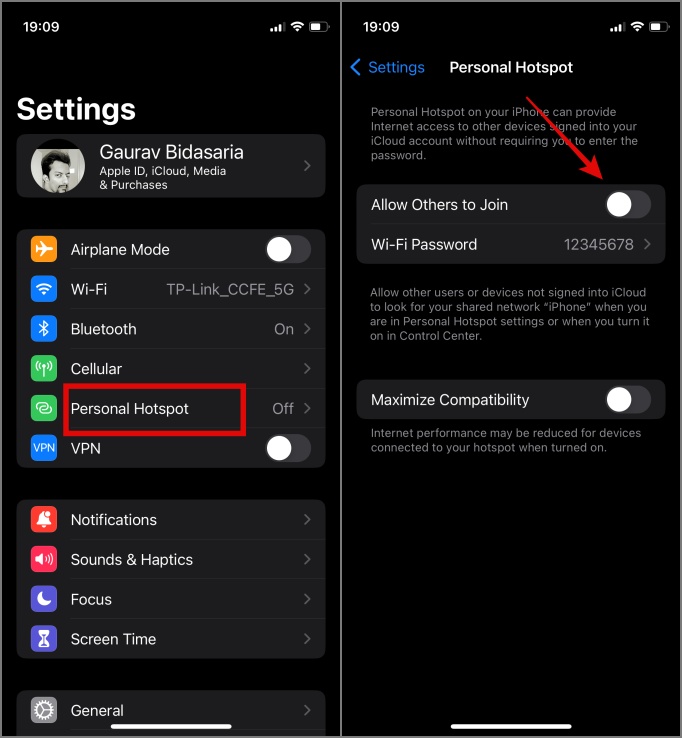
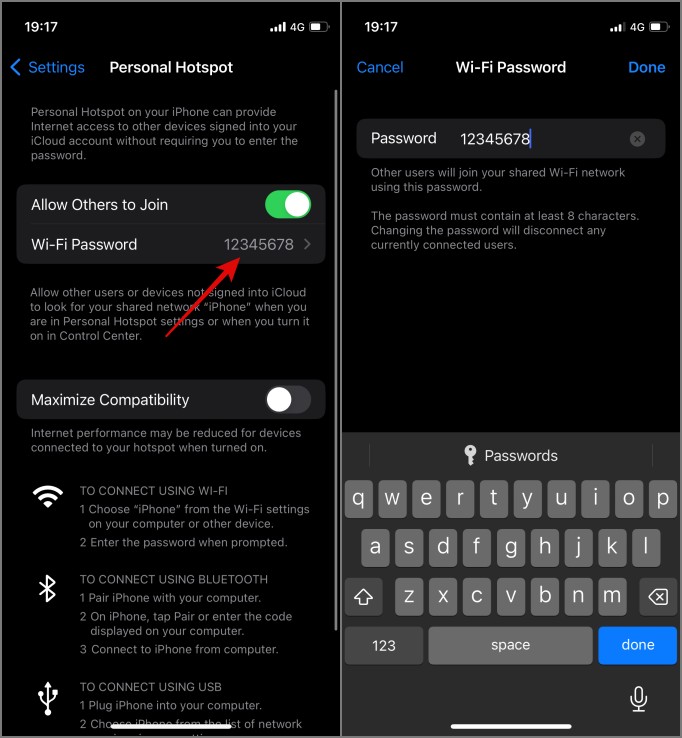
2. Now tap on Wi-Fi Password right below it to set a strong that’s at least 8 characters long password and nobody can guess. Ideally, it should be alphanumeric with some special characters (unlike mine). Tap on Done to save changes.
Once you have set up a hotspot on iPhone, you can enable it quickly from the Control Center too. As you know, Control Center can be accessed from any screen including the lock screen.
1. Swipe down from the top-right corner of the screen to open Control Center and long-press Wi-Fi icon to view more options. Inside the pop-up, toggle Personal Hotspot option.

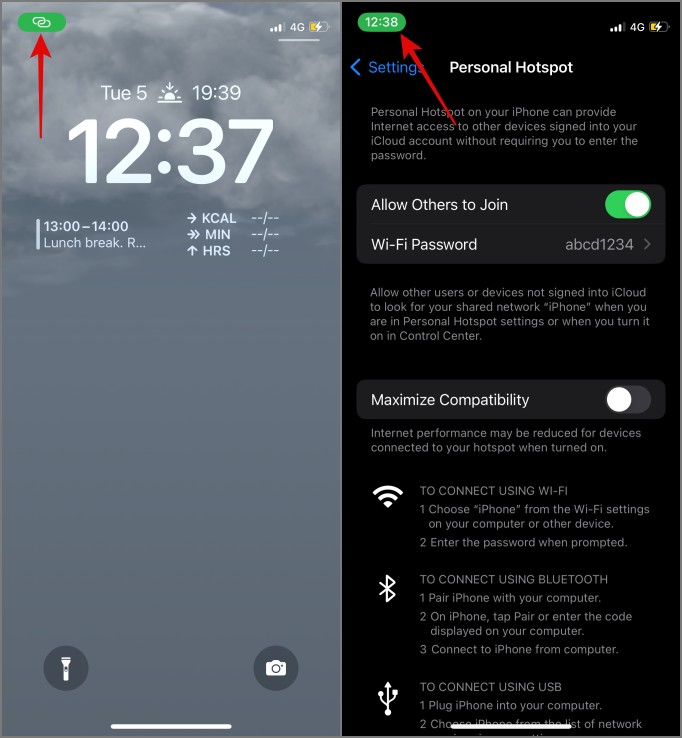
The moment a computer or device connects to the iPhone’s hotspot, the status bar or clock icon (depending on your iPhone model) should turn green. Tapping on that icon will open the iPhone hotspot settings.
While the native way works well, there are some interesting third-party hotspot apps for iPhone that offers more control like setting bandwidth limit, speed limit, and more options.
Tether iPhone Hotspot to Windows 11 Via USB
What you will need is lightning to type C or A cable, depending on available USB ports on your CPU or laptop, wherever it is that you are tethering iPhone data. That’s it.
Simply connect the iPhone to your Windows computer using a cable and Windows should automatically detect and connect to the Wi-Fi hotspot. Note that this will not work if your computer is already connected to a different Wi-Fi network. You must be disconnected from all networks.
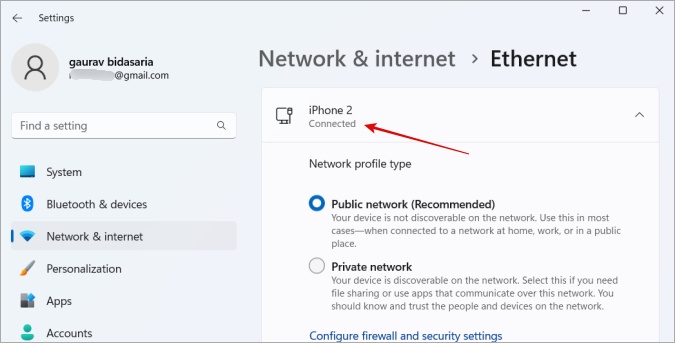
On your iPhone, you may see a pop-up. Tap Trust if asked to give necessary permissions. Don’t do this on a public computer as they will now have access to your iPhone data.
You should now see the ethernet icon instead of Wi-Fi icon in the Taskbar. Right-click on the same to open Network Settings where you can see more details.
Here you can set a metered connection to control bandwidth, view and edit IP addresses, and check link speed too.
Tether iPhone Hotspot to Windows 11 Via Bluetooth
Bluetooth is the slowest way to tether the internet from iPhone to Windows computer. We don’t recommend using this method unless you have to. Some reasons could be that you don’t have a cable to tether using USB and Wi-Fi is not working or allowed.
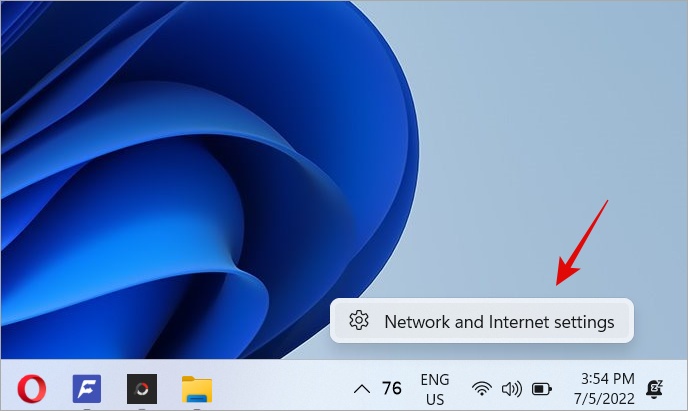
1. Right-click on the Wi-Fi icon in the Taskbar and Network and internet settings.
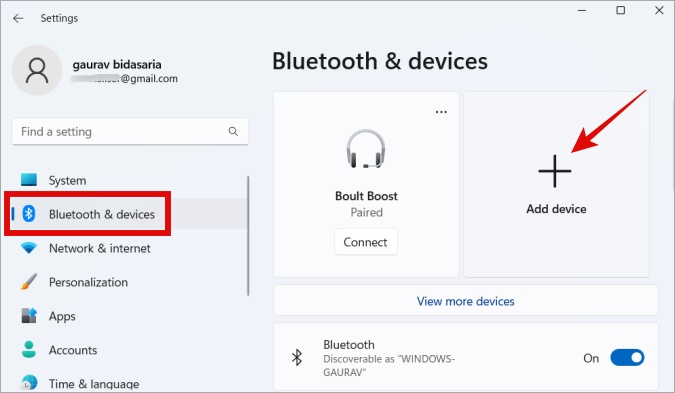
2. Select Bluetooth & devices in the sidebar and click on Add a device.
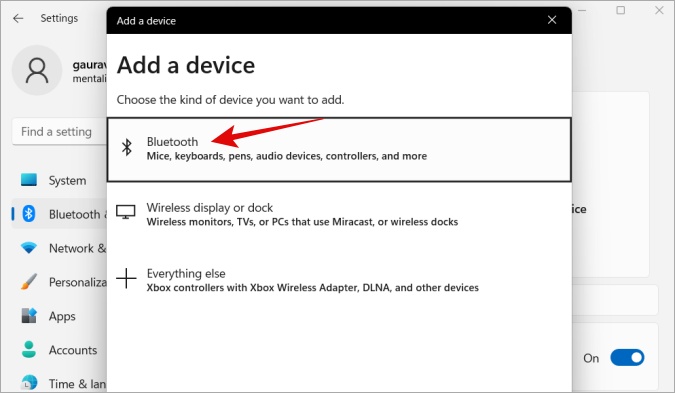
3. In the pop-up that follows, click on Bluetooth option.
4. Select iPhone next when Windows is done searching for new devices. Note that if Windows is unable to find your device, open iPhone Bluetooth settings and try again.

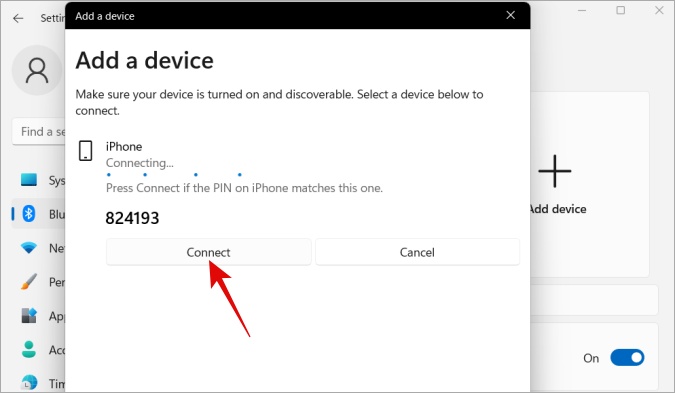
5. Click on the Connect button next. You will see a pairing or secret code which will also appear on your iPhone screen. On the iPhone, tap on Pair to complete the process.
6. Open Control Panel > Hardware and Sound and right-click on Devices and Printers and select Open.
Note: The reason we right-click and open is that when you click directly, it opens Settings app in a new pop-up window. But when you right-click and open, it opens inside Control Panel itself which is what we want.

7. Find and select iPhone from the list of connected devices, right-click on it, and select Connect using > Access point option.

You can now use your iPhone’s internet on your Windows PC.
Tether iPhone Hotspot to Windows 11 Wirelessly
There is no need for cables here though connecting via cable while tethering also charges your phone and keeps the battery juice at 100%. As noted earlier, tethering can deplete the battery quickly.
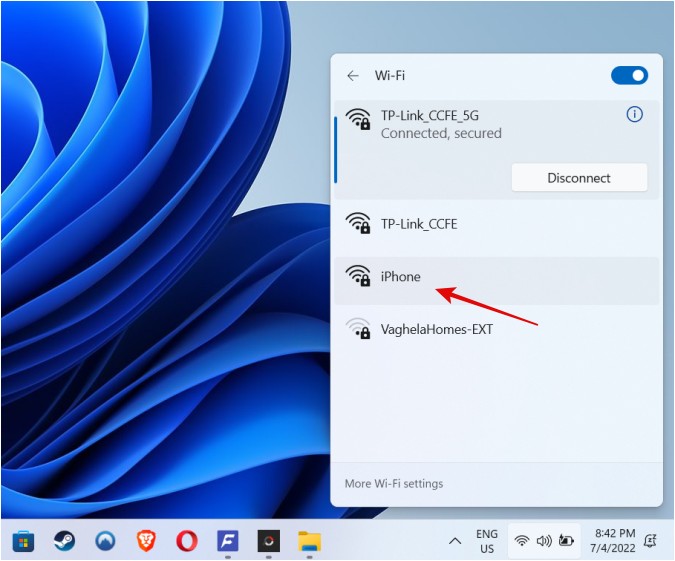
1. Enable the iPhone hotspot from the Control Center as we saw earlier. Now, on Windows 11 computer, click on the Wi-Fi icon and then select the arrow next to the Wi-Fi icon.

2. You should see the name of your iPhone hotspot (default name is iPhone) in the list along with the current Wi-Fi that you are connected to and other networks that Windows can detect. Click on the iPhone hotspot name here.
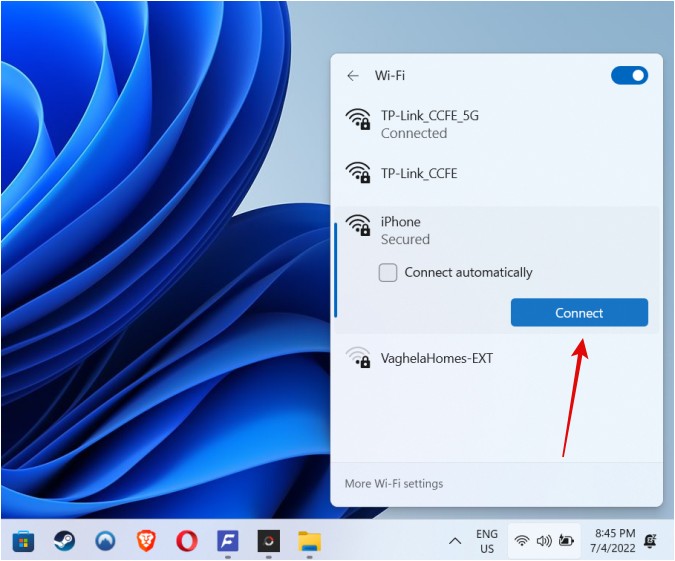
3. Click on the Connect button to initiate a connection to iPhone hotspot. Optionally, you can enable Connect automatically option if you intend to use this hotspot automatically whenever available.
4. On the next screen, you will be asked to enter the password you set above. Type the password as is (case sensitive) and hit Enter.
Note: You won’t have to enter the password again the next time you connect your Windows computer to an iPhone hotspot unless the password has changed.
FAQs
1. Which is the best way to tether iPhone hotspot to Windows?
Tethering the internet via USB is the best way to share iPhone’s internet with Windows. It is fast, hassle-free, and keeps your iPhone’s battery charged. No setups or passwords. Wi-Fi is the second-best while Bluetooth should be the last resort.
2. Which offers the fastest tethering speeds?
USB and Wi-Fi offered similar tethering speeds with USB taking the lead by a small margin. Note that a lot depends on your carrier plan, internet speed, connectivity, and network. This is why speeds may vary slightly at times even when connected to the same hotspot.
3. Which is the most secure way to tether iPhone hotspot to Windows?
Bluetooth is the most secure while Wi-Fi is the least secure way to tether iPhone hotspot, especially if you are using a weak password. Again, we recommend setting strong passwords for personal hotspots. You only need to enter your Wi-Fi password once though.
Spot On
Tethering iPhone via USB is the fastest and easiest way and offers decent speeds. Bluetooth remains more secure albeit difficult to set up and speed is rather slow. Wi-Fi strikes a balance between the two with easy setup, and decent speeds, but good security provided you have entered a strong password. I, personally, prefer USB tethering because it saves time and keeps my battery charged.
Did you know you can also create a Wi-Fi hotspot on your Mac?