The text-to-speech aka select-to-speak feature on Chromebook lets users hear the selected text on the screen. Chromebook will start speaking the selected text in the preferred language and voice. This is basically an accessibility feature designed for people with vision disabilities. But, a regular user can also use it to listen to the text. Let’s see how to enable and use text-to-speech on Chromebook.
Table of Contents
How to Enable Text-to-speech on Chrome
The text-to-speech feature is disabled by default on Chromebook. You must enable it first and then select the text in order to use it.
Here are the steps to turn on text-to-speech.
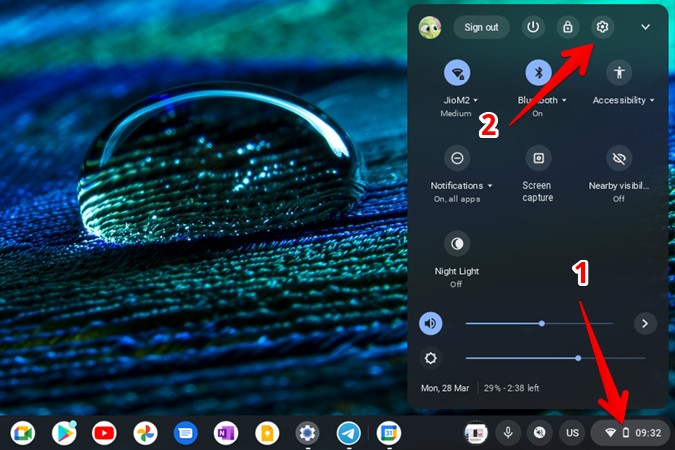
1. Open Settings on Chromebook. For that, click on time at the bottom right in Shelf and press the Settings icon at the top.
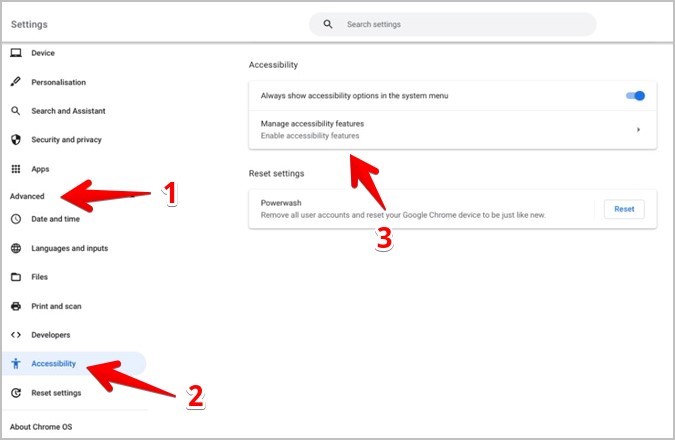
2. Expand the Advanced section from the left sidebar and click on Accessibility followed by Manage accessibility settings.
3. Turn on the toggle next to Enable Select to speak.
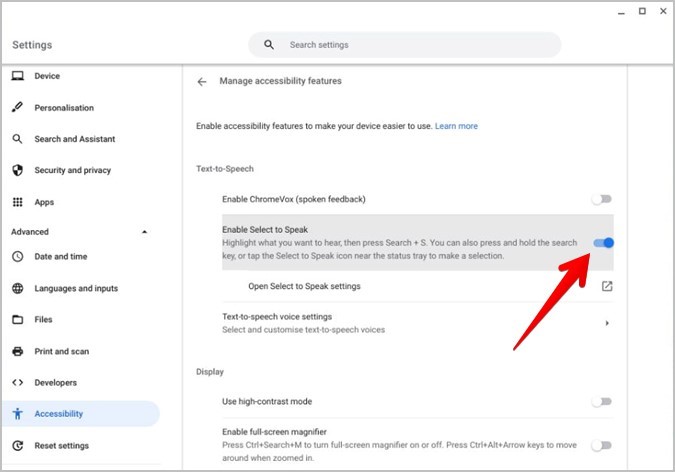
To disable text-to-speech, repeat the above steps and turn off the Enable Select to speak toggle
How to Use Select-to-speak on Chromebook
Step 1: Select and Hear Text
With the select-to-speak feature enabled, you must select the text that you want the Chromebook to read aloud. Once selected, a purple box will appear around the selected text.
Tip: If you will be using the Chromebook’s touchpad to select the text, go to Settings > Device > Touchpad. Turn on the toggle for Enable tap dragging for best results.
There are three ways to select the text.
1. Using Search Key
Press and hold the Search key on the keyboard and select the text or the area by dragging the mouse.
2. Using Keyboard Shortcut
Select or highlight the desired text. Then, press the Search + S keys on the keyboard.

3. Using Select-to-speak Button
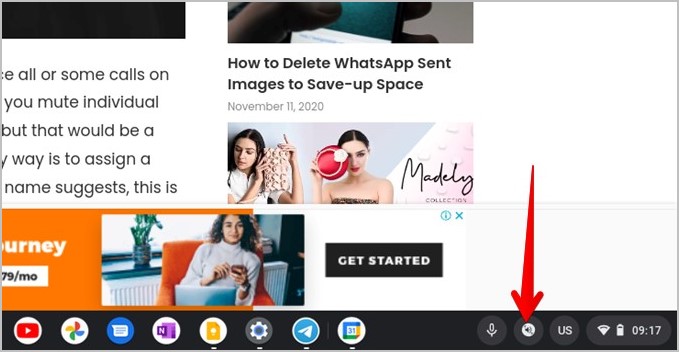
When you enable select-to-speak in settings, you’ll see its icon on the Chromebook’s shelf. The icon depicts a speakerphone with waves. Click on this icon and select the text or area using a mouse or finger (for touchscreen devices).
Tip: Check out 15+ tips and tricks to use a Chromebook like a pro.
Step 2: Control Playback
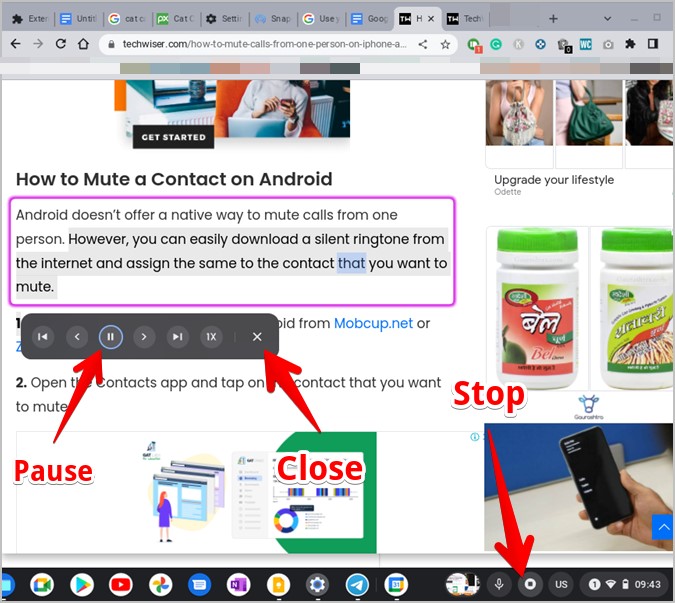
With the text selected, the Chromebook will start reading the selected text while highlighting the spoken words. You will also see a text-to-speech toolbar below the selected text. Use it for navigation controls like pause/play text, go to the next line or paragraph, and adjust the speed of the spoken text.

Step 3: Stop Select-to-speak
When you are done listening to the text, you can stop Chromebook from reading it in one of the following ways:
- Press the Ctrl key on the keyboard.
- Press the Search key (or Launcher key).
- Click on the X button in the select-to-speak toolbar.
- Click on the stop button in the shelf.
- To pause the text, tap on Pause button in the select-to-speak toolbar.
Tips to Use Select-to-Speak on Chromebook
You can customize various things related to the select-to-speak feature in Chromebook such as the language or voice, color of the highlight box, and turn off navigation controls.
1. Change Select-to-speak Language and Voice
By default, the text will be read in the device language with the system voice. But you can change both the language and the voice.
Go to Settings > Accessibility > Manage accessibility settings. Click on Open Select-to-speech settings under the Text-to-Speech section.

Choose the desired language and voice under the Speech section. You can also enable or disable the natural voice feature and choose its voice as well.

2. Customize Highlights
You can customize the color of highlights and also turn it off in case you don’t want the words to be highlighted.
Go to Settings > Accessibility > Manage accessibility settings. Press the Open Select-to-speech settings. Turn off the toggle for Highlight each word as it’s spoken and select a different color under the Color for word highlights box.

Tip: You can also enable Shade background content which will shade the whole screen except for the selected text.
3. Turn off Navigation Control Toolbar
If you don’t like the toolbar that appears below the highlighted text, you can turn it off by disabling the toggle next to Enable navigation controls. You will find it under Settings > Accessibility > Manage accessibility settings > Open Select-to-speech settings.

How to Hear Entire Page on Chromebook
If you want to hear the entire page on your Chromebook, you can use the advanced version of text-to-speech known as ChromeVox. It is nothing but a built-in screen reader that reads everything present on the screen.
To enable it, go to Settings > Advanced > Manage accessibility settings. Turn on Enable ChromeVox. Alternatively, use the keyboard shortcut Ctrl +Alt + Z to enable or disable ChromeVox from any screen.

Frequently Asked Questions (FAQs)
1. How to Fix Chromebook Text-to-speech Not Working?
If text-to-speech isn’t working i.e., Chromebook isn’t reading the text, restart the Chromebook once. After that, enable the text-to-speech as shown above. If that doesn’t fix the issue, update your Chrome OS by going to Settings > About Chrome OS > Check for updates.
2. How to Enable Speech-to-text in Chromebook?
The Chromebook allows users to dictate text, which is then automatically converted into typed text. To enable this feature, go to Settings > Manage accessibility settings. Turn on Enable dictation.
More Accessibility Features
The text-to-speech is just one of the features based on voice. Check out other ways to enable or disable voice on Chromebook. Also, learn how to use the on-screen keyboard on Chromebook.