Microsoft has been developing Windows 10X OS for futuristic foldable devices. The hype is so much so that a few people are even speculating, this is going to be a major part of Windows’ future. If you are an enthusiast like me or a developer, you can get a sneak peek into Windows 10X OS by simply emulating it on your existing PC. Thankfully, Microsoft made the entire process simple and easy. Let’s check it out
Installing Windows 10X Emulator on Windows 10
Though Windows Emulator can be installed by anyone, there are few software and hardware requirements to meet. You also need to enable Hyper-V before installing Windows 10X ISO.
Software Requirements
- 64-bit Windows 10 Pro, Enterprise, or Education ( Windows 10 Home Edition doesn’t work )
Hardware Requirements
- Intel CPU with at least 4 cores ( Does not work with AMD Processors )
- 8 GB of RAM or more.
- 15 GB of free disk space, SSD recommended
- Dedicated video card recommended: DirectX 11.0 or later, WDDM 2.4 graphics driver or later.
Enable Hyper-V
Before enabling Hyper-V, check whether the Hyper-V is supported on your PC or not. Open the Command Prompt, type the command “systeminfo.exe” and press enter. Now under the Hyper-V Requirements section, if you see the option YES, you can continue enabling Hyper-V.
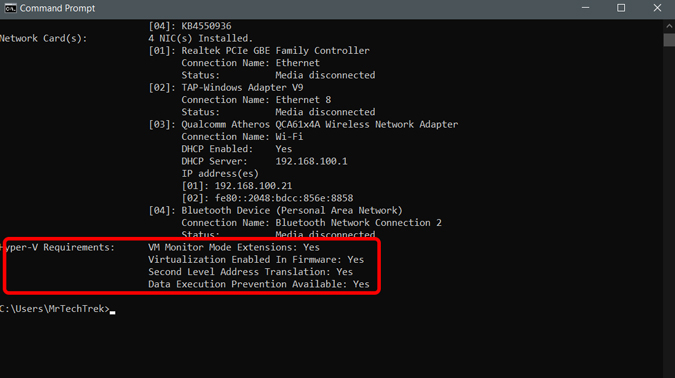
If the option says No, you can use the links to enable the following in BIOS. After enabling, recheck again whether the option is saying Yes or No.
- Hardware-assisted virtualization
- Second Level Address Translation (SLAT)
- Hardware-based Data Execution Prevention (DEP)
To enable the “Hyper-V” feature, navigate to Control Panel -> Programs -> Programs and Features -> Turn Windows Features on or off -> Enable “Hyper-V”.
Emulate Windows 10X on Windows 10
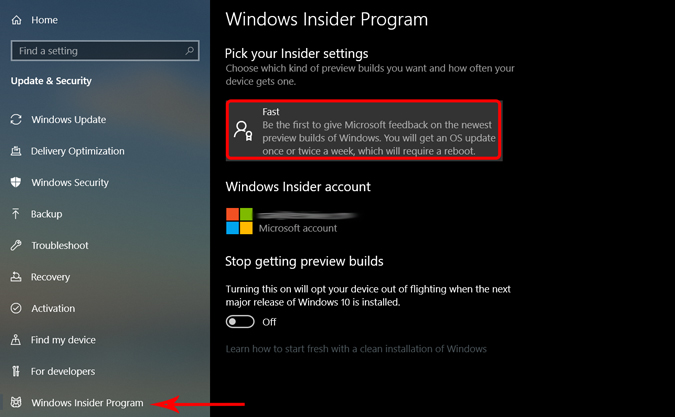
Open Settings on your PC > Update and Security > Windows Insider Program and select the Microsoft account you want and select the Option “Fast” under the Pick your Insider Settings.
In the same menu, select the Windows Update option and check for any updates that are pending. Update the Windows and restart the system.

Now, open Microsoft Store and install Microsoft Emulator.

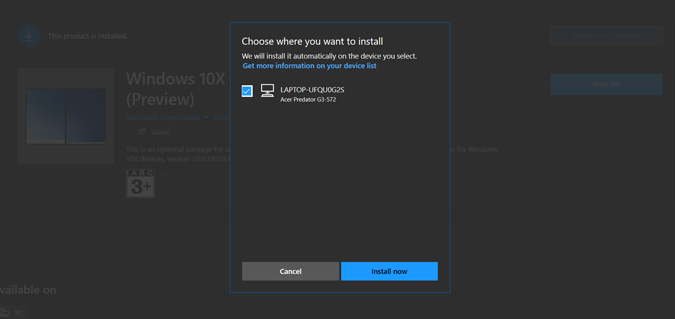
Now, you just need to download and install Windows 10X Emulator Image.

Once Windows 10X downloaded, click on Install and select the Device from the list. If your computer doesn’t support the above requirements, you may not see your device name.
After installing, search for Microsoft Emulator and open the application as administrator.

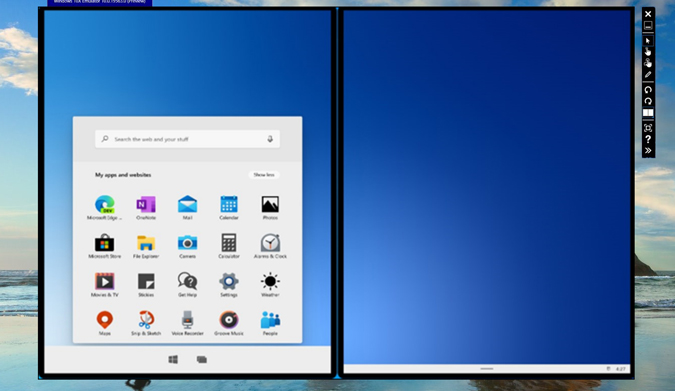
Now you can see, Windows 10X Emulator option, click on Start to boot Windows 10X.

You can use the emulator and can control it with the mouse and keyboard. This emulator is designed to give you a better idea of how your apps would look on a dual-screen device.
 Related: Top Apps to Block a Program From Accessing the Internet on Windows 10
Wrapping up
There you go, Windows 10x on your computer. You can experience the Windows 10X on your own. Also, take a look at this Youtube video from Windows Central to check out all the features of Windows 10X. So what’s your favorite feature of Windows 10X and what do you feel it still lacks? Let me know in the comments below.
Must Read: How to Remove Shortcut Arrow Overlay on Windows 10