User privacy and security are two of the biggest reasons to get an iPhone over Android. And with the iOS 15 update in 2021, Apple is only extending the lead over the rival platform. With the hide my email, iCloud Private Relay, App Privacy Report, location services, etc. you have more ways to secure your identity from advertisers and trackers. Here are the N best privacy settings for iPhone.
Privacy Settings for iPhone
First, we will talk about improvements and new privacy add-ons introduced with the iOS 15 update. And then, we will move to other privacy and security settings. Without further ado, let’s get started.
1. Use App Privacy Report
With iOS 14, Apple introduced Privacy Report in the Safari browser. The iOS 15 update brings the same excellent Privacy Report function system-wide.
With the App Privacy Report, you will have a detailed breakdown of which apps are accessing data & sensors, app network activity, website network activity, and more. The report is buried deep down in the Settings menu. Here’s how you can access it.
1. Open the Settings app on iPhone and go to the Privacy menu.
2. Scroll down to the bottom and open App Privacy Report to see a detailed breakdown of data access by installed apps.

2. Enable iCloud Private Relay
Available for iCloud+ users, iCloud Private Relay reroutes the Safari browsing data through an Apple server. It helps you protect the user location and only shares the approximate location with the website admin. Here’s how you can enable it from the Settings.
Open the Settings app on iPhone and go to Profile > iCloud > Private Relay and enable Private Relay toggle from the following menu.
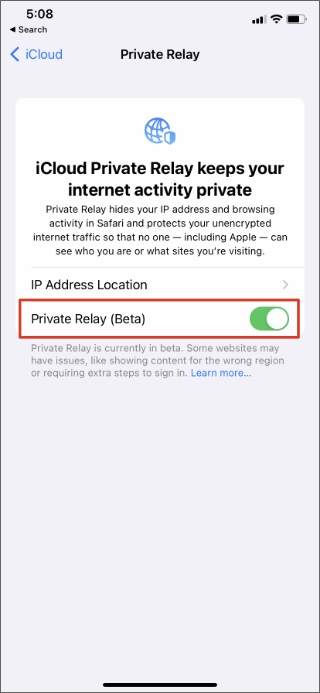
With iCloud Private Relay, all your unencrypted internet traffic gets protected and no one including Apple can see who you are and what sites you are visiting.
3. Use Sign in With Apple
Wherever required, you should use the sign-in with Apple function to protect your personal email ID. When you sign up for an app on iPhone or service from the Safari browser, you can select Sign in with Apple and start using service without sharing your email ID.
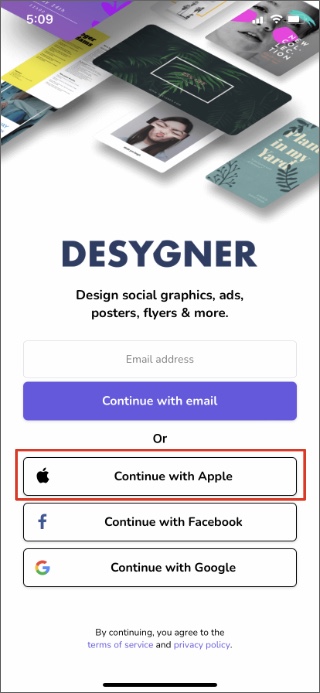
Apple will create a random email address and share it. Don’t worry though. Apple will forward all the incoming emails to your personal email inbox.
4. Create New Temporary Email Address
This is yet privacy setting available for only iCloud+ subscribers. If you need a temporary email address for some reason, Apple’s Hide My Email will allow you to create one with a single tap. Follow the steps below.
1. Go to the Settings app on iPhone and navigate to the user profile.
2. Move to iCloud > Hide My Email and select Create a new address from the following menu.

iOS will create a new temporary email address to use across the web. At any time, you can delete the created email address from the same menu.
5. Enable Two-Factor Authentication
The default password manager on iPhone, iCloud Keychain gets a new add-on with iOS 15. You no longer need a dedicated 2FA app from the App Store to generate authentication codes. You can set up the same from the Passwords menu.

Go to Settings and scroll down to Passwords. Here, you will see all your saved login info. Open a service that supports 2FA and you will have an option to set up two-factor authentication for the service.
6. Disable Ad Tracking
Most companies use ad tracking to serve you personalized ads. Both Apple and third-party apps gather a lot of information about you. The caveat is that some apps might end up selling your information without you realizing it. You can put an end to the practice by disabling a toggle in the Settings menu.
Go to iPhone Settings > Privacy > Tracking, and disable Allow Apps to Request to Track toggle.

From now on, all new app tracking requests are automatically denied on the iPhone.
7. Modify Location Settings
On iPhone, you have an option to share approximate location when using the app. Third-party apps can no longer ask for location permissions in the background. Follow the steps below to make changes.
1. Go to iPhone Settings > Privacy > Location menu.
2. Open an app and disable the Precise Location toggle.
3. From the same menu, you need to select the While Using the App option.

Do note that, you shouldn’t disable Precise Location toggle for apps like Google Maps, Uber, or Uber Eats where your exact location is required.
8. Change Default Search Engine
No one would give Google any medals for robust user privacy. iPhone uses Google as the default search engine to answer your queries. You can easily change it to Yahoo, Bing, or DuckDuckGo. Here’s how.
Open the Settings app and go to Safari > Search Engine and select Google alternative from the list.

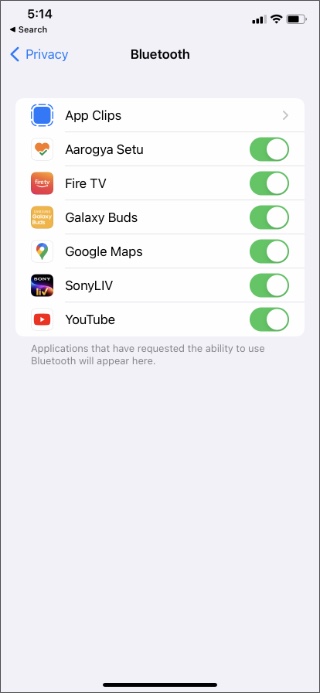
9. Block Apps from Accessing Bluetooth
You are already familiar with Bluetooth technology. Some sneaky apps on iPhone can use Bluetooth to track your location in physical space. You should disable Bluetooth access permission for such apps from the Settings menu.
Go to iPhone Settings > Privacy > Bluetooth and disable the toggle for unnecessary apps from the list.
10. Enable Protect Mail Activity
Mail Privacy Protection works by hiding your IP address and loading remote content privately in the background, even when you don’t open the message. This makes it harder for senders to follow your Mail activity.
Open iPhone Settings and navigate to Mail > Privacy Protection and enable Protect Mail Activity toggle from the following menu.

Protect Your Privacy on iPhone
From the Privacy menu on iPhone, you can check Camera, Microphone, and Photos settings for third-party apps and make necessary changes, if required.
Apple’s strong stance on user privacy remains unchanged. With iOS 15, Apple is offering more reasons than ever to choose an iPhone over Android for security reasons.