Seamless activation and ease of use make FaceTime the preferred video calling app for iPhone, iPad, and Mac users. And thanks to new features like SharePlay, you might be connecting via FaceTime even more than ever. Now, at times to capture fun memories, save a call for proof, or film an interview for your next podcast/YouTube video, you might want to record FaceTime with audio. Since Apple does not offer an inbuilt way to do this, let me show you the workarounds to screen record FaceTime with sound.
How to Record FaceTime Call with Audio on iPhone Using Cable on Any Mac
Before you begin:
- To record an iPhone FaceTime video call with sound, you need a Mac. There is no way to do it without it.
- If you make a FaceTime call and use the Screen Recording button in iOS Control Center, it will only record the video but no sound. This is because when you are on a call, the device microphone cannot be used for anything else.
- Now, if you already own a Mac, you can FaceTime from it and effortlessly record the call with audio using this method. But if the Mac has a different Apple ID than yours or if you want to use iPhone only (as it has better cameras with the ability to show around on the call), here are the steps to record iPhone FaceTime call with sound.
1. Use an appropriate Lightning cable to connect your iPhone to the Mac. Unlock your iPhone and be on its Home Screen. Do not let your iPhone automatically lock while you are following the steps below. Plus, now or after a while, if you see a popup asking you to trust the Mac, tap Trust and enter your iPhone passcode.

2. On Mac, open the QuickTime Player. It comes preinstalled on all Macs. You will find it in the Applications folder. You may also press Command + Space Bar and type QuickTime Player or open it from the Launchpad.

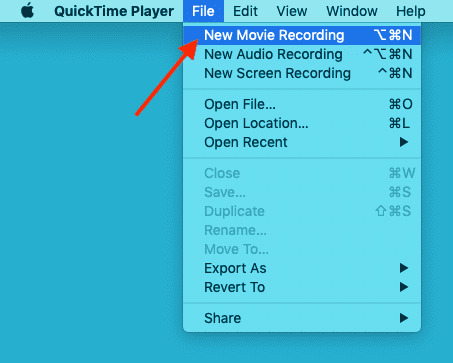
3. Press Option + Command + N or click File > New Movie Recording from the top menu bar.
4. Click the tiny arrow next to the white-red record button.
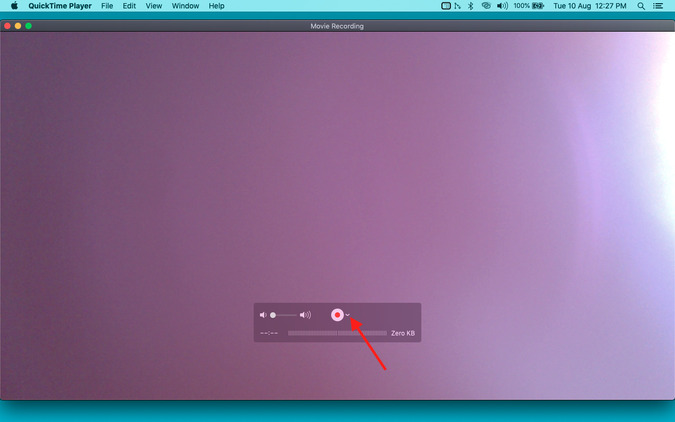
5. For Camera, select your iPhone. For the mic, stay with Internal Microphone. And do not forget to drag the volume slider all the way to the right.

Note: If you do not see your iPhone listed under Camera or Microphone, make sure your iPhone is unlocked, and you had trusted this Mac. If you had accidentally chosen Don’t Trust, disconnect the Lightning cable and connect again. Still, if you do not see it, quit the QuickTime Player by pressing Command + Q and after a few seconds, open it again.
6. With everything set, click the red-white record button inside the QuickTime Player. It will begin recording your iPhone screen and the audio using Mac’s microphone.

7. Now, make a FaceTime video call from your iPhone. The screen and the audio are being recorded on your Mac. Take precautions and do not tug the iPhone so as to disconnect it from the Mac. If you somehow disconnect the devices, the screen recording would fail.

8. Once you hang up the FaceTime call, click the white stop button in QuickTime Player to stop the recording.

9. Now, press Command + S to save the FaceTime call recording. You may also click the red stop button from the top left to save the file.

How to Record FaceTime Call with Audio on Your Mac
As evident from the steps above, recording iPhone FaceTime calls is a bit of a chore. But if you own a Mac, you can screen record FaceTime video calls without any hassle. Let me show you how.
1. On macOS Mojave or later (to check, click Apple logo > About This Mac), press Command + Shift + 5 to open the screen recording toolbar.
Note: If you are on macOS High Sierra or earlier, you will have to use QuickTime Player to record FaceTime calls, as mentioned above.
2. Click the screen record icon to either record the entire screen or just a portion of the screen where you can place the FaceTime app window.
3. Click Options and for Microphone select Built-in Microphone.
4. From the Screen Recording toolbar, click Record. This will start the screen recording. Now, open FaceTime on your Mac and make a call.

5. After you hang up the FaceTime call, click the tiny stop screen recording button from the top menu bar. Now, it will save the recorded file on the Desktop or the location you had set earlier.

Wrap Up: How to Get Sound on Screen Recording FaceTime
These were the steps to record iPhone and Mac FaceTime calls with audio. I hope this guide was helpful for you. Now, one crucial question is related to the legality of recording a call. Not all countries, regions, and jurisdictions allow it. And maybe this is why you do not have any kind of inbuilt call recording solution on your iPhone. But if you have informed the other party that you are videotaping the call, there should not be an issue.