There are plenty of screen recording applications available in the market. Depending on what you are looking for, the choice can get really confusing. In my case, I mostly use the recording in my blogs with the length ranging from a few seconds to a minute. If you are in the same boat as me and need a lightweight yet fully capable tool to record screen, I suggest giving Screencastify a try. So today, I’ll walk you through the extension and how to record on Screencastify. Let’s jump right in.
Screencastify: How to Record, Edit, and Export
What Is Screencastify
Screencastify is a Chrome extension that allows you to record your computer’s screen. Unlike other apps which mainly focus on screen recording, this one also allows you to edit the video once you are done recording. There are two main reasons why I recommend this to users. Firstly, since it’s a Chrome extension, it doesn’t take up much space. Secondly, Sccrencastify allows you to even record desktop and other windows and not just Chrome windows or tabs.
Get Screencastify Extension for Chrome
How to Add Screencastify Extension to Chrome
1. You need to install the Screencastify extension from the Chrome Web Store in order to use it. To do that, open the link we shared just above.
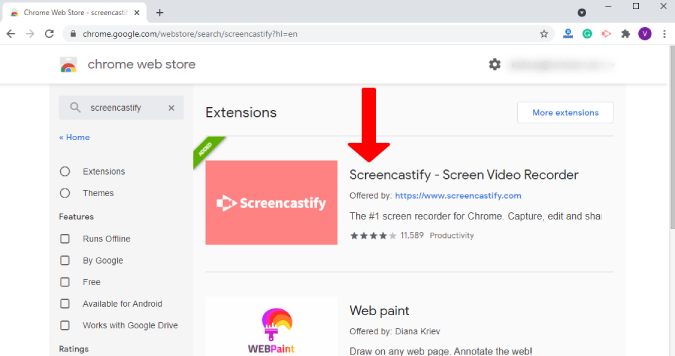
2. On the Screencatify extension page, click on Add to Chrome to install it in your browser. As soon as you do that, you’ll see another prompt asking if you wish to install the extension. Click Add again and the extension will be installed in no time.

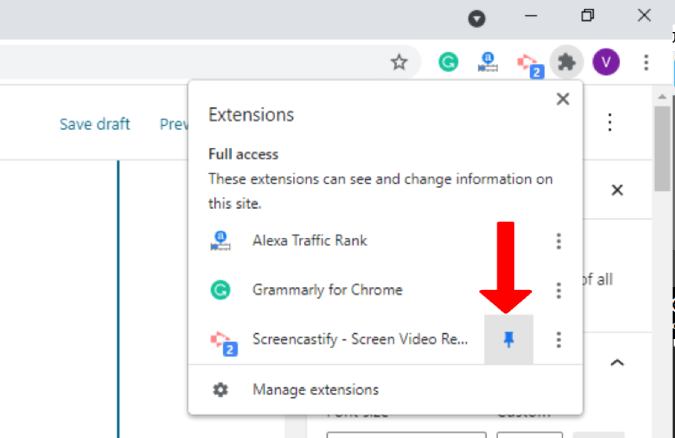
3. If you have installed an extension for the first time and cannot find the Screencastify icon, don’t worry. All you need to do is click on the extension option (jigsaw puzzle piece) on the top right corner and select the pin icon. This way you can pin any extension and make it visible on the top right corner for quick access.
How to Record on Screencastify
After you install Screencatify in Chrome, it’s time to put the extension to work. Simply follow the steps below.
1. Click on the Screencastify extension icon on the top right corner of Chrome browser. It’ll open a new tab along with a Google sign-in prompt. Select Sign in with Google and choose the Google account you want to sign in with.

2. Now select Grant access to allow access to Google Drive. The reason you need to do that is that Screencastify saves the video directly to Google Drive. This makes it extremely easy to share it with others.

3. Screencastify will ask for permissions to access the microphone, webcam, and annotation tools. Enable and allow access to the prompts to save yourself from back-to-back pop-ups asking for permission while recording.

4. With the set-up process complete, we can now start recording with Screencastify. To begin, click on the Screencastify extension icon on the top right corner. From the pop-up, select whether you wish to record your browser’s tab, webcam, or the desktop. After selecting the recording screen, click on Record at the bottom to start recording. Here are some common but helpful keyboard shortcuts for Windows and macOS users.
| Windows | Mac | |
| Start/Stop | Alt + Shift + R | Option + Shift + R |
| Pause/Resume | Alt + Shift + P | Option + Shift + P |
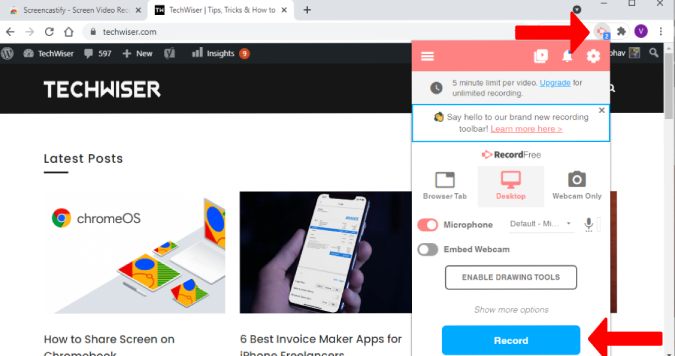
5. One has three options in terms of choosing the video source. As mentioned in the previous step, you can either choose to record:
- Browser Tab – Records Chrome browser tab
- Desktop – Allows you to select a specific window or the entire screen (as shown in the picture below)
- Webcam Only – Record your webcam

6. Since we’re recording the browser tab, choose Browser Tab from the source option and hit record. Once you are done recording, you can either click the stop button from the extension bar or from the annotation tools at the bottom left corner of the browser.
Other options such as pause, stop, restart, or delete while you are recording can be accessed from the extension icon on the top right.
Screencatify Sharing and Export Options
As soon as you stop the recording, it opens in a new tab where you can preview it. This tab also allows you to trim videos from the start and end of the video. As screencasting uploads the recorded video directly to Google Drive, you can generate a shareable link in no time. There are plenty more export options you can choose from like:
- Download to PC (WebM format by default)
- Download as MP4
- Generate Google Drive link
- Export as GIF
- Publish to YouTube
If you are a teacher and use teaching apps such as Google Classroom to take online classes, you would be happy to know that Screencastify integrates with Google Classroom. So teachers can share prerecorded classes and give detailed feedback using the annotation and submit tool.
Annotation Tools and Dedicated Video Editor
As soon as you hit record, the annotation tools will appear at the bottom left of the screen. There are several tools that come in handy if you want to focus or highlight any area of the screen. The pen tool allows you to write and rectangle tool to create boxes along with the option to change colors. Not just that, you can add stickers or use the eraser to scrub off any marking from the screen.

Screencastify Video Editor
The editor not only allows you to open files directly from Google Drive but also from your local storage. This way, you can also add and edit videos that were not recorded using Screencastify. The video editor has all the basic tools like cut, crop, text option, etc. Since the edit bay is in a timeline format, you can easily move multiple videos around and rearrange them.

The editor bay will be visible in the preview window once you’re done recording. Simply click on Open in Editor on the top.
Remember that the preview window only allows you to trim the recording. On the other hand, the video editor offers far more editing tools and options.

Screencatify Unlimited vs Free Version
The extension has two versions – free and unlimited. The free version limits your screen recording time to 5 minutes. On the other hand, the pro version has no such cap on the recording length. The 5-minute length also applies to exports. On the other hand, the good news is that there is no watermark in the free version which is a rarity for a free screen recording extension like this.
The screen recording time is limited to 5 minutes on the free version. However you can record multiple 5 minute videos without any hassle.
| Cost | Record Limit | Watermark | |
| Free | N/A | 5 minutes | No |
| Paid | $49/yearly | Unlimited | No |
Closing Remarks: Screencastify Chrome Extension
I hope now you know how to record on Screencastify and if need be use other annotation tools with ease. As I have mentioned before, Screencastify is a great Chrome extension for recording. If you do not require more than five minutes of recording time, the free version will suffice.
Also Read: 8 Best Screen Recorders for Ubuntu