Chromebooks are mostly popular in schools among children. Schools already do a good job at blocking mature content making the device more suitable for children. But if you are willing to provide a Chromebook to your child on your own, then here’s how you can set up the Chromebook and make it safer, and offer a better experience to him/her.
Before setting up Chromebook, your child needs to have a child account. Google recently unveiled a new setup process that is easier and straightforward. It allows Chromebook owners to create a child account and log in directly from the setup process.
Things to Know About Child Account
A child’s account is different from a normal Google account. Unlike the normal Google account, you create a child account using the Family Link app. This will keep the child’s account under your account and hence, under your supervision. There are multiple advantages to using the child account.
- Restrict adult content on the Internet
- Manage which apps they can access
- Control their daily usage limit
- Bedtime restrictions
- Location access
If your child already has a Google account, no worries! You can convert that account into a child account using the Family Link app.
How to Setup Chromebook for Your Child
1. Open the Chromebook lid to turn it on. If you have already logged in with any account, then click on Add people option at the bottom. If the child account is the first account that you are going to set up, then you can just skip this step and continue with the set-up process.
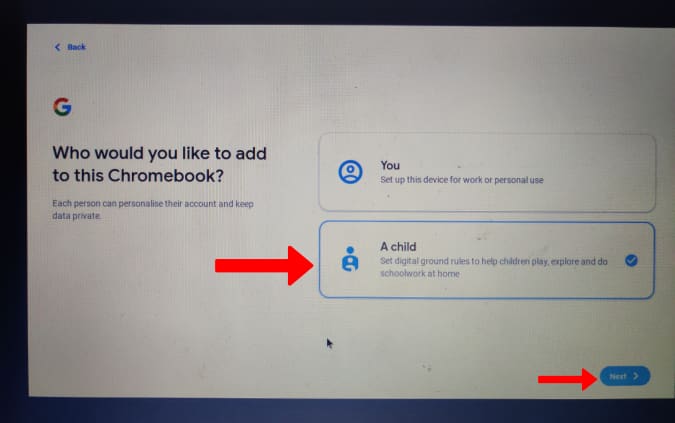
2. Select the A child option to set the Chromebook for your child and click on Next.
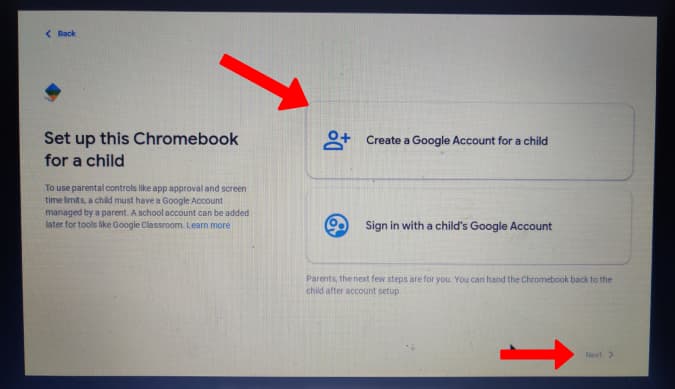
3. Here you get the option to create a new child account or sign in with an existing child account. If your child doesn’t have an account, create one by clicking on Create a Google Account for a child. But if your child has an account, then you can skip the entire account creation process. Instead, click on Sign in with a child’s Google Account and skip to step 13 to continue with the sign-in process.
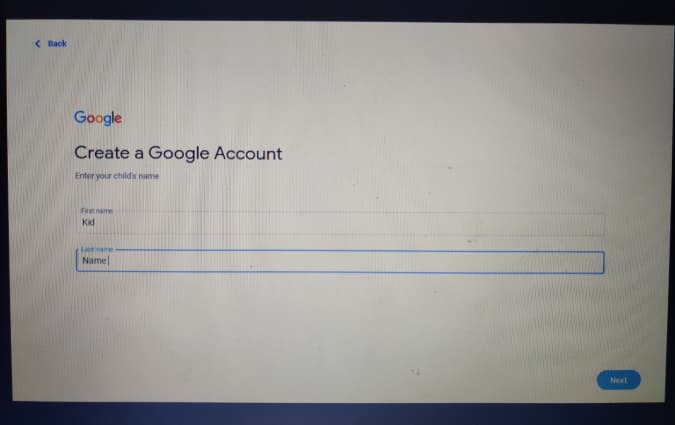
4. Now enter his/her First name and Last name and click Next.
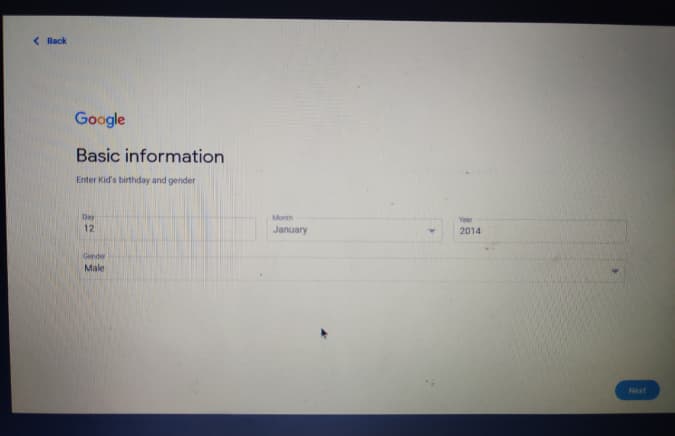
5. Then add his/her birthday and gender details and click Next.
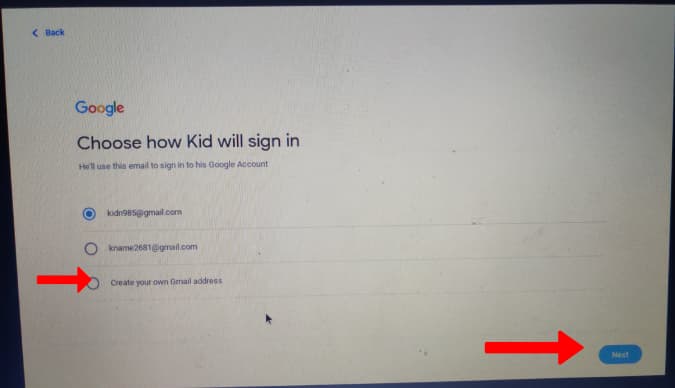
6. Choose an email id for your child and click on Next.
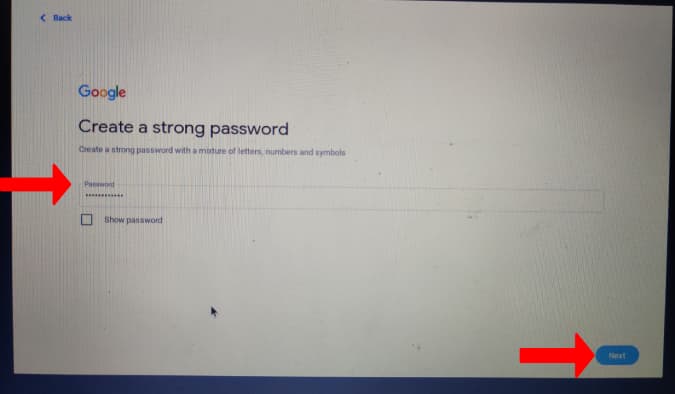
7. Now create a password for the child’s account. Then again click on Next to continue.
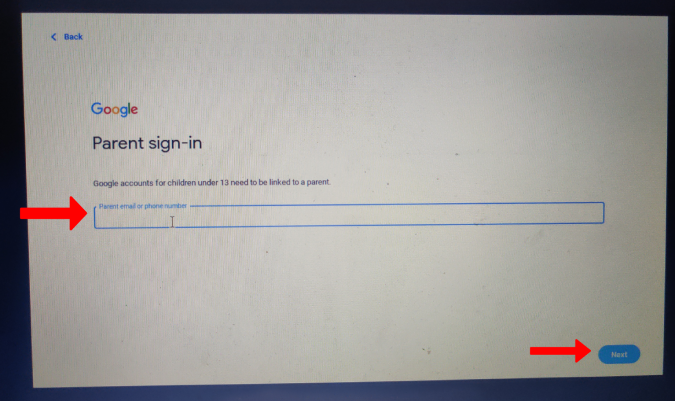
8. This will ask for a parent email id, enter yours and click Next.
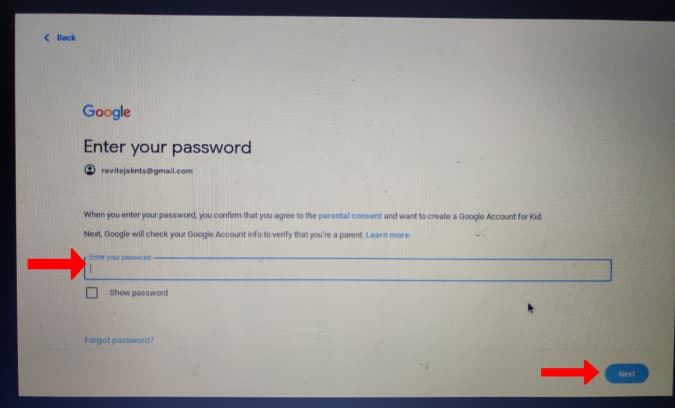
9. Then verify the parent account by entering your ‘parent’s’ Google account password. Once done, click on Next to verify. Then Complete the 2-step verification if you have enabled it on your Google Account.
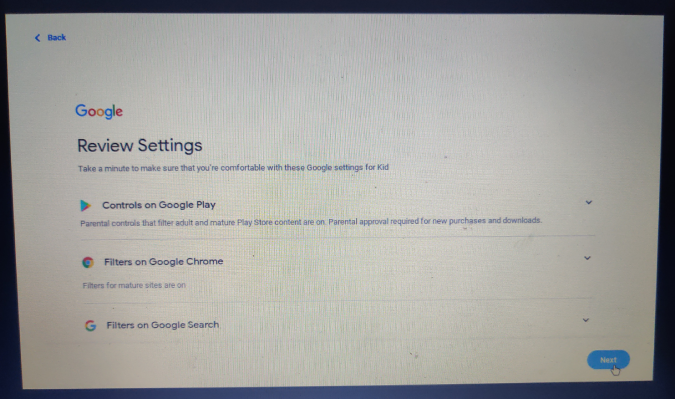
10. Now you can change few settings like what apps your child can access, filters on Chrome and Google Search, etc. Alternatively, you can change them later from the Google Family Link app directly from your phone.
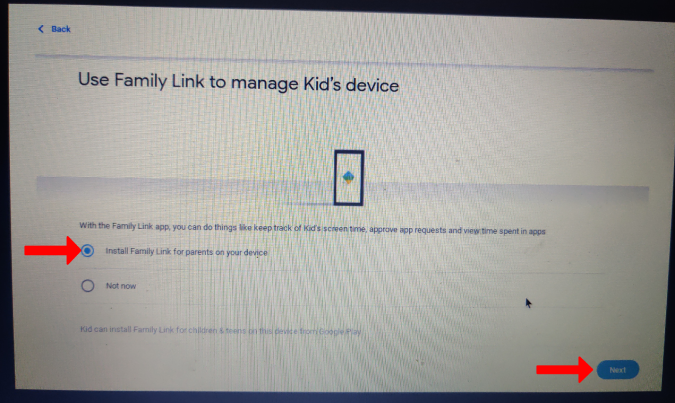
11. On the next screen, select the Install Family Link for parents on your device option. This will install the Family Link app on your phone so that you can control your child’s account remotely. Once done, click on Next.
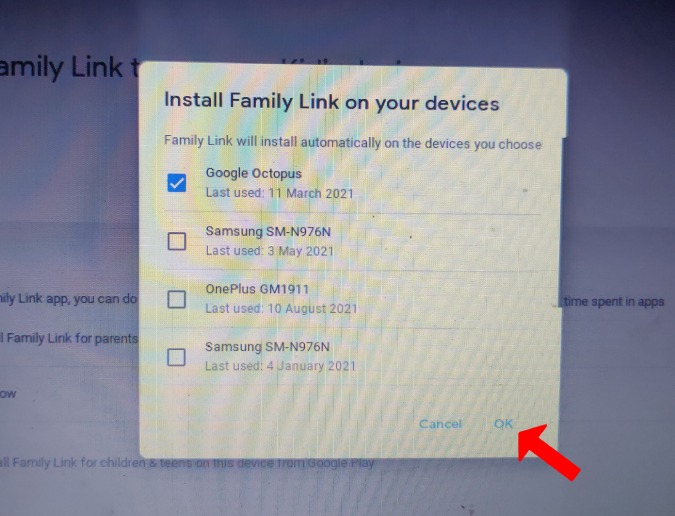
12. Select the device that you want to install the Family Link app on. You can also select multiple devices to install the app so that you can access your child’s account from any of the selected devices.
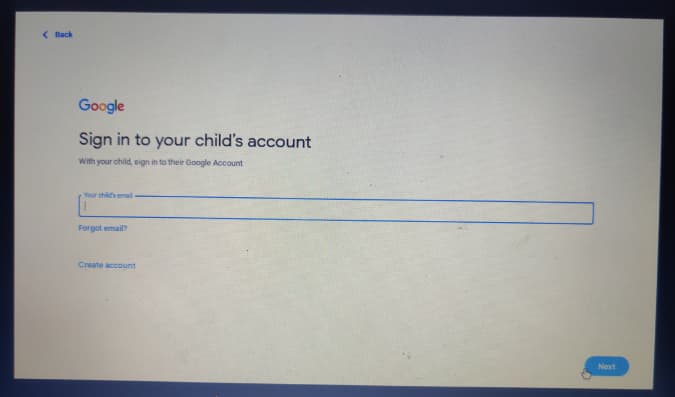
You have already created a child account. But it will not log you in automatically to Chromebook. It will ask you to manually log in with the newly created child account.
13. Now it will begin the sign-in process. Enter your child’s email id and password to log in with your child’s account.
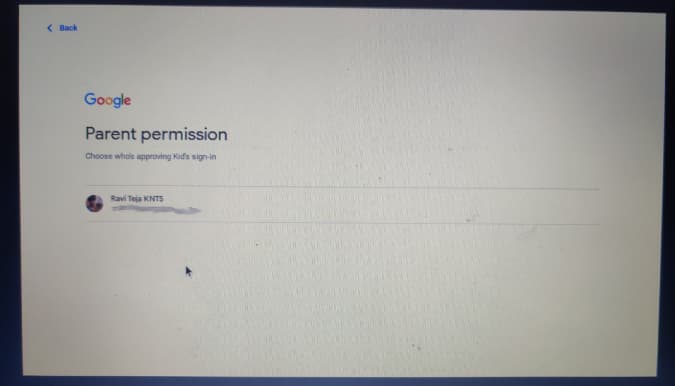
14. Chromebook will prompt for parent’s permission AKA your permission. Select the parent email id and enter your password. Also, complete the 2-step verification if you have enabled it. This will make sure that your child cannot log in to new devices without your permission.
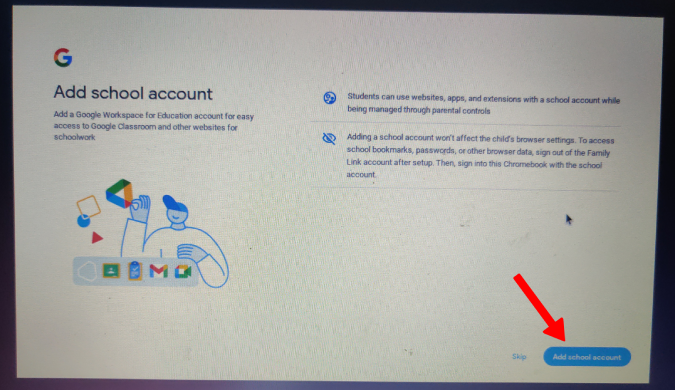
15. Now it will ask if you want to connect the child’s account to his/her school account. Click on Add school account to log in with those details. It will not merge both the accounts but instead offer to switch between accounts in the Chrome browser. You can skip if your child doesn’t have any child account.
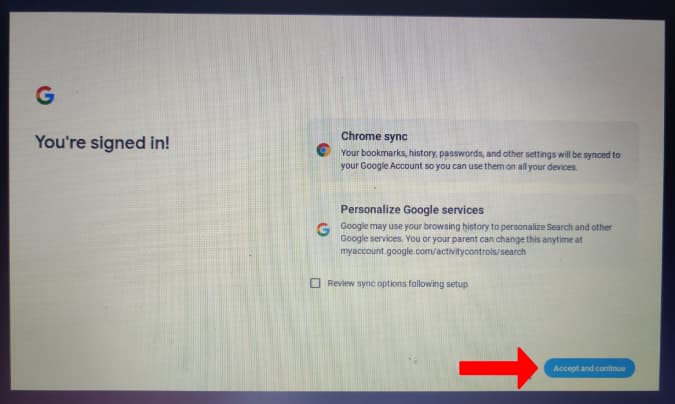
16. Now grant permission to Chrome sync and other Google services by clicking on Accept and continue.
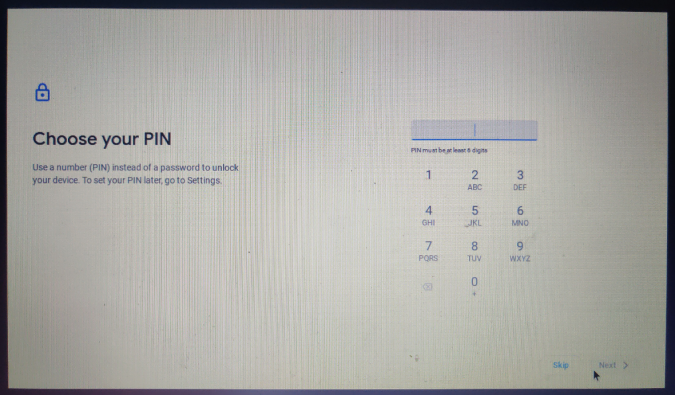
17. Now set a pin for the Chromebook to restrict access to this account. Your child doesn’t have to use the Google account password to log in every time. Just enter the PIN.
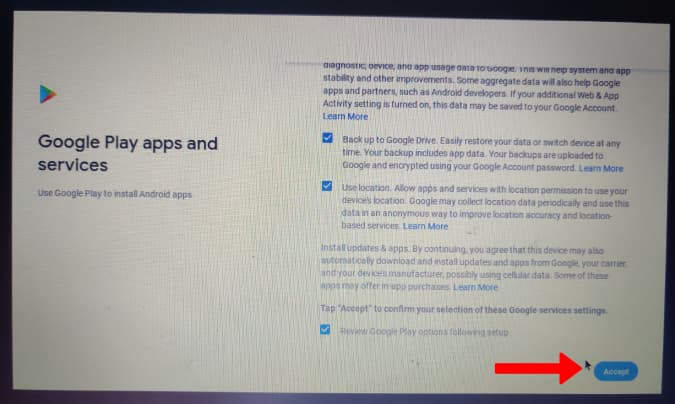
18. Now Google will ask for Privacy permissions, read, or not, and click on Accept.
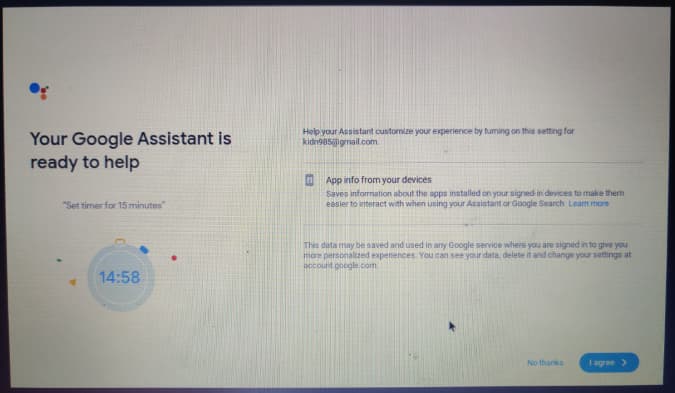
19. Then set up the Google Assistant by clicking on I agree and train the voice of the child for the Google Assistant to understand or click on No thanks to skip.
Once done, you are all set. You have successfully set up Chromebook for your child.
Wrap Up – How to Setup Chromebook for Your Child
If your child is already logged in with a Google account, you can convert that account into a child account by opening Chrome OS settings > Accounts > Parental Controls. We hope that your child is now surfing the web safely and you have complete or as much control over his/her activities as possible and required. Kids are smart these days and so you cannot take things for granted. Don’t be passive but instead, be active and take interest in his/her activities. Offer to guide in the right direction where required but also give them some privacy.