Microsoft has upgraded the hardware requirements for Windows 11 making TPM 2.0 necessary to install the latest version of Windows on your computer. What if you want to try Windows 11 without leaving the Windows 10 interface? What if you do not have Trusted Platform Module 2.0? Well, the good news is that installing Windows 11 still is possible without needing TPM 2.0 module using Hyper-V. Here is how you can set up a virtual machine on Hyper-V and install Windows 11 even if your computer lacks TPM 2.0.
If you are unaware, Hyper-V is a native Windows virtual machine tool that allows you to install and test various builds on virtual hardware. Although it is not enabled by default, you can quickly install the required modules and start using them on Windows 10.
How to Enable Hardware Virtualization
Before following the Hyper-V installation steps, you must check if virtualization is enabled or available on your computer or not. The Task Manager shows if hardware virtualization is possible on your computer or not. For that, open the Task Manager and switch to the Performance tab.
Select the CPU tab if it is not selected, and find out the Virtualization label. If the status is Enabled, you do not have to do anything and can skip to the Hyper-V installation part.

However, if the status is Disabled, you have to enable it in UEFI. The setting can be hidden somewhere in the Features or CPU Configuration tab.
Here is how you can enter the UEFI mode.
It entirely depends on which CPU you are using, and different manufacturers place this option at different locations. That said, it is better to search for SVM Mode, Virtualization Technology, Intel Virtual Technology, Intel Virtualization Technology, etc. in UEFI and enable it.

Otherwise, you can check your CPU manufacturer’s support or knowledge base to find the exact location. Note that Mouse doesn’t work in UEFI mode, so you will need to use the keyboard. You will find the instructions at the bottom of the UEFI screen which varies from PC to PC.
How to Setup and Install Windows 11 on Hyper-V
The following steps show how you can set things up on Hyper-V. Then, you can install Windows 11 like any other Windows version.
1. Click on the Taskbar search box, search for “turn windows features on or off,” and click on the respective search result.
2. After opening the Windows Features window, search for Hyper-V and enable it (check it).

3. Click the OK button to start the installation process and Restart Now to finish installing it.
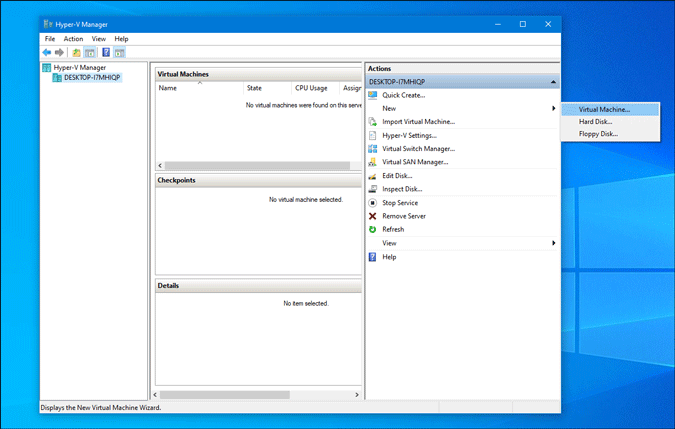
4. Search for “hyper-v manager” in the Taskbar search box and click on the corresponding search result to open the Hyper-V Manager window.
5. Click on your computer name on the left side and select New > Virtual Machine on the right side of the window.
6. Skip the introduction window by clicking the Next button and select the virtual machine name in the Specify Name and Location tab. Then, click the Next button again.

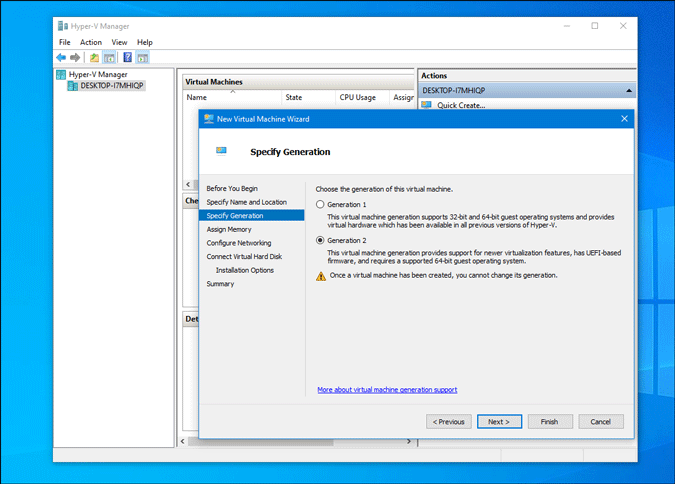
7. Select Generation 2 in the Specify Generation tab and click on the Next button. If you select Generation 1, you cannot install Windows 11.
8. In the Assign Memory tab, select at least 4GB of RAM so that your virtual hardware can run the OS smoothly.
9. In the next tab, Configure Networking, expand the drop-down list, and select Default Switch.

10. Next, you have to select the Create a virtual hard disk option, enter the name of your VHDX, select a location, size, etc. Once done, click the Next button.

11. Now, you have to select the Windows .ISO file. For that, choose the Install an operating system from a bootable image file option, click on the Browse button, and select the ISO file.
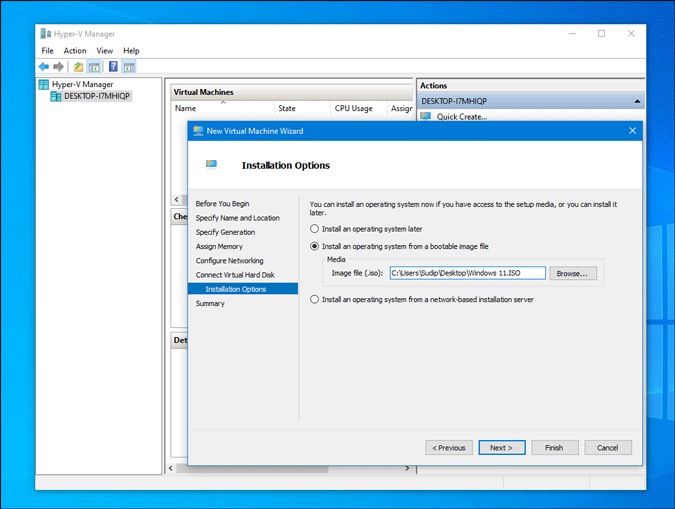
If you do not already have the Windows 11 ISO file on your computer, you can use the UUP dump command-line tool to download it.
12. Go to the next section, and click the Finish button.
Now you shall find the virtual machine on your screen. However, you have to enable virtual TPM to start the installation process. For your information, it is not mandatory to have physical TPM 2.0 module in order to enable VMTPM in Hyper-V.
13. Right-click on the virtual machine and select Settings from the context menu.
14. Switch to the Security tab and tick the Enable Trusted Platform Module box. Then, click the OK button to save the change.

15. Click the Start button to begin Windows 11 installation.

The installation process of Windows 11 is the same as any other older version of Windows like Windows 10, 8.1, and 7.
Wrapping Up: Setup and Install Windows 11 on Hyper-V
Setting up a Windows 11 virtual machine on Hyper-V is not that difficult. The best thing is that you can test the latest version of Windows even if you do not have the actual Trusted Platform Module. Do let us know if you encounter any problems while installing Windows 11 on Hyper-V.