Nowadays, it is common to have more than one computer, like a personal/work computer and home computer that everyone uses in your house. When you have multiple computers, it is common that you find yourselves wanting to share or transfer files between those two computers. Thankfully, sharing files between two computers is way easier than you think and you can do it in multiple ways.
Related: Send files From one Computer to Another Using a LAN Cable
1. Windows HomeGroup
If you have two Windows PCs that are Windows 7 and above then the easiest way to share files and folders between those computers is to use the Windows HomeGroup. Creating a HomeGroup in Windows is as easy as clicking a single button. However, one thing to keep in mind is the computers you want to access should be on the same network.
To start off, search for “HomeGroup” in the start menu and open it.
Related: Access Windows Shared Folder From Android Over Wi-Fi

Once opened, click on the button “Create Homegroup.”

The above action will open the HomeGroup creation wizard. Just follow the on-screen instructions.

At the end of the wizard, you will get a password. Just copy and save it.

That’s it. Whenever you want to access the files and folders on the other computer, launch your File Explorer and select the option “HomeGroup.” You will be asked for a password for the first time. Just enter the password that you’ve saved earlier and you are good to go.

If you ever want to share a custom file or folder, simply right-click on it and then select the option “Share > HomeGroup.”

2. USB Drive or External Hard Drive
Sharing files via a USB drive or External hard drive is an age-old method. However, this way of sharing files and folders is helpful if your need is temporary or if you don’t want to create network sharing, homegroup, etc. Moreover, this method doesn’t need you to be connected to a network. To make this even better, it is recommended to use faster external drives or USB 3.0 drives for faster read and write speeds.

Of course, to get most out of it, you need to plug those devices into the right ports. Generally, the USB 3.0 ports are in blue color. So, look out for the blue USB ports when plugging your USB 3.0 or external hard drives.
3. Use a Special Transfer Cable
If you don’t want to go through the hassle of plugging in the USB drive, copying the files and then plugging in that same USB in another computer to transfer files then you use special transfer cables. These special transfer cables like Belkin Easy Transfer (F5U279) lets you connect your two computers via USB so that you can easily share files and folders much faster. These types of cables are especially useful when you have a laptop and a desktop computer.
So, here is how it works. Insert both end of the cable to the USB port of 2 PCs (only Windows is supported). Open the file explorer (Win + E) and there you’ll see a new software near the USB or CD drive. Run that software on both computer. And you should a new window with split screen. The top half contains the file manager window of other computer and the bottom half is your computer; just like what you have on FTP clients like File Zilla. Now to transfer the files, simply copy paste them to the folder you want.
Though, these cables are pretty expensive. We won’t suggest you use them unless you really want it to, since there are a better option available for free.

4. Sync via Cloud Services like Dropbox or Google Drive
You can also use the cloud services like Dropbox, Google Drive, OneDrive, iCould, etc., to sync your files and folders between two computers. The good thing about this approach is you can also use the respective cloud apps to access your files even from your mobile devices. The only downside of this approach is the cloud space is limited and you need to upload your files to the cloud and then download them on the other device. This is not the thing you can enjoy if you have a slow internet connection.
Of course, applications for Google Drive, Dropbox, and OneDrive lets you enable Selective Sync so that you can sync only the files you need.

Also, if you are using Dropbox, don’t forget to enable the “LAN Sync” feature if you have multiple computers. This feature lets you sync the files and folders between the computers on the same network if they have the Dropbox client installed on the same account.
5. Share Folders and Drives Locally
Manually sharing necessary drives and folder is the oldest way and may confuse if you are not accustomed to the network sharing. However, once you are done setting up the network sharing, you can easily share and modify the folders as needed. Sharing a file or folder in Windows is pretty easy.
To start off, right click on the file you want to share and then select the option “Properties.”

In the properties window, navigate to the “Sharing” tab and then click on the button “Share.”

The above action will open the file sharing window. Here, select the option “Everyone,” click on the button “Add” and then click on the button “Share” to share the file or folder.

That’s it. When you are on the same network, open the File Explorer and then click on the option “Network” on the left panel. If this is your first time, you may be prompted to enable the network discovery. Just click on the message and then select the option “Turn on network discovery and file sharing.”

With the above action, you will see the shared files and folders.

6. Using AnySend
AnySend is one of my favorite applications that makes it easy to share your files and folders between your computers and even between your mobile devices. Just install the application on all your machines and mobile devices. Once you are on the same network, open the AnySend application on both the machines/devices, copy the item to your clipboard and transfer files and folders by simply click. See the following video on how it works.
The good thing about AnySend is it’s one of those few apps that is cross platform. i.e, you can install Anysend on all devices like – Windows, MacOS, Android, iOS, Windows Phone etc and then use it to transfer files between them over WiFi. No internet connection needed. Typically you get anywhere from 2-10 MB/s transfer speed depending on your router.
Related: Software to Share Files Between Two Computers Using WiFi

7. Send Files via Email
This is a pretty old school way. But, if you have small files that you want to send it to the other computer or mobile device then you can follow this method. With this, you don’t have to install yet another software or need to configure your network file sharing.
To start off, simply zip the files you want to send, create an email, upload the zipped files as an attachment and then email it to yourself or save it as a draft. Once you are done sending the email, open the email on another computer and download the attachment.

One thing to keep in mind while using this method is there will be size limits on your attachments. For instance, Gmail only allows attachments up to 25MB. Other email providers have their own limits. Generally, you cannot use this method to share large files.
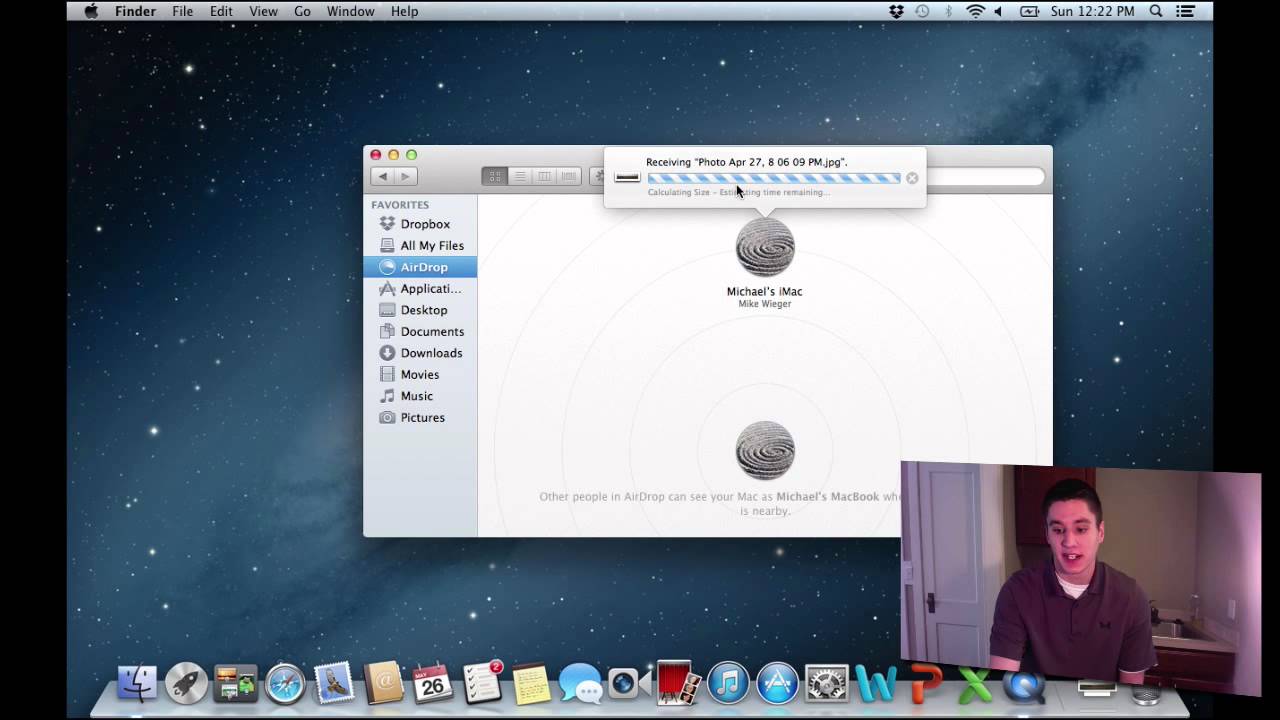
8. Airdrop for Mac
Airdrop feature on Mac is like HomeGroup on Windows but is much more refined and easy to use. Using Airdrop on Mac is pretty much like using the SHAREit app.
To start off, open the Finder on both your Macs and then select the option “Airdrop” from the left panel.
Once you open the Airdrop on both macs, you will see both your systems in the main window. Simply drag and drop the file or folder on to the other system in the Airdrop window. That’s it, the file will be automatically transferred to the other system.
9. Share Files via FTP
Just like the email method, sharing files via FTP is pretty old but works like a charm. Most power users use this method to share and transfer files because creating your own FTP server is like creating your own private cloud. However, the process can be a bit complicated and may also confuse beginners.
For Windows, WindowsCentral has a good detailed article on how to enable and configure an FTP server on Windows and you can find the guide for mac here. The good thing about this approach is you can access the files from anywhere you want.

10. Share Files via Bluetooth
Most desktops may not have Bluetooth built into them but most laptops and almost all the smartphones have Bluetooth functionality. So, if both your devices have Bluetooth then you can use it to send files and folder between your devices. Depending on what device you are using, the method to enable and share the files with Bluetooth may vary.
So, play with your device settings or Google for specific instructions for your device to share the files via Bluetooth. However, do remember the Bluetooth sharing is pretty slow most of the times and is not that reliable.
Wrapping up
Hope that helps and do comment below sharing your thoughts and experiences about using the above methods to share files and folders between your computers.