It is easy to show what you are doing or what’s happening on your desktop screen. Just ask your colleague to take a look and show him/her what’s happening or how. That’s no longer possible due to the on-going pandemic and it is forever going to change the way we work. The question here is how do you share desktop with others online, and do so quickly so that all the involved parties can arrive at a solution and continue work.
There are a few ways to solve this problem and it is going to vary slightly based on the desktop OS that you are using. We are going to cover screenshots, screen recordings, and live video calling. Depending on your use case, you can choose any to share your desktop – image, video or live.
Let’s begin.
1. Share Desktop with Screenshots
Awesome Screenshot is truly awesome. Once you have installed the extension on Chrome or any other Chromium-based browser like Brave, you can begin immediately. You can take both screenshots and record screens to send a video recording. It works inside the browser as well as on desktop and for 3rd party apps too.

Under the screenshot tab, what you can do is take a screenshot of the browser window, desktop, and app window. You can then decide whether you need to cover the entire visible area or just capture part of the open window. You can also choose a local image here from your hard drive. There is a handy timer to create a countdown, so you time your screenshots.
Once the screenshot has been taken, there are a number of tools to annotate the image like blur certain parts or highlight certain text or bring attention using arrows, and even more. You can write text on the image too.
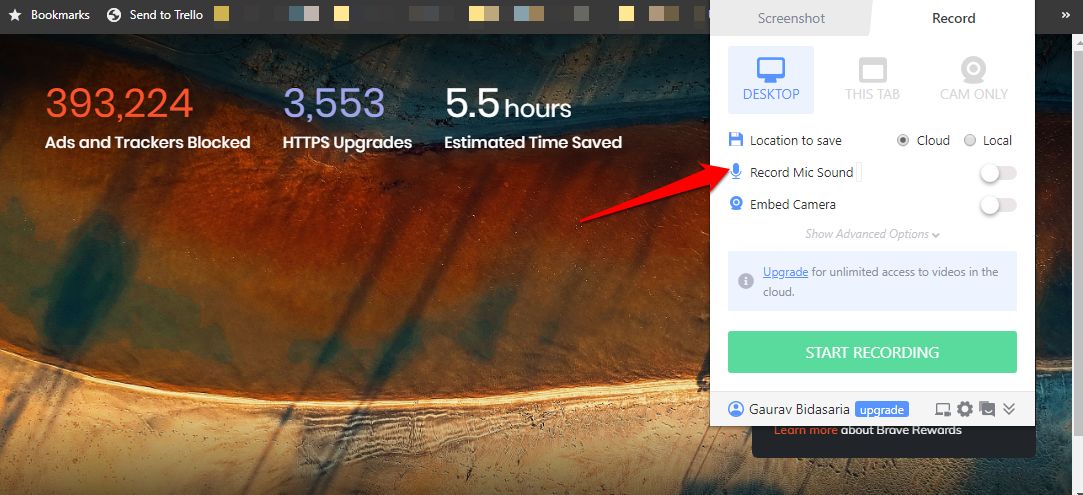
The second tab is for recording. You can not only record what’s on your screen but also use the webcam to record yourself or whatever’s in front of the camera. Again, there are some handy options liking storage options including cloud, ability to shut mic or video and so on.
Awesome Screenshot is completely free with no strings attached. Just download and give the necessary permissions.
Download Awesome Screenshot: Chrome | Firefox
2. Share Desktop with Video Conferencing
WebRTC is an open-source and free client for those who need to share their desktop screens in real-time, but without having to worry about MNCs using and abusing their data. It works right out of a browser, and any browser for that matter. It’s not an extension but a web app.
Click on the link below to open the page and click on the big blue button that says Share Your Screen. That will instantly create a private room where you can invite up to 10 participants using an invitation code or link. Note that adding #private-room at the end of the link will make it private. Otherwise, anyone can join these meetings. You can also choose whether you want to share an entire screen or part of it.
In order to stop streaming or sharing your desktop screen, simply close the link open in the browser window or tab.
Download WebRTC: Browser
Also Read: Zoom Tips & Tricks to Manage Your Video Conferences Better
3. Share Desktop with Advanced Features
While WebRTC is cool, it lacks several advanced features like meeting recording, the ability to add hundreds of participants or host large meetings, and so on. This is where Zoom comes in. It’s a powerful but mostly free video conferencing app that allows you to do so much more.
Zoom will allow you to hold video conference meetings but audio calls are also supported. During the call, you can text message other participants in the group to share links or anything else of importance. There is an option to share a desktop so everyone can see what’s happening on your screen. Then there are some cool features like the ability to record meetings and save them locally or in the cloud for future reference or record.

There is a ‘raise hand’ feature where if any participant wants to say something, instead of disturbing someone else, he can raise his/her hand. Just like in the real world. Doing so will show a hand icon next to your name on everyone’s screen.
Even the free version of Zoom will allow you to host up to 100 participants but here’s the kicker. The participants don’t need to create an account either. Just download the app, enter the code, and done. Group meetings are limited to 40 minutes in the free plan. Pricing begins at $14.99/month/host.
Also Read: How to use Zoom With Slack Seamlessly
Share Desktop
These are some of the best ways to share desktop computer with others. It doesn’t matter whether you are using Windows, macOS or Linux platform, these apps work everywhere. I wanted to make it easy for everyone in the team to join the meeting or view the shared desktop. That’s why I decided to go with browser-based web-apps that also work on all browsers and not just Chrome.
I would recommend you to use Zoom but if you think that’s an overkill for your specific use case, you can go with Awesome Screenshot to record short videos and send them. That should be enough for issues like troubleshooting or whatever it is that you want others to see on your desktop.
If you are using another desktop sharing app, do let us know in the comments below. That will also help our other readers.