One of the most missed features on Mac is the window snapping where you can just drag a window to the edge of the screen, causing the window to “snap” into place. Until Apple makes up its mind, we’d have to rely on third-party solutions. Let’s see how to snap windows on macOS, just like we do on Windows.
1. Native Solution
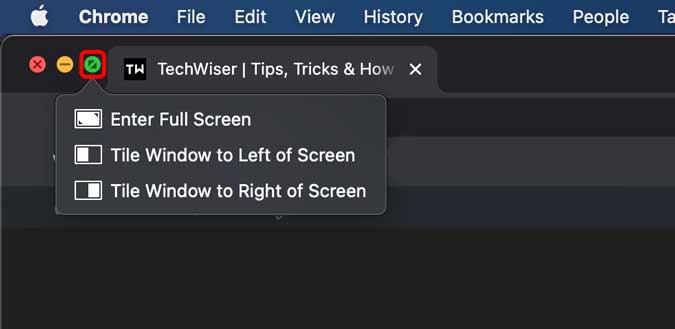
macOS included this feature on Catalina and above that lets you snap your windows to either the left or right half of the screen. It is built-in but you would have to manually enable it from the Mission Control Settings. Navigate to Settings> Mission Control> check “Display have separate spaces”. Once done, simply click and hold the green expand button on the top left corner of any active window to select the snapping location.
Tip: Simply clicking the green expand button on the top left corner of any window would expand the window to full screen. If you need to bring up the menu for snapping, click and hold the green button.
This method is still less intuitive and you can’t use keyboard shortcuts or drag the windows to magnetically snap it to the side.
2. Create a Keyboard Shortcut to Snap Windows Manually
While the previous method is easy and comes inbuilt on the macOS, I still prefer using keyboard shortcuts on Mac, wherever possible. Fortunately, you can create a keyboard shortcut to snap windows on Mac. You simply need to create a shortcut in Keyboard settings and it would work. For example, if you want to tile the active window to the left of the screen, you can simply register a shortcut that would instantly move any active window to the left. Simply, navigate to System Preferences> Keyboard> Shortcuts> App Shortcuts> Create New Shortcut.
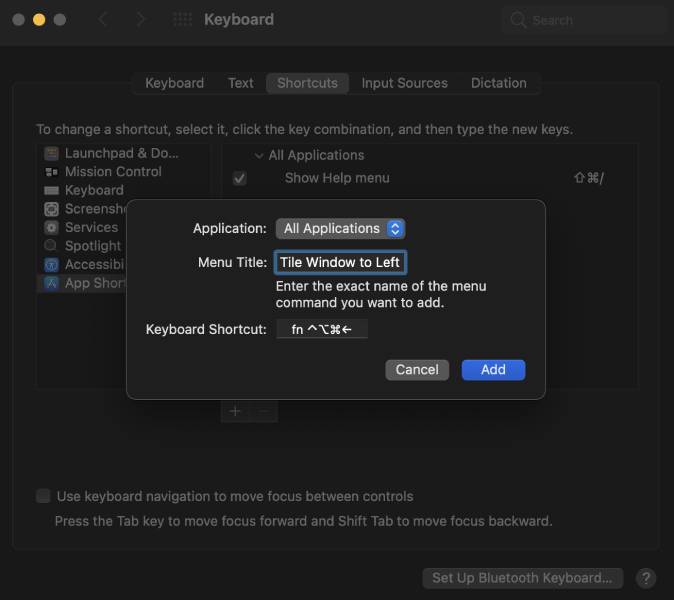
This method would allow you to create four shortcuts namely, tiling and moving the window to either half of the screen. For a more in-depth guide, you can check out how to create a keyboard shortcut to snap windows on Mac.
3. Rectangle
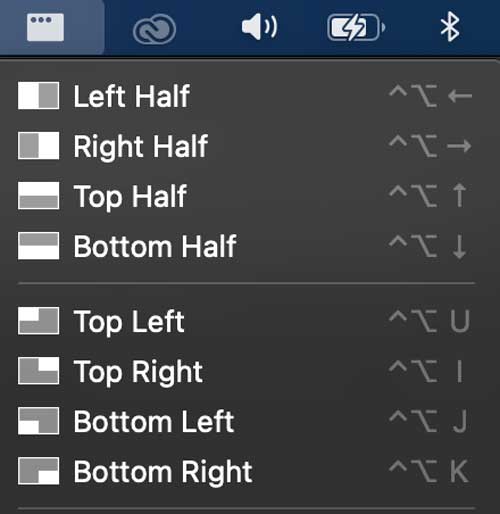
Rectangle is a free and open-source app that allows you to quickly snap your active windows on macOS. Unlike the native solution, Rectangle lets you snap windows by using a keyboard shortcut. It has presets such as snapping to either side, top and bottom halves, corners, thirds, etc. There are more than 20 different positions and sizes that you can implement on a window. The app runs from the Menubar and detects keyboard shortcuts flawlessly.
However, this app doesn’t give you the functionality of snapping windows by dragging the window using the cursor to the side.
Install Rectangle (free)
4. Hookshot
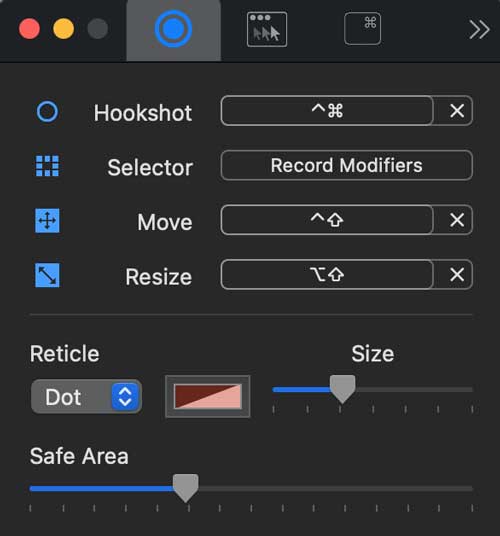
Hookshot is another app by the same dev as Rectangle and it aims to offer more functionality. Apart from all the keyboard shortcuts, Hookshot also lets you snap windows by simply dragging the window. Simply press the key combination to activate the snap mechanism and then simply the cursor to select an appropriate size and position for the window. For instance, press the ctrl+cmd key to activate and then move the cursor to the left of the screen to set the window to display on the left half.
Hookshot is a paid app but you can try it for 10 days for free and make up your mind for the final purchase.
Install Hookshot (free, $7.99)
5. Magnet
While there aren’t many different ways to snap windows, Magnet does have some distinguishing features from the rest of the apps. For starters, you can activate the snapping mechanism by dragging the window with the cursor and position the windows into halves, quarters, and even sixths. Magnet also supports multiple displays, even in vertical alignments, and makes organizing windows really easy. Other than that, you also get keyboard shortcuts to assign any window a position on the screen.
Magnet is available on the App Store for $2.99.
Install Magnet ($2.99)
6. Swish
Swish is a window management tool that offers a superior experience. The whole idea behind this app is that you don’t drag around a window and use the gestures on the trackpad to snap windows in place. The interface is comprehensive and the gestures are intuitive. You can precisely snap multiple apps on the screen and they would never overlap, it’s that precise. The app has premade shortcuts for snapping a window into thirds, quarters, sixths, etc. It also lets you minimize, close, and quit any active window with the trackpad gestures.

The gestures work only from the window titlebar i.e., the top bar of a window. This would be a helpful tip when you first start using the app. Swish is a paid app and offers a 14-day free trial. After that, you can purchase it for $5 or if you have a Setapp subscription, you can get it from there.
Install Swish (Free-trial, $5)
7. Better Snap Tool
Better Snap Tool is a customizable app for window management on your mac computer. It has the most features of any app on the list that allows you to set custom modifiers for window snapping. The key feature is the customizable window size, other apps only give you halves, thirds, and quarters but with Better Snap Tool you can create a truly custom size and position for your windows.
Better Snap Tool is paid and available on the App Store for $2.99.
Install Better Snap Tool ($2.99)

Final Words
These were a few of the apps that allow you to customize your windows layout and manage it more effectively. Rectangle is the only free app that lets you snap windows and I would recommend it to most people. There’s also Spectacle for Mac that’s really good and lets you snap windows with keyboard shortcuts for free. However, it’s not being actively maintained which means it may stop working in the future, and then you’d have to look for an alternative again.
However, if you have specific requirements then Hookshot, Magnet, and Better Snap Tool are also decent alternatives. What do you think? Let me know in the comments below or reach out to me on Twitter.
Read: 10 Best Menu Bar Apps for macOS That You Should be Using (2020)