The Sony WH-1000XM3 headphones are capable of much more than just supreme noise-cancellation. You can turn on/off ambient mode based on location, remap the button, connect to two devices, and much more. With that said, here are the best Sony WH-1000XM3 tips and tricks.
Before we begin I am just going to call these XM3 instead of WH1000-XM3. Makes both of our life easier.
Sony WH-1000XM4/XM3 Tips and Tricks
1. Quick ambient sound
Both the XM3 and XM4 supports “Quick Attention Mode”. In simple words, you can cover the right earcup with your hand to lower the volume of the media playing, stop noise cancellation, and let in external ambient sound. I mostly use this feature to have a quick conversation or at times, if I want to peek in on conversations.

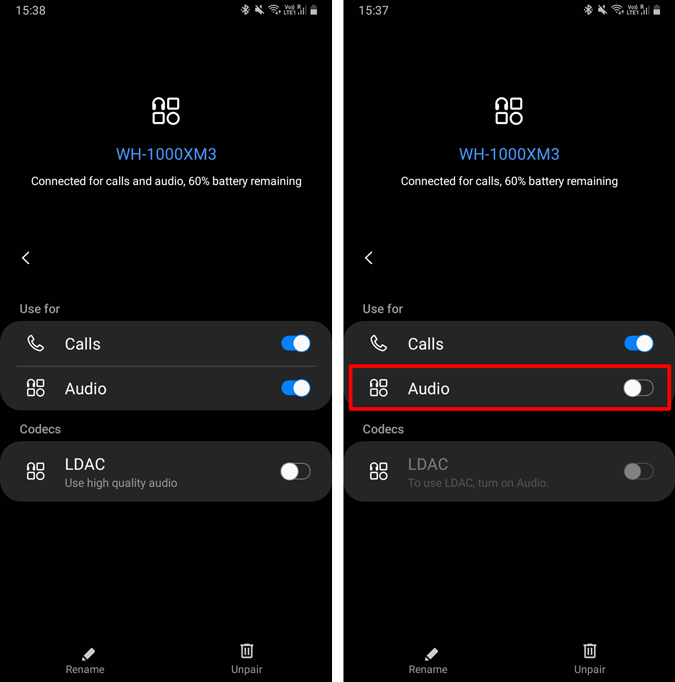
2. Dual Device Connectivity
The newly released WH-1000XM4 comes with a much-needed multi-device connectivity. This lets you connect to 2 devices at once so you can seamlessly switch between your laptop and smartphone for audio and calls. But do you know the older XM3’s can also connect to 2 devices?
To connect the XM3 with 2 devices at once, pair it with both the devices first. Next, connect to your Android device and turn off the “Audio” capability on 1 device from the app. For instance, when you connect the XM3 to Android, turn off the Audio toggle within the device. Now, you can connect it with your laptop as well. This way you can listen to audio on the laptop and take calls from your Android. I do this quite often during my office hours and once I am done with the day, I turn back the “Audio” toggle and connect to my Android.
3. Use the app
I have read several forums and reviews, not enough people use the Sony Headphones Connect app. Use the app! It provides a whole new dimension of features to your headphones. You get customizable adaptive noise cancellation, equalizer to fiddle with the sound profile, customize button actions, etc.
Download Sony Headphones Connect (Android | iOS)
4. Location-based noise cancellation
The Sony Headphone Connect app has a nifty feature called – Adaptive Noise Cancellation. It uses your smartphone’s sensor to gauge your current activity – Staying, Walking, Running, or Commuting. Based on that, it sets up your noise cancellation like the following.
- Staying – Noise Cancellation: On, Ambient Sound: 0
- Walking – Noise Cancellation: On, Ambient Sound: 14
- Running – Noise Cancellation: Off, Ambient Sound: 20
- Commuting – Noise Cancellation: On, Ambient Sound: 0
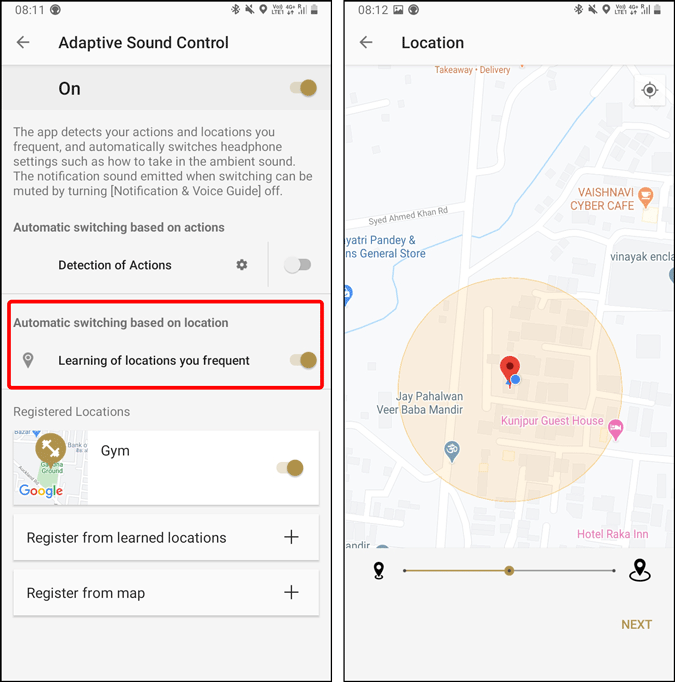
However, this Adaptive Noise cancellation is quite annoying. It uses your phone’s sensor and at times might kick in unnecessarily. Hence, I have disabled “Automatic switching based on actions” but turned on “Automatic switching based on location“. This lets you map places on the map and your noise cancellation level based on that. So, for instance, I have my noise cancellation at a lower level with ambient sound on when I am at the gym.
5. Sound Quality Mode
If you feel lag between audio and video while watching YouTube or Netflix, you can switch up the “Sound Quality mode” in the Sony Headphones Connect app. It is set to Priority on Stable Connection where it uses Android’s default SBC Bluetooth audio codec which is just average. In case you switch up to “Priority on Sound Quality“, it’s forced to use Qualcomm aptX which is a superior audio codec with lower latency.
6. Use LDAC
You might have seen Hi-Fi printed on top of the headphone box. But, what does it mean? Well, Sony headphones use Sony’s own Bluetooth audio codec called “LDAC“. It lets you stream up to 990 Kbps of 24-bit 96 kHz audio files. So, in case, you have CD-Quality or FLAC files stored on your local storage, LDAC would do justice to these recordings. By default, Sony doesn’t turn on LDAC in order to save battery.
To switch to LDAC, head over to Bluetooth settings and tap on the gear icon beside the headphone name. Under the Headphone settings, turn on the toggle beside LDAC to activate Hi-Fi audio listening. Do note that, there’s no option to switch to LDAC on Windows 10, macOS, iOS, and Linux.

Read: How to Get Better Quality Audio From Your Bluetooth Headphones With LDAC
7. Allow Human Voice
I found this setting buried inside the Sony app. In case you are waiting for an announcement on an airport or a mall, you can choose to enable noise cancellation but at the same time allow human voices. To do that, head over to the Sound tab within the app.
Tap on the arrow key beside Noise Cancellation and move the slider 2 steps until you see the label change to “Ambient Sound 1“. Next, enable the checkbox below that says “Focus on Voice“. This will allows human voices through the mic and block all the low-frequency noise such as the fan, AC, printer noise, etc.
8. Google-Assistant button
The Sony Headphones Connect app lets you remap the Ambient/NC button to either trigger Google Assistant or Alexa. Since I am an avid Google Assistant user, I have remapped it to trigger Google Assistant. Now, pressing the Ambient/NC button once will make Google Assistant read out your notifications. In case you want to speak to Google Assistant, long-press the button, narrate your command.
By default, the Assistant will read-only limited notifications from apps. To modify this list, head over to the Google Assistant app settings>Assistant tab>WH-1000XM3. Tap on WH-1000XM3 and next, select Spoken notifications. Here you will have the list of apps downloaded on your phone. You can curate app notifications as per your choice.

9. Battery Saving Tip
Although Sony headphones have a humongous 30-hour battery life, it’s practically not the same. With noise cancellation, DSE, and LDAC on, it probably lasts only around 12-13 hours. Hence, to get the best battery life, turn off LDAC, which would boost the battery life to about 20 hours.
Moreover, use the supplied AUX cable. For instance, when I am at my desk, I use the AUX cable with my laptop. I switch off the headphones and stream audio via the AUX cable to the headphones. This way you won’t be consuming any battery. Now, when you are on the move, just plug out the AUX cable, turn on the headphones and it’ll connect back to your smartphone.
10. Third-party app
The equalizer within the Sony Headphone Connect app doesn’t let you tune sound per frequency. Hence, you should use a third-party app to do that. The best third-party equalizer app that I have used is “Wavelet”. The thing I like about it is that it has an inbuilt equalizer preset for every headphone.
For instance, consider the Sony WH-1000XM3. The Sony’s have a slightly warm sound signature with a bit boosted bass and more pronounced mids. The inbuilt Wavelet preset for the headphones cuts down on the bass and emphasizes the treble. It really complements the headphone’s frequency response graph.
Download Wavelet (Android)

Closing Words
With the launch of the Sony WH1000-XM4, the Sony WH1000-XM3 are down on sale at a price of $280. It makes them quite a pleasant offering at the price point. For more issues or queries, let me know in the comments below.
Also Read: Best Music Players for Android You Should Try in 2020