Screenshots let you capture what is on your iPhone screen for proof, safekeeping, capturing a valuable piece of information, and more. The process is straightforward. On iPhone with Face ID, simply press the button on the right side and the volume up button together. And on iPhones with the front Home button, press the Home and the power button simultaneously. But what if you do not want to or cannot use the physical iPhone buttons? Let me show you four ways to take screenshots without Home button or Power button on an iPhone.
Take iPhone Screenshots Without Home or Power Buttons
The methods below apply for all iPhones unless mentioned otherwise. This means whether you have an iPhone 6, the best selling iPhone XR, iPhone 11, or the powerful iPhone 12, these cool screenshot techniques will work on all.
1. Using Siri
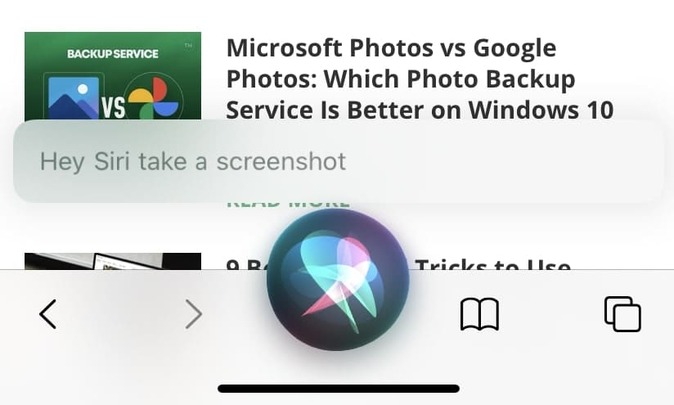
Siri is the in-built voice assistant of your Apple devices like the iPhone and iPad. During the iPhone setup process, you are asked to enable it. And most people, including you, might be using it already. In case you are not, open Settings > Siri & Search and enable Press Home/Side Button for Siri. Also, enable Listen for “Hey Siri”, which lets you summon the assistant just by saying Hey Siri. No need to press any button.
To take a screenshot without Home button, be on the screen whose screenshot you wish to capture. Now, say Hey Siri, take a screenshot.
2. Using AssistiveTouch
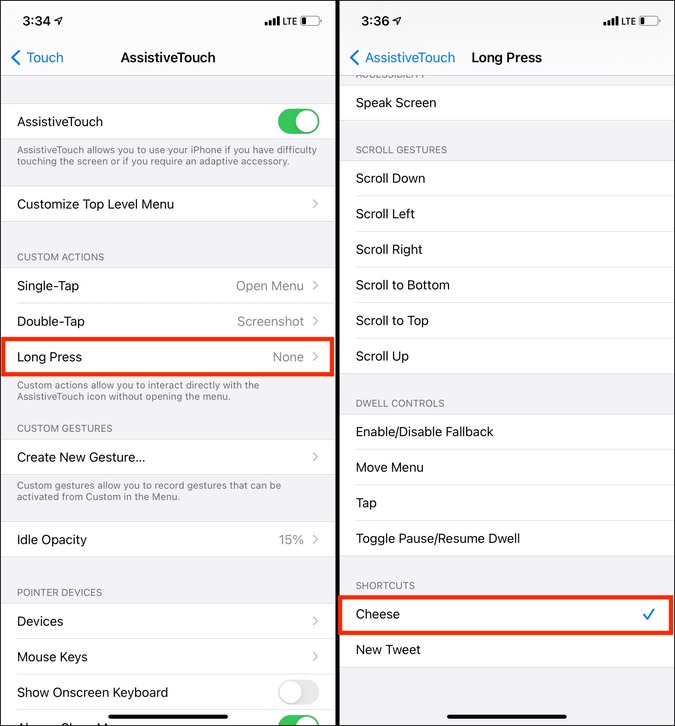
AssistiveTouch is an accessibility feature that puts a virtual, floating button on your iPhone screen, which can perform various actions. If your iPhone Home button, power button, or volume button is broken, you can use AssistiveTouch to do all the essential functions of those physical buttons, including taking screenshots. Here’s how:
1. Enable AssistiveTouch by opening the Settings > Accessibility > Touch.

2. Tap AssistiveTouch. From here, enable the switch for AssistiveTouch. You will see a button appear on one of the edges of your iPhone screen.

3. Under Custom Actions, you have Single-Tap, Double-Tap, and Long Press. You can use any of these to take a screenshot. Since I like to keep Single-Tap for opening menu, I will set Double-Tap for screenshots. To do this, tap Double-Tap and select Screenshot from the list of actions.
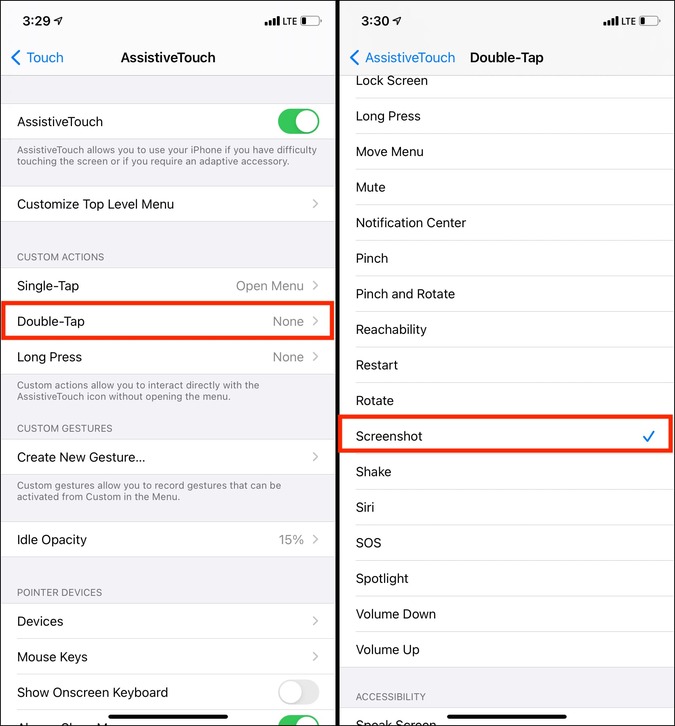
4. Now, go to the screen where you wish to take a screenshot. Finally, double-tap the AssistiveTouch button. It will do a screenshot and save it to the Photos app.
Note: If you were already using AssistiveTouch, this is great. But if you are new to this accessibility feature, a constant button on the screen can be initially disturbing. One way to solve this is by moving the AssistiveTouch button to a position where you do not touch the screen much, like the top right corner. Secondly, you may also set its idle opacity to the minimum (15%), which makes it almost invisible.

3. Using Back Tap
In iOS 14, Apple introduced a new accessibility feature called Back Tap that lets you perform the set action by double or triple tapping the backside of the iPhone. This works surprisingly well, even if you are using a case. For example, you can use it to launch Google Assistant on the fly.
If you are on iPhone 8, 8 Plus, or later, follow the steps below to take screenshots using Back Tap.
1. Open iPhone Settings and tap Accessibility.
2. Tap Touch, and from the bottom, select Back Tap.
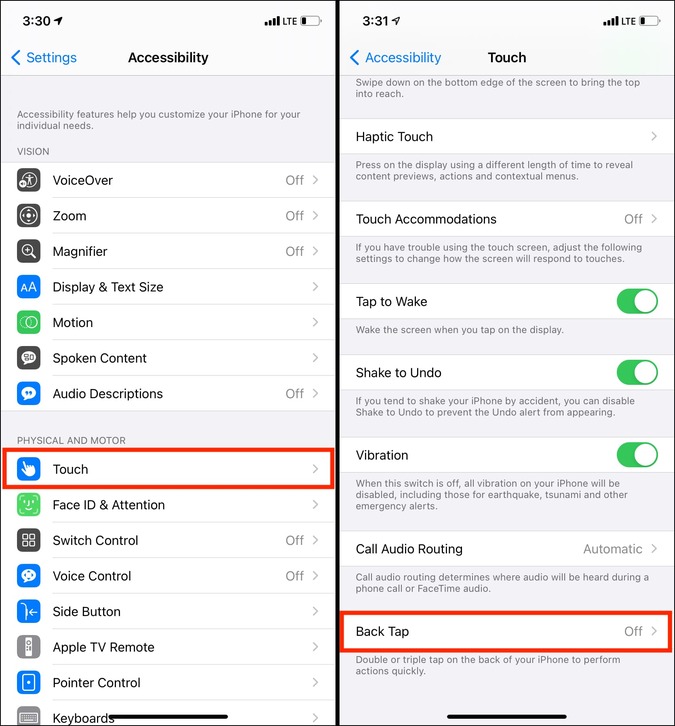
3. Choose Double Tap or Triple Tap, and from the list of actions, select Screenshot. From now on, double or triple tap your iPhone’s backside to capture a screenshot.

Note: Sometimes, while taking the phone out of the pocket or purse, unexpected taps may lead to accidental screenshots. If someday you wish to turn this feature off, follow the above steps and choose None in step 3.
4. Using the Shortcuts App
Shortcuts app on iPhone, iPad, and now even on Mac lets you perform a series of tasks with a single or few taps. Using this, you can execute various actions like download YouTube videos, save Instagram photos, and more.
Here, let me show you how to build a simple shortcut that will take a screenshot and immediately let you share it via WhatsApp or other apps.
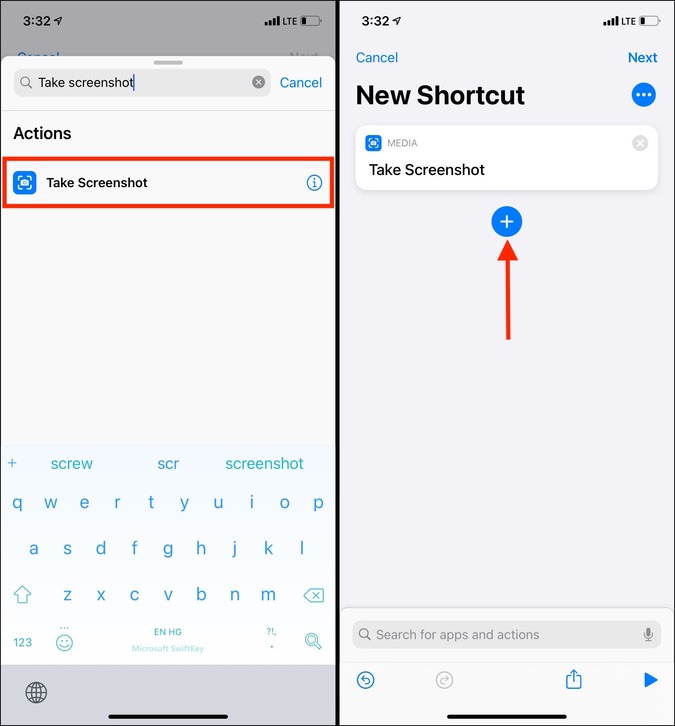
1. Open the Shortcuts app and make sure you are in the My Shortcuts tab. From here, tap the plus icon (+) from the top right and select Add Action.

2. Now search for ‘Take Screenshot‘ and tap on it from the search results.
3. Next, tap the blue plus icon (+) on the shortcut building screen.
4. Tap on Sharing button. From here, you can choose one of the various options. For example, if you wish to immediately share the screenshot via WhatsApp, scroll down and tap Send Photo via WhatsApp. I sometimes share the screenshot via AirDrop, sometimes via WhatsApp, and at times via other apps. So, I will go with the regular Share option which opens the iOS Share Sheet from where I can choose any app I like.

5. Tap on Next and give the shortcut a name. Make sure to keep it simple. Finally, tap on Done.

6. The shortcut is ready. You can ask Siri to Run [shortcut name]. But the drawback here is that it will also capture the Siri interface in the screenshot. To fix that, you can assign this shortcut to AssistiveTouch or Back Tap.
7. To set this shortcut as AssistiveTouch: Open iPhone Settings > Accessibility > Touch > AssistiveTouch. Tap one of the options below Custom Actions. Now, from the bottom, tap the shortcut name.
8. To set this shortcut as Back Tap: Open iPhone Settings > Accessibility > Touch > Back Tap. Tap Double Tap or Triple Tap and from the bottom, tap the shortcut name.

Bonus Tip: How to Take a Scrolling Screenshot on iPhone
In some inbuilt Apple apps like Safari and Notes, you can take scrolling screenshot that lets you capture everything on the webpage or the notes. This scrolling screenshot is then saved as a PDF to the Files apps.

If the app displays a separate tab called Full Page then it means you can take scrolling screenshots. You can see it in action in the Safari app where when you take a screenshot, tapping on the screenshot thumbnail displays Full Page tab where you can also edit and annotate the screenshot.
If you need more recommendations, we have a separate post detailing the best apps to take scrolling screenshots on iPhone.
Wrap Up: How to Screenshot on iPhone Without Buttons
These were some quick ways to take iPhone or iPad screenshots without using the physical on-device buttons. I hope this guide was helpful. Out of all, I find the Siri method the quickest. Which one is your favorite?