Chromebook offers a variety of interesting login options. In addition to a primary Google account, you can add more users to Chromebook, use it without a Google account, restrict users, use a PIN instead of a password, and do much more. Let’s check these Chromebook login features in detail.
Best Tips to Use Chromebook Login Options
1. Sign Out of Google Account
You can sign out from your account to log in as a guest user or add a new Google account. For that, click on the time at the bottom-right corner. Press the Sign out button in the Quick Panel. Alternatively, press Shift + Ctrl + q (twice) to sign out.
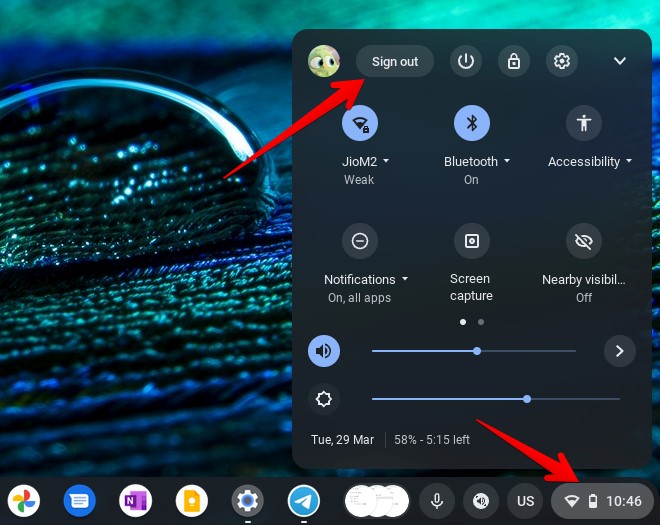
Tip: To quickly lock your Chromebook screen, use the Search + L keyboard shortcut.
2. Use PIN Instead of Password
It’s no surprise that your Chromebook’s password is the same as your Gmail password. That can be very annoying and disturbing, especially if you have to enter it in front of someone.
Thankfully, you can log in with a PIN instead of a password on your Chromebook. For that, you will need to set up a PIN as shown below.
Note: If you forget your Chromebook’s PIN and password both, you will have to reset the Chromebook.
1. Click on time at the bottom-right corner of the Chromebook to open the Quick settings panel. Press the Settings icon.
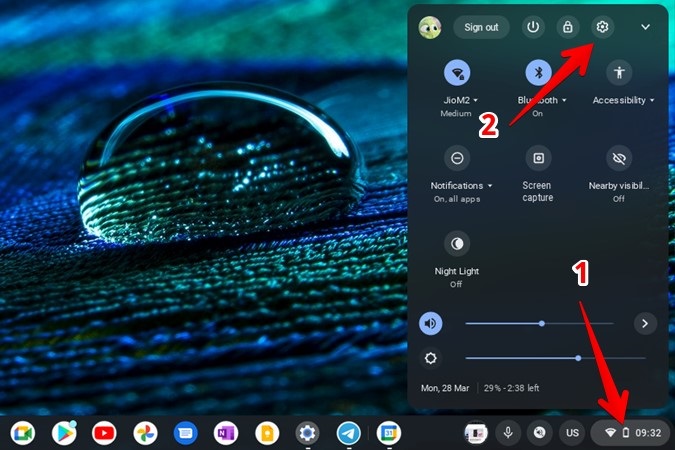
2. Go to Security and privacy followed by Lock screen and sign-in.

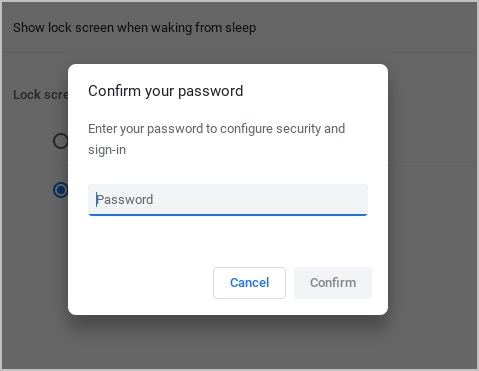
3. Enter your password and click on Confirm.
4. Select PIN or password under the Lock screen from the sleep mode section and press the Set up PIN button.
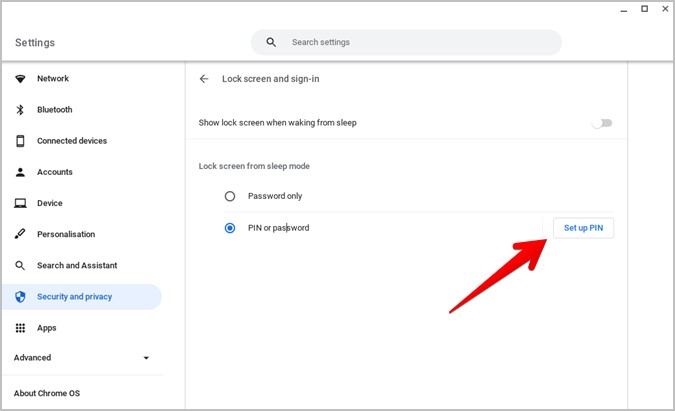
Note: To disable PIN on Chromebook and use a password instead, select the Password only option.
5. Set a PIN of at least 6 digits. You will have to re-enter the PIN to confirm.
6. If you want Chromebook to unlock automatically without pressing the Enter key after you type the PIN, make sure the toggle next to Unlock automatically once the PIN is entered is turned on.

At any point, if you want to change the PIN, click on the Change PIN button and set a new PIN.
7. Enter the PIN on the login screen.
Tip: Click on Switch to password on the login screen if you want to sign in by entering a password instead of a PIN.
3. Use Chromebook Without Google Account
Generally, a Google account is required for using Chromebook. But if you don’t want to add a Google account on Chromebook, you can use the device by signing in as a guest user. This profile also comes in handy when someone wants to borrow your Chromebook but you don’t want to give access to your Google account and associated apps.
The guest profile or mode is a pre-created user profile that can be accessed from the lock screen. When a user signs in as a guest user, they will get an empty profile. The guest user won’t have access to the files, apps, and Google accounts from other users on Chromebook, thus maintaining the privacy of users.
However, if you plan on using Chromebook in guest mode, please note that you cannot install apps, change security settings, login settings, or do anything important. The guest profile only lets you browse. You can’t do anything more than that.
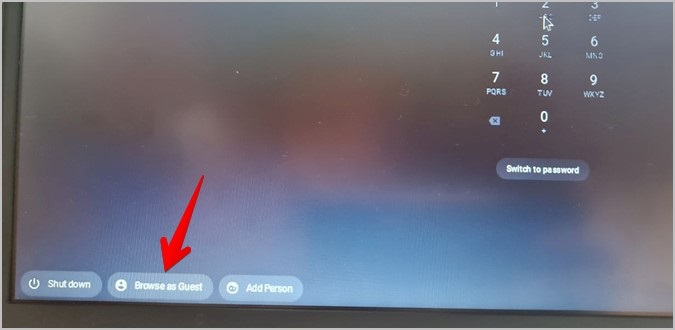
To sign in as a guest user, follow these steps:
1. Sign out from your account on Chromebook, if you are logged in.
2. Click on Browse as guest on the lock screen present at the bottom.
Note: If you don’t see the guest browsing option, go to Settings > Security and privacy > Manage other people. Turn on Enable guest browsing. If it’s grayed out, it could be disabled by your Chromebook’s administrator (school, college, etc.)
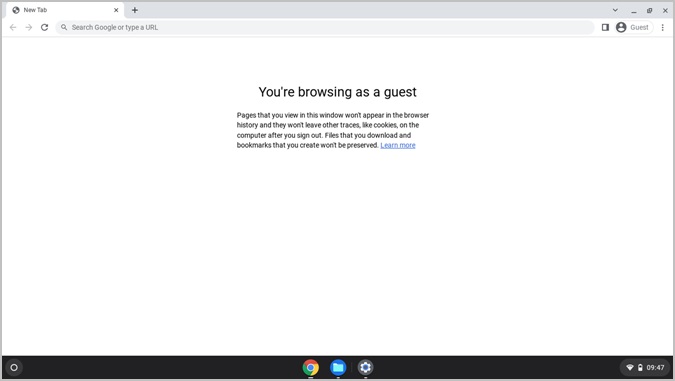
3. You will be taken to the guest mode where you will access to Chrome, Files app (for downloads), Settings, and Camera only.
4. To get out of guest mode, click on time at the bottom-right corner and press the Exit guest button.
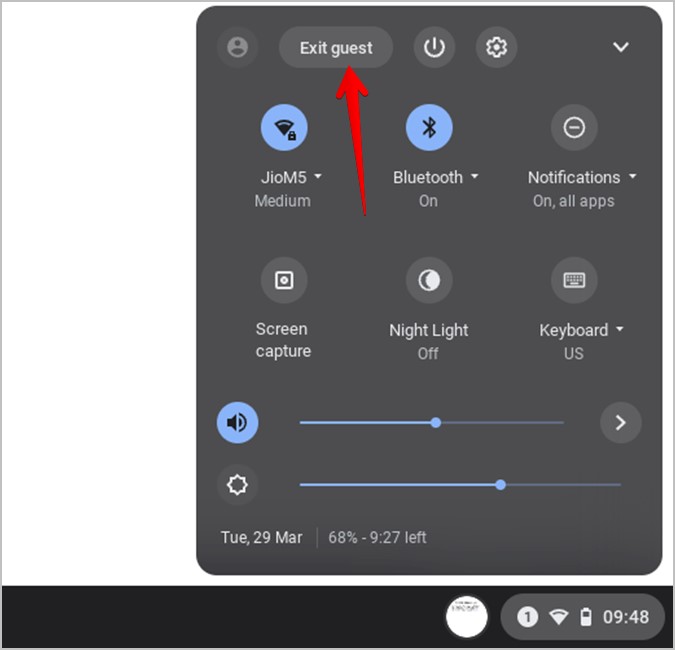
Once you exit guest mode, your files, cookies, website data, and browsing activity will be removed.
4. Turn off the Lock Screen When Waking From Sleep
If you don’t want the lock screen to show up after your Chromebook wakes up from sleep, you can turn it off in settings. That way you don’t need to enter the password. It’s only required after restarting or after you turn on Chromebook.
Go to Chromebook Settings > Security and privacy > Lock screen and sign-in. Enter your password. Turn off the toggle next to Show lock screen when waking from sleep.

5. Use Multiple Google Accounts on Chromebook
If you want to share your Chromebook regularly with someone like a family member or a friend, you can add another person to Chromebook. This prevents your user profile from sharing apps and login details with other users.
The other person will have their own Chromebook profile where they must sign in with their own Google account. As a result, for different Chromebook users, everything will remain separate.
To add a new person to Chromebook, sign out from your account. On the login screen, click on Add person. Enter the Google account email and password and follow the on-screen instructions to set up the account.

6. Switch Between Multiple User Profiles
To sign in to a different user profile on your Chromebook, click on time at the bottom-right corner of your profile and click on your profile picture. Select the profile to sign in.

Alternatively, sign out from your profile. Then, on the lock screen, click on the username to which you want to sign in.
7. Restrict Sign in to Selected Users
If your Chromebook has multiple users, you can allow only selected people to sign in. Other users won’t be able to sign in even though their account exists on Chromebook.
To enable this feature, open Chromebook Settings > Security and privacy > Manage other people. Turn on Restrict sign-in to the following people. Press the Add user button and select the accounts that can sign in.

Tip: Learn 15+ ways to make your Chromebook faster.
8. Login With Phone
You cannot get rid of login on Chromebook. A password or a PIN is necessarily required to sign in. But, if you are looking for an easy or alternate way to sign in to Chromebook, you can unlock the Chromebook with your Android phone using the Smart lock feature.
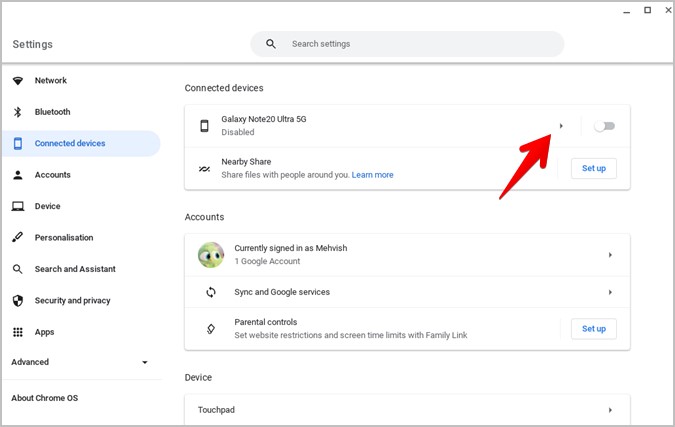
Follow these steps to use Smart lock to unlock Chromebook:
1. Open Settings on Chromebook and go to Connected devices.
2. Click on Set up next to the Android phone and follow the on-screen instructions to connect the phone to Chromebook.

3. Once you set up the phone, click on the arrow next to your phone’s name.
4. Enable the toggle next to Disabled and turn on the toggle next to Smart lock.

5. Click on the arrow next to Smart lock and select Unlock device and sign in to Google account.

6. Now, whenever you are on the lock screen, simply unlock your phone and your Chromebook will unlock automatically.
Note: If the Smart lock doesn’t work, make sure your phone’s Bluetooth is turned on. And if you are using PIN protection, enter your password once by clicking on Switch to password on the login screen.
Let’s Log Out
Hope you enjoyed reading about the Chromebook login options. In addition to those, you can also set up your Chromebook for a child, remotely sign out from Chromebook, or even log out from the primary Google account.