How many times have you wondered whether the email you sent has been received, opened, or read by the other party? The thing is, almost all major email service providers offer no such feature as email tracking to let you know whether the recipient has opened your email or not. To deal with this, there are many services out there that can track your email to give details like when the email has been opened, what links did the recipient clicked, etc. Thanks to the extension support in most modern browsers, general desktop users have been enjoying these services for years. Android users had no such luck. However, there are still ways to track email on Android. Here’s how to do it.
Related: MailTag: How to send Encrypted Email from Computer
How Email Tracking Works
Though it looks like magic, the way the email tracking works are pretty simple and straightforward. When you decide to track an email, the email tracking service adds a transparent image with the dimension of 1 X 1 to the email you are sending. This transparent image is generally known as the Tracking Pixel. When the email is opened by the recipient, the tracking pixel is automatically loaded. Since the tracking pixel is hosted on servers controlled by the email tracking service, it instantly knows the email has been opened as soon as it gets a request to load the transparent image. On the other hand, if the recipient has configured their email client to not load images to avoid tracking, no email tracking service can track the email.
Apart from using tracking pixels, most email tracking services can also track link clicks by masking the actual URL with a tracking URL. When a user clicks on the URL, a request is first sent to the email tracking service and then it is automatically redirected to the actual destination. Much like the URL shortener services.
Related: How to Send Encrypted Emails in Gmail and Outlook
Boomerang Mail Features
Since the regular email app or service on your Android device doesn’t allow tracking, we are going to track emails on Android using a free app called Boomerang Mail. The best thing about Boomerang Mail is that it is a complete email app where you can read, send, and manage all your emails. Other features of Boomerang Mail include but not limited to read receipts, click tracking, location tracking, push notifications, account specific themes, ability to snooze and schedule messages, email signature, support for multiple accounts, multi-gesture support, robust search function to search for emails, etc.

As good as it is, Boomerang currently only supports Microsoft Exchange, Gmail, and Google Apps accounts. If you are using any other email service then this is not the app for you. On the bright side, Boomerang is working to support other major email services like Yahoo, Rackspace, etc.
Track Emails on Android
To track emails we first need to install and activate Boomerang Mail app on your Android device. So, head over to the play store, search for Boomerang Mail and click on the “Install” button to install the app on your Android device.
After installing Boomerang Mail, launch the app from the main menu by tapping on the Boomerang Mail app icon.
As soon as you launch the app, it will list all the email accounts linked to your Android device. If you can see your email address on the list, tap on it. Otherwise, tap on your email service provider under “Add New Account” and follow the wizard. Since my email address is already listed, I’m selecting it from the list.

The above action will take you to the authentication screen, verify the permissions and tap on the “Allow” button to continue.

As soon as you tap on the Allow button, you will grant access to Boomerang to manage your email account. Once connected, Boomerang will show you a quick tour. Simply slide left to complete the tour and tap on the button “Let’s Go” to start using the app.

Here on this screen, choose a theme for your email account. In my case, I’m choosing the Drak theme. Tap on the “Save” button to continue.

Being a complete email client, you can see all your emails on the main screen.
Before you can start tracking, it is better if you enable notifications. This lets Boomerang show alerts when the recipient opens your email. To enable notifications, tap on the Menu icon (three horizontal lines) appearing on the top left side of the screen. Here, scroll down and select the option “Settings.”

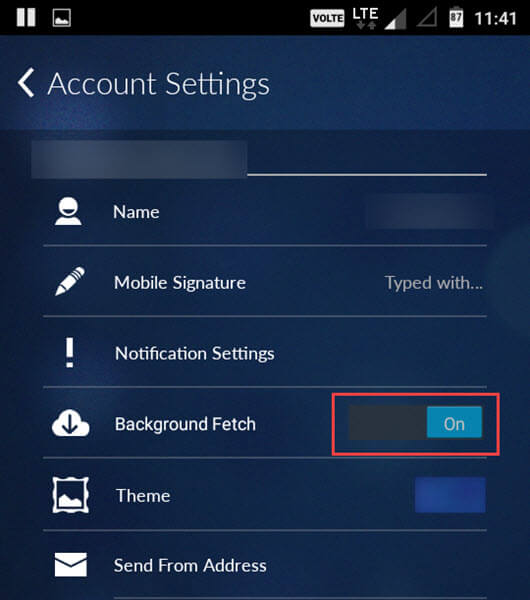
In the Settings screen, scroll down to your email account and tap on the option “Account Settings.”

Here in the Account Settings screen, tap on the “Notification Settings” option.

Now, toggle the button next to “New Message Notifications” and tap on the button “Save” to save the settings.

When you enable Notifications, Boomerang also enables “Background Fetch” option. This feature allows Boomerang to check for new emails in the background.
Once you are done setting up the notification settings, you are all set to track emails on Android. To start off, tap on the “Compose” icon appearing in the top right corner.
![]()
Here, enter recipients email address in the To field, type subject in the “Subject” field, and type your message in the “Body.” By default, Boomerang doesn’t add any tracking pixel to track your sent emails. You have to manually add the tracking pixel. To do that, tap on the “Attachment” icon appearing in the bottom right corner.
![]()
The above action will expand the menu with new options. From the list, select the option “Read Receipt.”

With the above action, you have successfully added a tracking pixel to the email. Once you’ve done that, tap on the option “Send” to send the email. If you want to schedule the email to be sent at a later date or time then select the option “Send Later” and set the timings.
![]()
As soon as the recipient opens your email, Boomerang tracks it and send an email notification. This is how the email notification looks like. Do remember that Boomerang cannot track the email if the recipient is actively blocking third-party content like the tracking pixel from loading in their emails.

The email notification is pretty basic. However, if you want more information about how many times the email has been opened or what links are clicked, you have to access Boomerang on your desktop. Simply install the Firefox or Chrome extension and login to your email account. Here, click on the “Boomerang” icon appearing in the top right corner of the window and then click on the link “Manage Scheduled Messages.”

The above action will take you to the Boomerang page. Here, navigate to the “Tracked Messages” tab to see the tracked messages. By clicking on the “message” you will see how many time the email has been opened and if any links are clicked. You can also see the time and date when Boomerang first and last tracked the message.

That’s all there is to do and it is that simple to track emails in Android. Comment below sharing your thoughts and experiences about using the above method to track emails in Android or share your favorite apps that can do the same.
Also Read: 5 Email Services to Send Encrypted Email