If you use Google Drive on your iPhone, it would have some limitations. Unlike iCloud, you won’t get a seamless experience and you would often do things manually. For example, backing up your photos to Google Drive isn’t seamless, nor is downloading them to your iPhone but there is a way. Let’s see how to upload all photos from iPhone to Google Drive.
Whether you call it Apple’s restrictive policies or Google’s inaction at implementing a seamless method of uploading photos to the Drive, it’s inconvenient for us, the user. I found 4 ways to alleviate this problem.
1. The Conventional way
Before we look at the faster methods, I’d show a quick rundown of the traditional method of uploading iPhone photos to Google Drive.
1: Open the Google Drive app on your iPhone and tap the folder where you would like to upload the photos. When in the desired folder, tap the + button on the bottom right corner of the screen.
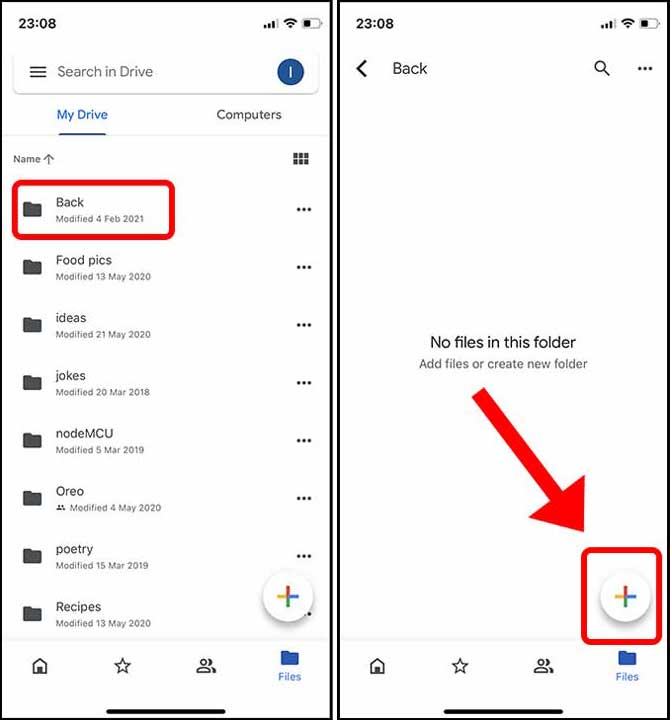
2: Tap Upload and select Photos and Videos to upload from the Photos app. If you have photos stored in the Files app, tap the Browse button.

3: Now, you would have to manually tap each photo to select it and then hit the Upload button.

The infuriating part of this method is that you have to tap every single thumbnail. However, I’m used to selecting multiple photos in the Photos app by swiping across thumbnails and it automatically selects every photo I’ve swiped on. You can swipe and hold the finger on the top corner and the app would continue to select images till the last one or until you release your finger. This current method is neither intuitive nor efficient.
2. Use the Files App
The inability to select multiple photos quickly was one of the main reasons I looked for alternative ways and this is the closest option that feels smooth. The Files app can map your Google Drive within itself and you can directly drop all the photos from the Photos app to Google Drive. It really is an amazing method.
1: If you don’t see the Google Drive location in the Files app, you’d have to enable it first. Open the Files app, tap the options button on the top right corner, and tap Edit.

2: It would reveal a toggle switch to enable Google Drive, enable the switch and tap Done.

3: Now, simply open the Photos app and select all the pictures you wish to upload to Google Drive. After selecting, tap the Share button on the bottom left. On the Share Sheet look for the option “Save to Files”.

4: Tap Google Drive to reveal the folders. Select the folder of your choice and tap Save on the top right. Your photos would be immediately uploaded to Google Drive.

The best part of using this method is that I can use that smooth swiping gesture to select all the photos in the Photos app. It’s infinitely better than selecting every photo manually.
3. Enable Auto-Backup with Google Photos
Even though your cloud storage is shared between Gmail, Google Drive, and Google Photos, you can’t automatically back up your photos to Google Drive. You need to use Google Photos and the backup feature built-in the Google Drive is utterly useless.
When you try to take a backup from Google Drive, it only works if the app stays open until the backup completes or you would have to start all over again. Google Photos, on the other hand, is seamless and even works in the background.
If you can manage with a backup in Google Photos, proceed with the steps below. However, the next method would exclusively enable backup to Google Drive and not Google Photos. That being said, let’s enable Auto backup with Google Photos.
1: Start by installing Google Photos on your iPhone. Once installed, log in with your Google account credentials and allow access to all photos.
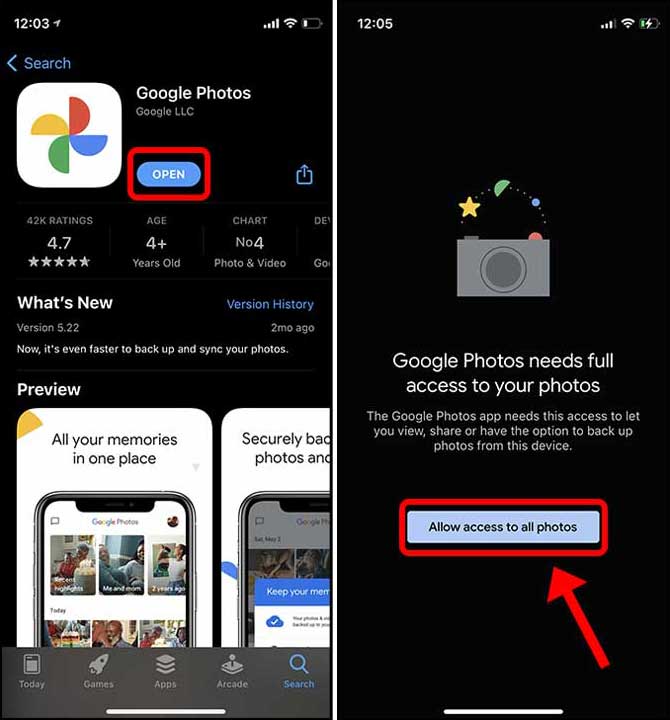
The first thing the app would ask you to do is enable backup, tap the backup button and select a backup quality for your photos.
2: Original Quality is the uncompressed image but takes up space of your allocated Google account storage. High-quality images are compressed and consume less space. After choosing a setting, tap Confirm.
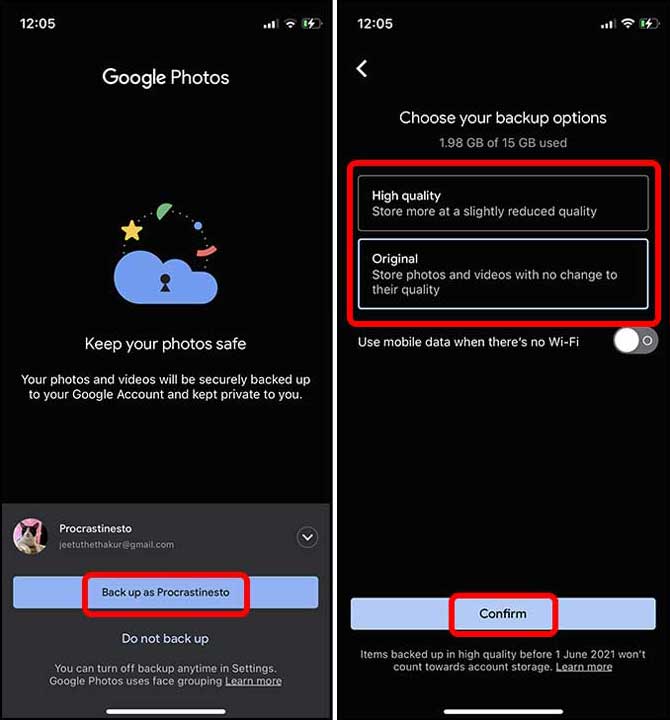
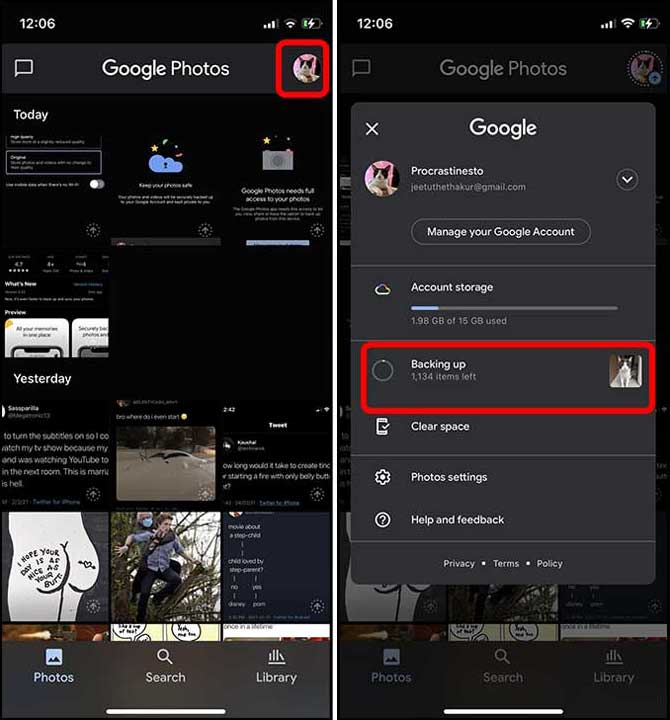
3: Your backup would begin and you can check the progress by tapping your avatar on the top right corner.
4. Use Photosync to Upload All Photos to Google Drive
Even if Google doesn’t allow you to backup your photos from iPhone to Google Drive, there is Photosync. It’s was developed to ease the process of transferring files and photos from the device to multiple locations such as NAS, PC, and Cloud storage.
1: Start by installing Photosync from the App Store. Open the app and tap the Settings button on the bottom right. Tap the Configure button to open the list of destinations.

2: Select Google Drive from the list of targets and sign in with your Google account. You can configure exactly where and how the images and videos should be backed up. You can set a destination, define upload quality, create sub-directories, etc.
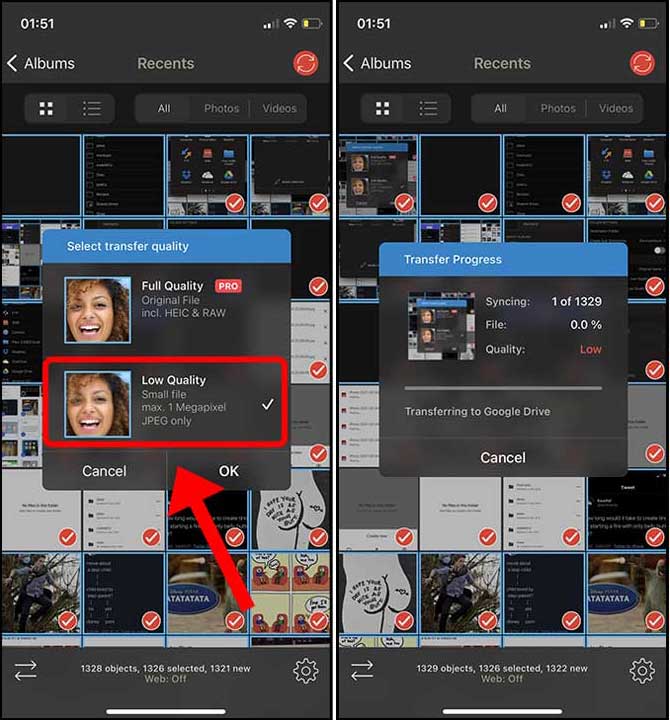
If you wish to upload in higher or original quality, you would need to unlock that feature by buying the subscription at $0.99/mon. Tap Done to save the changes.

3: To back up the photos, go back to the album section in Photosync and tap the sync button on the top right corner.
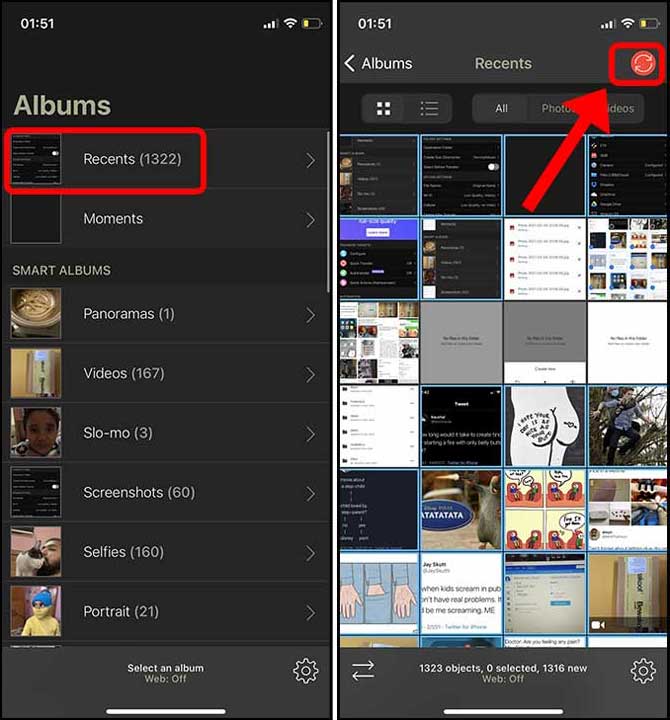
4: Select all the pictures by tapping the All button and choose a destination. I chose Google Drive to upload iPhone photos.

5: Simply select the upload quality and tap OK. Your Google Drive backup should initiate.
How Do You Upload All Photos From iPhone to Google Drive
These were a few ways to transfer and create a backup of all the photos stored on iPhone to Google Drive. These methods are way better than manually backing up your photos, especially if you have a ton of pictures. What do you think? Is there a better method to take a backup? Let me know on Twitter.
Also Read: How to Transfer Google Drive Data to OneDrive Easily