Earlier, if you wanted to hide photos in Google Photos, you would either archive them, put them in the trash, or use a third-party app locker. Fortunately, Google has now introduced a native ability way to password-protect photos inside Google Photos. This has been made possible with the help of the Locked folder. What is the Google Photos Locked folder and how to add photos to it? Find the answer here.
Table of Contents
What Is Locked Folder in Google Photos
Found in the Utilities section of Google Photos, the Locked folder allows you to hide sensitive photos and videos behind a passcode. The Locked folder uses your phone’s screen lock, which can either be a password or a biometric. That is, in addition to unlocking the device, you will need to unlock the Locked folder separately.
The items inside the Locked folder are kept private and no other app can access them. Such photos and videos are also hidden from other gallery apps. You can view them only inside the Locked folder after unlocking it.
Previously, the Locked folder was only available on Google Pixel phones, but it is now available on any non-Pixel phone running Android 6 or later.
How to Add Photos or Videos to Locked Folder
There are three ways to hide photos and videos in the Locked folder.
Method 1
1. Open the Google Photos app and go to the Library tab.

2. Tap on Utilities. If it’s your first time, you will see the Set up Locked folder option, tap on it.

Alternatively, scroll down and tap on Locked folder under Organize your library section.

3. You will need to unlock your device if you have a screen lock in place. In case you don’t, you will need to create it first before you can set up the Locked folder.
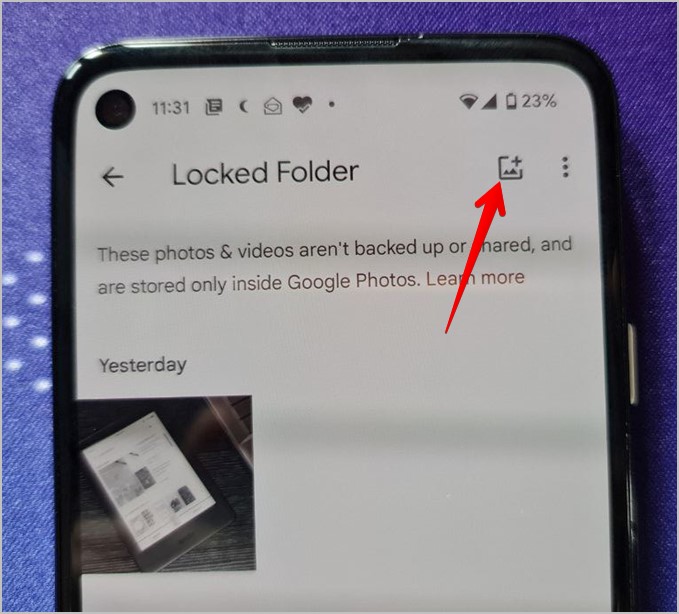
4. The Locked folder screen will appear. Tap on the Move items button or press the Add icon at the top.

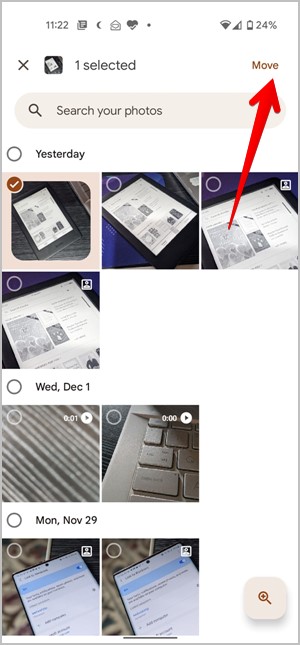
5. Select the items that you want to add to the Locked folder and tap on Move at the top.

6. The item will appear in the Locked folder.

Method 2
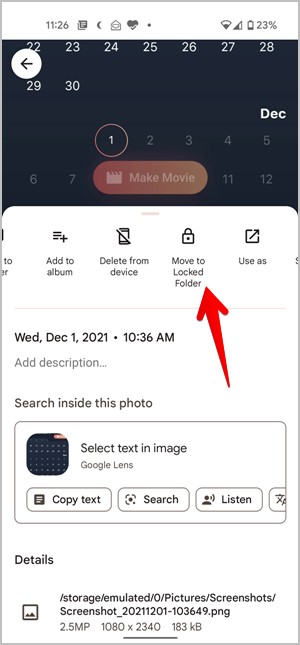
Alternatively, open a photo or video in Google Photos and swipe up. Tap on Move to Locked folder.

Method 3
If you own a Google Pixel phone, you can save photos directly from the Camera in the Locked folder. This feature works on Pixel 3 and above.
To do so, open the Google Camera app on your phone. Tap on the Photo Gallery option at the top. The Save to menu will appear. Choose Locked folder.

Now, any photo or video that you capture will be saved automatically in the Locked folder. To save in the regular album, choose Photo Gallery from this menu.
What Happens by Putting Photos and Videos in Locked Folder
The Locked folder not only hides the photos placed inside it, but it also has an effect on other things as shown below.
Google Photos Features
The items added in the Locked folder won’t appear in Google Photos search, memories, movies, or albums. They will be visible only inside the Locked folder. Furthermore, you cannot move items to Trash from the Locked folder or put them in albums. The Locked folder also lacks the ability to edit pictures.
Restricts Sharing
When you add photos to the Locked folder, you won’t be able to share them either from the Google Photos app or directly through other apps. That’s because other apps cannot access the photos present in the Locked folder.
Cloud Functionality
Google Photos is used both as a regular gallery app and a cloud storage tool. However, any photo or video added to the Locked folder is stored locally on your device and will not be uploaded to the cloud. If a photo has already been uploaded to the cloud, the cloud backup will be deleted and the photo will be saved on your phone’s storage.
Data Transfer
Similarly, the items inside the Locked folder aren’t transferred when sharing with other devices using cable or USB transfers.
Screenshots
Both screenshots and screen recordings are blocked inside the Locked folder. If you try to capture either, the captured photo or video will appear black.
Uninstalling App
Generally, uninstalling the Google Photos app or clearing its data won’t affect the photos or videos. However, any item inside the Locked folder will be deleted permanently when you delete the Google Photos app or clear its data. To save them, you will need to remove them from the Locked folder.
How to Remove Photos from Locked Folder
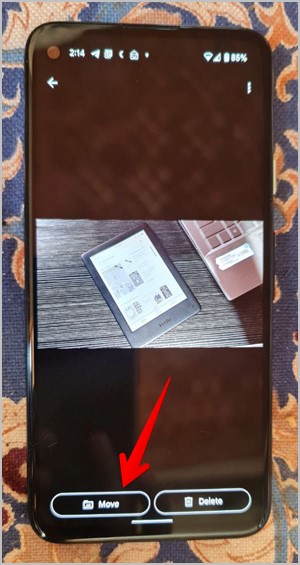
Go to the Locked Folder inside Google Photos. Unlock the folder and tap on the photo or video that you want to move back to a regular album. Tap on the Move button. In case you want to delete the photo permanently, tap on the Delete button. Please note that the item will not be taken to Trash but will be deleted permanently.

If you want to move back multiple items, tap on the three-dot icon on the Locked folder screen. Select the items and tap on Move.
Frequently Asked Questions (FAQs)
Can You Password Protect a Google Photos Albums?
You cannot put a password on individual albums in Google Photos. If you want to hide a photo, you will need to move it to the Locked folder.
Can You Use a Different Password Than Lock Screen
Sadly, no. The Locked folder uses your device lock only. So anyone having access to the device screen lock will be able to unlock the Locked folder.
What’s the Difference Between Locked Folder and Archive
Archived items aren’t protected by any lock. They can be accessed by anyone and will also show up in the Google Photos’ search, unlike the Locked folder items. Furthermore, you can easily share archived photos.
Have Fun With Google Photos
The Google Photos Locked folder has been a much-awaited utility tool. Now that it’s here, you don’t need to rely on any external tools to password protect Google Photos. If you enjoy using Google Photos, check out the best tips to edit photos and videos in it.